
Klimax DSM /3 (2020 Variant)
Linn Klimax DSM
(2020 variant)

Digital music player

| • Product Name: |
KLIMAX DSM/3
|
| • Date of Introduction: | March 2021
|
|
| |
| • Type: | Digital music player with Organik
|
|
|
- ⊕ Variants:
| • Klimax DSM AV with full capabilities (EXAKT + HDMI) | |
| • Klimax DSM Music with no HDMI capabilities | |
| • Klimax DSM Hub with only Exakt audio outputs |


Product info
| • Product Name: |
KLIMAX DSM/3
|
| • Date of Introduction: | March 2021
|
|
| |
| • Type: | Digital music player with Organik
|
|
|
- ⊕ Variants:
| • Klimax DSM AV with full capabilities (EXAKT + HDMI) | |
| • Klimax DSM Music with no HDMI capabilities | |
| • Klimax DSM Hub with only Exakt audio outputs |
- Note: Each variant is a product in itself. That is, no variant can be modified to another variant
Features

- Organik DAC plays up to 384k-24bit files from streamed ethernet sources.
- Digital streaming via Bluetooth, Wi-Fi, USB & Airplay
- Exakt system
- HDMI-2
- Connect TV via HDMI ARC / HDMI eARC
- Switchable Analogue Output
- Surround Sound
- ARM-Linux hardware
- DSD Support Not available on Klimax DSM (Hub)
- DS Design
- Dynamik Power Supply
- Optical Ethernetb
- Apple Airplay 2 support from Davaar 92 (June 2022)
- UTOPIK supply fitted, as standard, from October 2023
Hardware Upgrades
- Linn Surround Module for bitstream Surround sound decoding
- UTOPIK Power Supply upgrade: Improved power supply
Initial Configuration
- Considerations before installation, make sure that you have
-
- A mains power socket
- Stable mains supply
- 100-120V rms 50~60Hz,
- 220-240V rms 50~60Hz
- An Ethernet/LAN connection to your broadband Router. (You may need to connect it to a wired network connection to allow setup and configuration. Then you can use the Wifi capabilities of your network to control and stream music to the Klimax DSM/3)
- The HDMI connection from you TV is not too long and is the correct specification cables.
 Linn recommend using Premium High Speed Certified HDMI cables for an optimal experience.
- The product has adequate ventilation for operation.
- Positioning
Hardware Upgrades
Note: It should be noted that this upgrade information may at times be out of date and should not be used as a current list of what upgrades are available
Unpacking
- Remove product from packaging and place on a flat surface
- Please retain all packaging for future transport of Klimax DSM
- Check you have all of the accessories.
Wiring
BACKPANEL
Klimax DSM (AV variant)
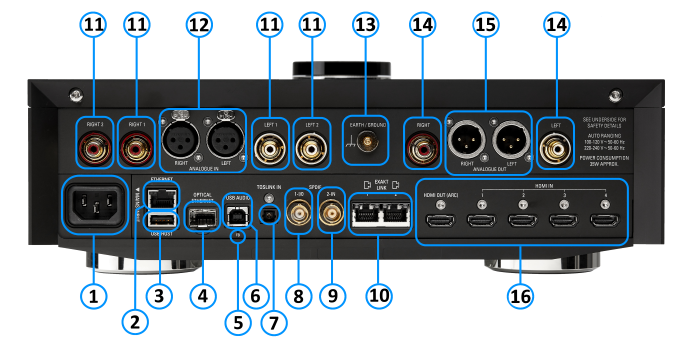
- MAINS INPUT - To connect to the mains electricity supply.
- ETHERNET - To connect to a network (100Base-T / 1000Base-T)
- USB-A socket: for Service Use only This socket does not accept USB sticks / USB-Drives
- FIBRE ETHERNET - SFP module socket to connect to a fibre network
- FALLBACK - To put the device into Fallback mode (used when reprogramming)
- USB-B socket - To connect to a PC/MAC for Class 2.0 PCM Asynchronous USB Audio playback
- Optical digital input (Toslink): connects sources with Toslink (optical) digital outputs.
- Digital input or output (S/PDIF, BNC): connects sources with S/PDIF digital outputs, or can be configured as an S/PDIF digital output.
- Digital inputs (S/PDIF, BNC): connect sources with S/PDIF digital outputs.
- EXAKT LINK - To connect to Exakt compatible devices (Exaktbox, Exakt Speakers, Urika II etc)
- Analogue inputs (RCA, line level): connect sources with RCA analogue outputs, such as a CD player.
- Balanced inputs (XLR, line level): connect sources with balanced (XLR) outputs.
- Phono ground: connects to your turntable's earth (ground) terminal.
- Analogue output (RCA, variable level): connects to a separate power amplifier or a headphone amplifier.
- Analogue output (XLR, variable level): connects to a separate power amplifier or a headphone amplifier.
- HDMI inputs, and HDMI output with ARC/eARC: connect sources with HDMI 1.4 or 2.0 outputs, and a TV with ARC or eARC (Audio Return Channel, which sends sound from your TV to the Klimax DSM over the HDMI cable).
Analogue inputs (RCA and XLR)
- Input range adjustable from 1 V to 4 V RMS; 10 kΩ input impedance.
- Converted to digital at 192 kHz / 24-bit.
Analogue outputs (RCA and XLR)
- Only the RCA output uses the audio transformer. On the earlier Klimax DSM /1 and /2, the RCA and XLR outputs shared the same transformer, so only one of them could be used at a time.
- On this model, the RCA and XLR outputs can be switched independently, so you can use RCA only, XLR only, or both. See Analogue output mode in the setup guide.
Digital inputs
Digital inputs: 32kHz, 44.1kHz, 48kHz, 88.2kHz, 96kHz, 176.4kHz, 192kHz
- SPDIF1 can be converted to a 2-channel SPDIF OUTPUT, audio that will support up to 192KHz via Manage Systems
- This output is a fixed volume control output..
- Only supports FL/FR channel output. (even if playing Surround audio)
- SPDIF2 is ALWAYS a SPDIF INPUT and CANNOT be configured as a SPDIF output.
- SPDIF1 can be converted to a 2-channel SPDIF OUTPUT, audio that will support up to 192KHz via Manage Systems
USB input USB Supported Sample rates: 44.1k, 48k, 88.2k, 96k, 176.4k, 192k, 384k HDMI
Linn recommend using Premium High Speed Certified HDMI cables for an optimal experience. (supporting HDCP 2.2 up to and including 60Hz UHD.)
Klimax DSM (Music variant)
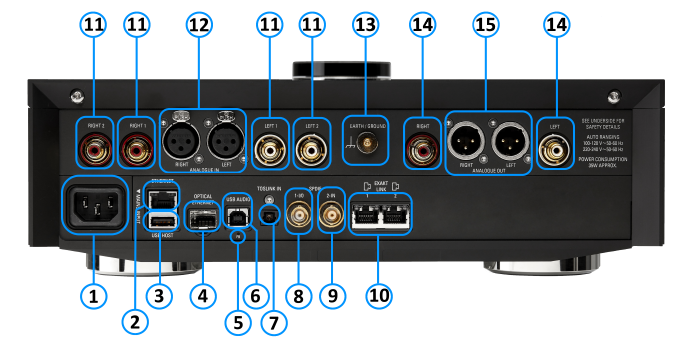
- MAINS INPUT - To connect to the mains electricity supply.
- ETHERNET - To connect to a network (100Base-T / 1000Base-T)
- USB-A socket: for Service Use only This socket does not accept USB sticks / USB-Drives
- FIBRE ETHERNET - SFP module socket to connect to a fibre network
- FALLBACK - To put the device into Fallback mode (used when reprogramming)
- USB-B socket - To connect to a PC/MAC for Class 2.0 PCM Asynchronous USB Audio playback
- Optical digital input (Toslink): connects sources with Toslink (optical) digital outputs.
- Digital input or output (S/PDIF, BNC): connects sources with S/PDIF digital outputs, or can be configured as an S/PDIF digital output.
- Digital inputs (S/PDIF, BNC): connect sources with S/PDIF digital outputs.
- EXAKT LINK - To connect to Exakt compatible devices (Exaktbox, Exakt Speakers, Urika II etc)
- Analogue inputs (RCA, line level): connect sources with RCA analogue outputs, such as a CD player.
- Balanced inputs (XLR, line level): connect sources with balanced (XLR) outputs.
- Phono ground: connects to your turntable's earth (ground) terminal.
- Analogue output (RCA, variable level): connects to a separate power amplifier or a headphone amplifier.
- Analogue output (XLR, variable level): connects to a separate power amplifier or a headphone amplifier.
Analogue inputs (RCA and XLR)
- Input range adjustable from 1 V to 4 V RMS; 10 kΩ input impedance.
- Converted to digital at 192 kHz / 24-bit.
Analogue outputs (RCA and XLR)
- Only the RCA output uses the audio transformer. On the earlier Klimax DSM /1 and /2, the RCA and XLR outputs shared the same transformer, so only one of them could be used at a time.
- On this model, the RCA and XLR outputs can be switched independently, so you can use RCA only, XLR only, or both. See Analogue output mode in the setup guide.
Digital inputs
Digital inputs: 32kHz, 44.1kHz, 48kHz, 88.2kHz, 96kHz, 176.4kHz, 192kHz
- SPDIF1 can be converted to a 2-channel SPDIF OUTPUT, audio that will support up to 192KHz via Manage Systems
- This output is a fixed volume control output..
- Only supports FL/FR channel output. (even if playing Surround audio)
- SPDIF2 is ALWAYS a SPDIF INPUT and CANNOT be configured as a SPDIF output.
- SPDIF1 can be converted to a 2-channel SPDIF OUTPUT, audio that will support up to 192KHz via Manage Systems
USB input USB Supported Sample rates: 44.1k, 48k, 88.2k, 96k, 176.4k, 192k, 384k
Klimax DSM (Hub variant)
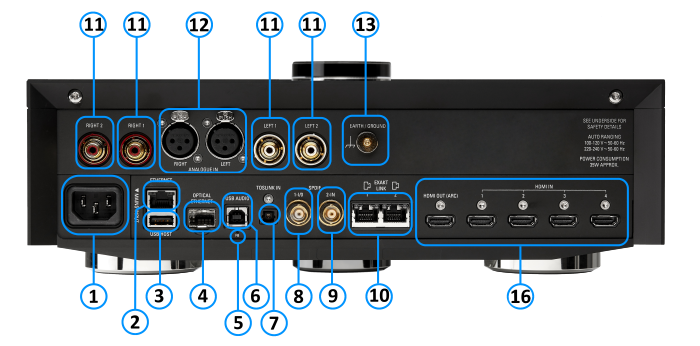
- MAINS INPUT - To connect to the mains electricity supply.
- ETHERNET - To connect to a network (100Base-T / 1000Base-T)
- USB-A socket: for Service Use only This socket does not accept USB sticks / USB-Drives
- FIBRE ETHERNET - SFP module socket to connect to a fibre network
- FALLBACK - To put the device into Fallback mode (used when reprogramming)
- USB-B socket - To connect to a PC/MAC for Class 2.0 PCM Asynchronous USB Audio playback
- Optical digital input (Toslink): connects sources with Toslink (optical) digital outputs.
- Digital input or output (S/PDIF, BNC): connects sources with S/PDIF digital outputs, or can be configured as an S/PDIF digital output.
- Digital inputs (S/PDIF, BNC): connect sources with S/PDIF digital outputs.
- EXAKT LINK - To connect to Exakt compatible devices (Exaktbox, Exakt Speakers, Urika II etc)
- Analogue inputs (RCA, line level): connect sources with RCA analogue outputs, such as a CD player.
- Balanced inputs (XLR, line level): connect sources with balanced (XLR) outputs.
- Phono ground: connects to your turntable's earth (ground) terminal.
- HDMI inputs, and HDMI output with ARC/eARC: connect sources with HDMI 1.4 or 2.0 outputs, and a TV with ARC or eARC (Audio Return Channel, which sends sound from your TV to the Klimax DSM over the HDMI cable).
Analogue inputs (RCA and XLR)
- Input range adjustable from 1 V to 4 V RMS; 10 kΩ input impedance.
- Converted to digital at 192 kHz / 24-bit.
Digital inputs
Digital inputs: 32kHz, 44.1kHz, 48kHz, 88.2kHz, 96kHz, 176.4kHz, 192kHz
- SPDIF1 can be converted to a 2-channel SPDIF OUTPUT, audio that will support up to 192KHz via Manage Systems
- This output is a fixed volume control output..
- Only supports FL/FR channel output. (even if playing Surround audio)
- SPDIF2 is ALWAYS a SPDIF INPUT and CANNOT be configured as a SPDIF output.
- SPDIF1 can be converted to a 2-channel SPDIF OUTPUT, audio that will support up to 192KHz via Manage Systems
USB input USB Supported Sample rates: 44.1k, 48k, 88.2k, 96k, 176.4k, 192k, 384k HDMI
Linn recommend using Premium High Speed Certified HDMI cables for an optimal experience. (supporting HDCP 2.2 up to and including 60Hz UHD.)
Surround examples
7.1ch Surround using all Exakt loudspeakers and Exaktboxes
The configurations below are examples only. They show typical Linn systems to illustrate how the Klimax DSM/3 connects. They are not the only supported configurations, and the Linn products shown can be replaced with other suitable amplifiers, Exaktboxes and loudspeakers.

7.1ch Surround using analogue output and Exakt products

More Surround options can be seen in the Surround section
Download App
Initial Installation
Control of the Linn DS/DSM using a PC/MAC/Tablets & Phones
These manuals should only be used as a basic guide for what the buttons can do. We would recommend just using the App/Software and only using the guide if you are having difficulty or want to see what more features are available.
- Linn app for iPhone/iPad/Mac -:This is a Linn DS control software for Android phone, Android tablets, iPhone, iPad and M-Series Mac and replaced Kazoo.
- Spotify Connect Manual - How to play Spotify on a Linn DS/DSM
- Roon - "The music player for music lovers" control interface
Setup and changes
Bluetooth & Wifi
Bluetooth and Wifi features are available on Klimax DSM/3
Quick setup can be done using the Pin buttons or the Klimax dial
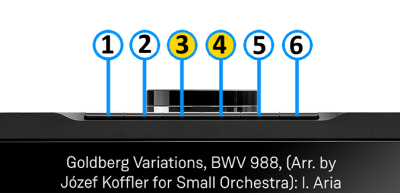
Setting up Bluetooth using the Pin buttons
- 1. Select the Bluetooth menu on your device for pairing
- 2. Press and hold Pins 3 & 4 on the Klimax DSM until "Bluetooth: Pairing..." appears on the front panel display
- 3. Select the Klimax DSM from the list of available Bluetooth devices on your device for pairing
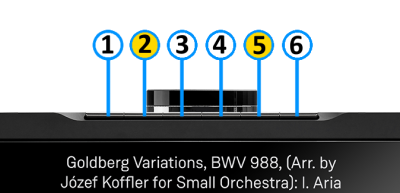
Setting up Wifi using the Pin buttons
- 1. Remove/disconnect any cable LAN connections from the Klimax DSM
- 2. Press the WPS button on your internet router
- 3. Press and hold Pins 2 & 5 on the Klimax DSM until "WPS: Connecting..." appears on the front panel display
- 4. The Klimax DSM should now automatically connect to the Wifi network
- Press and hold Pins 1, 2 & 5 to forget the Wifi network
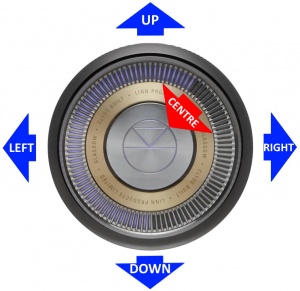
Setting up Bluetooth or Wifi using the Klimax dial
- 1. With the Klimax DSM out of Sleep mode. (If Wifi setup disconnect any cable LAN connections)
- 2. Press dial UP to enter Service menu
- 3. Scroll UP/DOWN to highlight "Connect"
- 4. Press RIGHT to select this menu
- 5. Scroll UP/DOWN to highlight the desired option and RIGHT to select
- Wifi (WPS): put your router into WPS discovery mode for auto pairing of the Klimax DSM
- WIfi (Reset): to clear any previous Wifi settings
- Bluetooth Pair: configure you Bluetooth device for pairing before selecting
- Press LEFT to cancel Service menu
Alternative Wifi Setup Method via Web Browser
- 1. With the Klimax DSM out of Sleep mode and cable LAN connections removed from Klimax DSM
- 2. Go to the Wireless settings on your device (e.g. iPad)
- 3. Find the Klimax DSM on the list of available networks. It will be called Klimax DSM - <serial number>
- 4. Select this Linn DSM as the wireless network
- 5. Now open a web browser on your device and type "https://setup.linn.co.uk" in the address bar
- 6. The Klimax DSM Wifi Setup page should now be displayed
- 7. Select the Wifi network you want to connect to
- 8. Enter the passkey for the Wifi network
- 9. Click on 'Set Network'
Note: If you cannot get any page from "https://setup.linn.co.uk", this may be due to added security on your phone/tablet. Check that the:
- VPN is disabled on your phone or tablet
- Go to Settings > WiFi > Select the Unsecured Network. Then tap the “i” next to that Wi-Fi network you’re trying to log in to and toggle OFF both “Auto-Join” and “Auto-Login.”
- Disable Location Services for Wi-Fi System Services for iPhone/iPad
- Go to Settings > Privacy > Location Services iOS system services for location and privacy settings
- Tap on System Services near the bottom of this page
- Locate "Wi-Fi Networking" or "Networking & Wireless" and toggle it OFF
- Retry the connection to "https://setup.linn.co.uk"
- This is extra network security and recommend that it is turned back ON after setting up the Linn DSM.
Wifi can also be setup using Manage_Systems
Setup and Changes
Configuring your Linn DS/DSM player/Speakers etc:
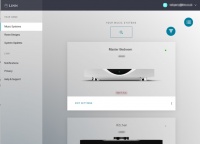
Before you do anything you will need to have a Linn Account. This is a simple process that can only be performed using the Linn App.
Details on how to create your Linn Account and how to use Manage systems can be found in the Manage Systems page.
Space Optimisation
- Linn Space Optimisation is a digital room-correction and acoustic modelling technology built into all Linn network music players and systems. It removes the unwanted distorting effects of your listening environment to reveal cleaner music.
How It Works
- Acoustic Modelling: Instead of using a calibration microphone, it uses mathematical and physical modelling to analyse how your speakers and room interact.
- Room Parameters: Scan your room using LinnDAR or enter your room dimensions, construction materials, ceiling shapes, and features like windows, doors, and furnishings into a web tool.
- Speaker Matching: Select your specific speaker model from a large database (supporting hundreds of models from both Linn and third-party brands).
- Low-Frequency Control: It targets frequencies below 80 Hz where room boundaries and dimensions cause energy peaks, muddy bass, and prolonged decay, cutting down that distortion.
- Practical vs. Ideal Placement: It allows you to place your speakers in practical positions for your living space while making them sound as though they are sitting in their acoustically ideal locations.
Detailed setup instructions are available HERE.
Analogue Output Mode
- From Davaar firmware 4.81.396 (Apr 2021), you now have the ability to enable/disable the XLR and RCA analogue outputs on the Klimax DSM/3 (AV) & (Music).
- For example:
- This will allow you to have say, Loudspeakers on the XLR outputs and a headphone amplifier on the RCA outputs.(The Exakt outputs are unaffected in this setup.)
- For example:

- To select the Analogue Output mode using the IR Handset
- 1. Manage systems configure for * key operation Analog Output Mode
- 2. To switch between outputs, press and hold the * button on the REM022 handset
- This will then switch to the other analogue output. If currently on XLR, then it will switch to RCA. If currently RCA, then it switches to XLR
- 3. Press and hold * button on the REM022 handset to switch back to the other output.
- Manage systems will need to be configured for * key operation Analog Output Mode. This will allow IR handset and Dial selection will allow you to have both XLR & RCA operational at the same time.

- To select the Analogue Output mode using the top dial
- RCA Only: to only output on the RCA sockets
- XLR Only: to only output on the XLR sockets
- Dual (XLR & RCA): to have both RCA and XLR sockets live.
- Off: to disable these analogue outputs.
Lip Sync
- Lip-sync can be set with a default setting in the Konfig:Device page or Manage Systems: Advanced - "Video Sync Delay (ms)" setting
- To trim these using the IR handset or top dial
Using the Linn Klimax DSM
Top dial and front panel operation
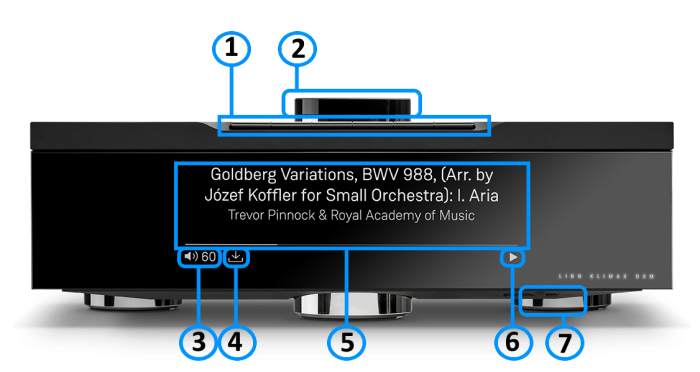
Front panel controls and indicators. Select one to jump to its description:
- 1. Pin buttons: personalised media selection, Pins 1 to 6
- 2. Control dial: main control dial and switch interface
- 3. Volume level and mute indicators
- 4. Software update available indicator
- 5. Media information: the source name, track name or radio station you are on
- 6. Transport information: play, stop, pause or buffering
- 7. Mains power button
1. PIN BUTTONS
- Half-press a button (press it gently) to see what it will do.
- Press it fully to select that Pin.
You can set up Pins in the Linn app. See the Linn App - creating PINs for:
2. CONTROL DIAL
- GO INTO SLEEP:
- Press the dial CENTRE and continue to press the CENTRE (approx 2seconds) until the volume indicator dial starts to decrease.
- BRING OUT OF SLEEP:
- Press any of the UP/DOWN/LEFT/RIGHT or CENTRE of the dial.
- SOURCE SELECT
- Press the dial DOWN to list the inputs available menu
- Scroll UP/DOWN the selection.
- Press RIGHT to select source or LEFT to cancel selection menu
- PLAY/STOP/PAUSE
- A quick press of the dial CENTRE will toggle between PLAY and STOP/PAUSE
- (Radio-PLAY/STOP, Playlist-PLAY-PAUSE).
- TRACK/PRESET PREV/NEXT
- A quick press of the dial LEFT/RIGHT jump to Playlist tracks or Radio stations.
- Volume
- Rotate dial clockwise to increase volume, anti-clockwise to reduce volume. The dial indicators will tell you the present volume.
- SURROUND TRIM
- With the Klimax DSM out of Sleep mode
- Press dial UP to enter Settings menu
- Press RIGHT to select or LEFT to cancel Settings menu
- Scroll UP/DOWN to highlight "Surround"
- Press RIGHT to select or LEFT to cancel Surround menu
- Select a the channel and trim with UP/DOWN
- Klimax DSM INFORMATION
- Software version
- With the Klimax DSM out of Sleep mode
- Press dial UP to enter Service menu
- Scroll UP/DOWN to highlight "Software Update"
- Press RIGHT to select or LEFT to cancel Service menu
- Klimax DSM "Properties" (Room name, device name, IP address etc)
- Press dial UP to enter Service menu
- Scroll DOWN to highlight "Device" or 'Network"
- Press RIGHT to select or LEFT to cancel Properties menu
- Klimax "Settings" (|Balance, Lipsync, Surround volumes, Connect (Blutooth/Wifi) etc)
- Press dial UP to enter Service menu
- Scroll DOWN to highlight "Settings"
- Press RIGHT to select or LEFT to cancel Settings menu
Note: Cancel any previous menus by pressing LEFT key.
3. Volume level & Mute indicators
Shows the current volume level, and whether the sound is muted.
4. Software update available
Shows that a software update is available for your Klimax DSM.
- The update is not compulsory, just an indication that an update is available.
- A Software update is performed by:
- the dial settings to do a Software update,
- Press the UPPER part of the dial. The front panel display will now show System options.
- Press the LOWER part of the dial to highlight "SOFTWARE UPDATE"
- Press the RIGHT part of the dial to select this option.
- If a Software update is available you will see the agree to update message and pres the RIGHT part of the dial to select this option.
- The update is not compulsory, just an indication that an update is available.
- Manage Systems - Software Updates,
- IR handset or Linn App.
- Instructions on how to do this update are listed HERE
5. Media information
Press the i button on the IR remote handset to wake the display, then press it again to scroll through the information available.
- When playing from a playlist, this is typically the artist, album and codec. The lower bar shows the position in the track.
- When playing a radio source, this shows the information provided by the radio station, and the codec.
6. Transport information
Shows the current transport state: Play  , Stop
 , Pause
 or Buffering
 .
7. Mains Power button
Switches the mains power to the Klimax DSM on and off completely.
Controlling your Linn DS/DSM using an infrared handset
To control your Linn DS/DSM you can you the infra-red handset supplied with product as well as the Linn App. This can be downloaded & installed
The infra-red handset supplied has;-
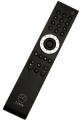
* Volume control, Mute
* Input control with PIN selection
* Radio station selection using the handset joystick,
* Playlist navigation using the handset joystick,
* Transport control (Play, Stop, Pause, Skip & Search) &
* Music information.
The Technical Specifications of the IR handset can be found HERE
Control of the Linn DS/DSM using a PC/MAC/Tablets & Phones
These manuals should only be used as a basic guide for what the buttons can do. We would recommend just using the App/Software and only using the guide if you are having difficulty or want to see what more features are available.
- Linn app for iPhone/iPad/Mac -:This is a Linn DS control software for Android phone, Android tablets, iPhone, iPad and M-Series Mac and replaced Kazoo.
- Spotify Connect Manual - How to play Spotify on a Linn DS/DSM
- Roon - "The music player for music lovers" control interface
Features
USB Stream

Setting up and using The Linn DSM and Windows / Mac / iPhone / iPad.
Bluetooth receiver

Bluetooth specification
Paring Bluetooth devices using Linn DSM PIN button operation
Tidal

Setting up and using Tidal with the Linn DS/DSM and Linn App
Qobuz

Setting up and using Qobuz with the Linn DS/DSM and Linn App
Calm Radio

Setting up and using Calm Radio with the Linn DS/DSM and Linn App
Spotify Connect

Setting up and using Spotify Connect with the Linn DS/DSM
Roon

Setting up Roon to work with the Linn DS/DSM
Deezer

Setting up and using Deezer with the Linn DS/DSM and Linn App
AirPlay

Using AirPlay with the Linn DS/DSM
Amazon Music

Setting up and using Amazon Music with the Linn DS/DSM and Linn App
Presto Music

Setting up and using Presto Music with the Linn DS/DSM and Linn App
Airplay 2

Using AirPlay 2 with your Linn DS/DSM
HDMI-2

Using HDMI 2.0 with the Linn DSM Help with any HDMI issues
HDMI-ARC

Using HDMI ARC with the Linn DS/DSM Help with any HDMI issues
HDMI-eARC

Using HDMI eARC with the Linn DS/DSM Help with any HDMI issues
DSD

Using DSD with the Linn DS/DSM
General products manuals and information
Top Of Page Index
Controlling the product User Guide
Product setup:Manage Systems user manual
Third Party Software Copyright
FAQs
- Klimax DSM/3 FAQ: general questions on the Klimax DSM/3 operation
- Klimax DS/DSM FAQ: questions specific to Klimax models
- Exakt trouble shooting
Troubleshooting
Top Of Page Index
For information on: troubleshooting, Surround options, "Ripping" Cd's , Exakt system then this next section will provide the information that you need:
Technical Specifications
| Overview |
| |||||||||||||||||||||||||||||||
| Dimensions |
(H) 126 mm x (W) 350 mm x (D) 350 mm | |||||||||||||||||||||||||||||||
| Weight | 16.4 kg / 36.1 lb | |||||||||||||||||||||||||||||||
| Mains supply voltage | (auto ranging)
| |||||||||||||||||||||||||||||||
| Expected energy usage | 50-70W | |||||||||||||||||||||||||||||||
| Screen Type | 1600 x 480 TFT display | |||||||||||||||||||||||||||||||
| Construction | Machined from Solid Aluminium | |||||||||||||||||||||||||||||||
| Finish | Silver Anodised, Black Anodised | |||||||||||||||||||||||||||||||
| Supported file types | FLAC, WAV, MP3, AAC, AIFF/AIFC, ALAC, OGG/VORBIS, WMA, DSD (DSF and DFF) | |||||||||||||||||||||||||||||||
| Audio sample rates | 7.35 k, 8 k, 11.025 k, 12 k, 14.7 k, 16 k, 22.05 k, 24 k,29.4 k, 32 k, 44.1 k, 48 k, 88.2 k, 96 k, 176.4 k, 192 k, 384 k | |||||||||||||||||||||||||||||||
| Word depths | 16–24 bits | |||||||||||||||||||||||||||||||
| Control protocol | Compatible with UPnP™ media servers, UPnP™ AV 1.0 control points | |||||||||||||||||||||||||||||||
| Ethernet | 1G Base-T RJ45 / SFP Optocal (1G) | |||||||||||||||||||||||||||||||
| EXAKT | 2off | |||||||||||||||||||||||||||||||
| inputs | ||||||||||||||||||||||||||||||||
| KLIMAX DSM (AV) | KLIMAX DSM (MUSIC) | KLIMAX DSM (Hub) | ||||||||||||||||||||||||||||||
|
| |||||||||||||||||||||||||||||||
|
| |||||||||||||||||||||||||||||||
| ||||||||||||||||||||||||||||||||
| ||||||||||||||||||||||||||||||||
| ||||||||||||||||||||||||||||||||
| ||||||||||||||||||||||||||||||||
| ||||||||||||||||||||||||||||||||
| ||||||||||||||||||||||||||||||||
| ||||||||||||||||||||||||||||||||
| ||||||||||||||||||||||||||||||||
| ||||||||||||||||||||||||||||||||
| Sources |
LAN | |||||||||||||||||||||||||||||||
| AUDIO OUTPUTS | ||||||||||||||||||||||||||||||||
| KLIMAX DSM (AV) | KLIMAX DSM (MUSIC) | KLIMAX DSM (Hub) | ||||||||||||||||||||||||||||||
Line Output:
The XLR output can be disabled and RCA output left running and vice-versa. Both Line outputs can be used simultaneously |
||||||||||||||||||||||||||||||||
| ||||||||||||||||||||||||||||||||
| ||||||||||||||||||||||||||||||||
| Video Outputs | ||||||||||||||||||||||||||||||||
| KLIMAX DSM (AV) | KLIMAX DSM (MUSIC) | KLIMAX DSM (Hub) | ||||||||||||||||||||||||||||||
|
| |||||||||||||||||||||||||||||||