Difference between revisions of "Series 3"
m |
m |
||
| (54 intermediate revisions by 2 users not shown) | |||
| Line 1: | Line 1: | ||
| − | {{HIDE_PAGE_TITLE}} | + | __HIDDENCAT__{{HIDE_PAGE_TITLE}} |
<div style="margin-left:10px;max-width:1000px;"> __NOTOC__ | <div style="margin-left:10px;max-width:1000px;"> __NOTOC__ | ||
{| id="Kiko main page" style="width:100%;margin-top:0px;" | {| id="Kiko main page" style="width:100%;margin-top:0px;" | ||
| colspan="2"| | | colspan="2"| | ||
| style="vertical-align:centre;padding-top:0px;width:50%" | | | style="vertical-align:centre;padding-top:0px;width:50%" | | ||
| − | + | <div> </div>{{Title_Text | Linn Series 3}}{{Title_sub_text| Fully Integrated wireless speaker}} | |
| − | <div> </div>{{Title_Text | Linn Series 3}} | + | <div style="background-color: #FFFFFF;padding:10px; clear: both;">[[image:Series3-stand.png|160px|link=#Fitting the Stand]][[Image:Linn Series 3-600h.png|250px|link=Series_3_Setup]]</div><br> |
| − | <div style="background-color: #FFFFFF;padding:10px; clear: both;">[[Image:Linn Series 3-600h.png| | + | ::* ''Product Name:'' Linn Series 3 |
| − | + | ::::301 - Wireless integrated Linn DSM loudspeaker. | |
| − | :::: | + | ::::302 - Series3 Exakt partner loudspeaker. |
| − | :::: | + | ::* ''Date of Introduction:'' October 2019 |
| − | : | + | <div align="right" color ="blue"><i><b> [[Series_3_Setup|more....{{tab}}{{tab}}{{tab}}{{tab}}]]</b></i></div> |
| − | < | + | <br><br> |
| style="vertical-align: top;padding:20px 1px 10px 10px;width:50%" | | | style="vertical-align: top;padding:20px 1px 10px 10px;width:50%" | | ||
| − | <span style="position:relative;left:-20px;top:10px">[[File:Setup.png|57px]]</span> | + | <span style="position:relative;left:-20px;top:10px">[[File:Setup.png|57px|link=Series_3_Setup]]</span> |
{| style="margin-top:23px; border:3px solid #AABBDD; background:#E9F3FF; width:100%; padding:10px; margin-top:-30px; border-spacing: 0;" | {| style="margin-top:23px; border:3px solid #AABBDD; background:#E9F3FF; width:100%; padding:10px; margin-top:-30px; border-spacing: 0;" | ||
| − | |<span style="font-size:150%;margin-left:40px;text-decoration:underline;">[[ | + | |<span style="font-size:150%;margin-left:40px;text-decoration:underline;">[[#Setup|Setup Guide]]</span> |
| − | + | :::[[#Unpacking|Unpacking]], [[#Fitting_the_Stand|Fitting the stand]], [[#Initial Setup|Wiring up]], [[#Setup_and_changes| configuration.....]] | |
| − | : | ||
| − | |||
|} | |} | ||
| − | <span style="position:relative;left:-10px;top:+20px">[[File:Kazoo_Finger_Ctrl.png|57px]]</span> | + | <span style="position:relative;left:-10px;top:+20px">[[File:Kazoo_Finger_Ctrl.png|57px|link=#Using_the_Series-3_loudspeaker]]</span> |
{| style="margin-top:23px; border:3px solid #ff8033; background:#ffbd33; width:100%; padding:10px; margin-top:-30px; border-spacing: 0;" | {| style="margin-top:23px; border:3px solid #ff8033; background:#ffbd33; width:100%; padding:10px; margin-top:-30px; border-spacing: 0;" | ||
| − | |<span style="font-size:150%;margin-left:40px;text-decoration:underline;">[[Using the Series-3 loudspeaker]]</span> | + | |<span style="font-size:150%;margin-left:40px;text-decoration:underline;">[[#Using_the_Series-3_loudspeaker|Using the Series-3 loudspeaker]]</span> |
| + | ::* [[#Series3-301_Touch_Interface| Top plate]], [[#Control_of_the_Linn_DS.2FDSM_using_a_PC.2FMAC.2FTablets_.26_Phones|PC/Tablet control]], [[Songcast|Sharing Music]], [[Linn_DS/DSM_control#ROON|Roon]], [[Linn_DS/DSM_control#SPOTIFY_CONNECT|Spotify Connect]].... | ||
| + | <!-- | ||
<hr/> | <hr/> | ||
| − | :* [[Using the Series-3 loudspeaker# | + | :* [[Using the Series-3 loudspeaker#Top_plate| Control using Top plate]] |
| − | :* [[ | + | :* [[#Control_of_the_Linn_DS.2FDSM_using_a_PC.2FMAC.2FTablets_.26_Phones|PC/Tablet control]] |
:* [[Songcast|Sharing Music with other Linn DS/DSM players]] | :* [[Songcast|Sharing Music with other Linn DS/DSM players]] | ||
{{Hidden EXPAND Box Header||IndexText={{tab}}...Click for more }} | {{Hidden EXPAND Box Header||IndexText={{tab}}...Click for more }} | ||
| − | :* [[ | + | :* [[Linn_DS/DSM_control#ROON|Roon]] |
| − | :* [[ | + | :* [[Linn_DS/DSM_control#SPOTIFY_CONNECT|Spotify Connect]] |
| − | {{Hidden text end}} | + | {{Hidden text end}}--> |
|} | |} | ||
| − | <span style="position:relative;left:-20px;top:10px">[[File:Features.png |50px]]</span> | + | |
| + | <span style="position:relative;left:-20px;top:10px">[[File:Features.png |50px|link=Series_3_Setup#FEATURES]]</span> | ||
<!--<span style="position:relative;left:-10px;top:10px">[[File:Lightening_flash1.png|50px|link=]]</span>--> | <!--<span style="position:relative;left:-10px;top:10px">[[File:Lightening_flash1.png|50px|link=]]</span>--> | ||
{| style="margin-top:23px; border:3px solid #33ff90; background:#DAF7A6; width:100%; padding:10px; margin-top:-30px; border-spacing: 0;" | {| style="margin-top:23px; border:3px solid #33ff90; background:#DAF7A6; width:100%; padding:10px; margin-top:-30px; border-spacing: 0;" | ||
| − | |<span style="font-size:150%;margin-left:40px;text-decoration:underline;">[[ | + | |<span style="font-size:150%;margin-left:40px;text-decoration:underline;">[[#FEATURES|Features]]</span> |
| + | ::: [[#Wifi|Wireless]], [[#Bluetooth|Bluetooth]], [[#Single_or_Stereo_operation|Single or Stereo…]], [[#HDMI_ARC|HDMI ARC]], [[Series_3_Setup#Exakt|EXAKT]].... | ||
| + | <!-- | ||
<hr/> | <hr/> | ||
| − | :* [[Bluetooth|Bluetooth operation]] | + | :* [[#Wifi|Wireless operation]] |
| − | :* HDMI ARC | + | :* [[#Bluetooth|Bluetooth operation]] |
| − | :* EXAKT | + | {{Hidden EXPAND Box Header||IndexText={{tab}}...Click for more }} |
| + | :* [[#Single_or_Stereo_operation|Single or Stereo playback]] | ||
| + | :* [[#HDMI_ARC|HDMI ARC]] | ||
| + | :* [[#Exakt|EXAKT]] | ||
| + | {{Hidden text end}}--> | ||
| + | |} | ||
| + | <!--FAQ--> | ||
| + | <span style="position:relative;left:-20px;top:10px">[[image:Info2icon.png |60px|link=Series_3_Setup#FAQ.27s]]</span> | ||
| + | <!--<span style="position:relative;left:-10px;top:10px">[[File:Lightening_flash1.png|50px|link=]]</span>--> | ||
| + | {| style="margin-top:23px; border:3px solid #cd6155; background:#fadbd8; width:100%; padding:10px; margin-top:-30px; border-spacing: 0;" | ||
| + | |<span style="font-size:150%;margin-left:40px;text-decoration:underline;">[[#FAQ.27s|FAQ's]]</span> | ||
| + | ::: [[#Common_FAQ.27s|Common FAQ's]], [[#Series3|Series3 FAQ]], [[Series_3_Setup#Troubleshooting|Issues]], [[#Technical_Specifications|Tech Specs...]] | ||
|} | |} | ||
|} | |} | ||
| + | |||
{{footer:4 | {{footer:4 | ||
| − | | [[ | + | | [[#Technical_Specifications|Technical Specifications]] |
| − | | [[ | + | | [[Series_3_Setup|Series3 Index]] |
| − | | [[ | + | | [[#Troubleshooting|Troubleshooting]] |
| [http://www.linn.co.uk/support Contact us] | | [http://www.linn.co.uk/support Contact us] | ||
<!-- Add History--> | <!-- Add History--> | ||
}} | }} | ||
[[Category:Linn_DSM]] | [[Category:Linn_DSM]] | ||
| − | [[Category: | + | <!--{{:Exakt_Loudspeaker_Category}}---> |
| − | + | [[Category:Wi-Fi]] | |
| − | + | [[Category:Bluetooth]] | |
| − | + | [[Category:CORE4]] | |
| − | + | [[Category:Gateway API]] | |
| − | + | [[Category:PIN]] | |
| − | }} | + | [[Category:Roon Ready]] |
| + | [[Category:Airplay 2]] | ||
| + | |||
| + | {{:Series_3_Setup}} | ||
Latest revision as of 14:13, 29 October 2024
|
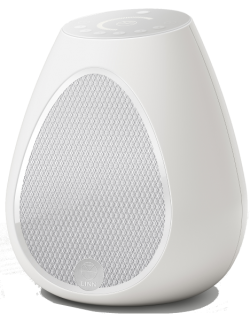
Linn Series 3 Fully Integrated wireless speaker
|
| ||||||
Contents
- 1 Product info
- 2 Initial Setup
- 3 Download App
- 4 Setup and changes
- 5 Space Optimisation
- 5.1 What are the differences between the Konfig Space Optimisation and Linn Account (Kloud Konfig) Space Optimisation?
- 5.2 What is the difference between Space Optimisation & Space Optimisation+?
- 5.3 Is the Linn Account Manage systems only available for the new Linn DSM's
- 5.4 Why don't you use a Microphone in Space Optimisation?
- 5.5 Can I use "Linn Account Space Optimisation" with my Exakt system?
- 6 Using in a Surround system
- 7 Using the Series-3 loudspeaker
- 8 FEATURES
- 9 FAQ's
- 9.1 Series3
- 9.1.1 Does the Series 3 have an IR handset?
- 9.1.2 Can I swap left and right hand channels on Series 3 pairs?
- 9.1.3 How do I do a "hard reset"/"Restore to Factory defaults" on the Series 3?
- 9.1.4 Does the Series3 allow Wireless Stereo?=
- 9.1.5 Can I use two Series3-301s for Stereo operation?
- 9.1.6 Can I use a Series3-301 with an LP12 turntable?
- 9.1.7 Can I use the Series3 speakers in a Surround system?
- 9.1.8 ARC - Audio Return Channel information
- 9.2 General Linn DS/DSM/HUB Wifi
- 9.3 Common FAQ's
- 9.3.1 How do I Update, or recover, the software on a Linn DS/DSM
- 9.3.2 Linn Ds/DSM software updates using Linn App
- 9.3.3 Can I change the audio quality of the Tunein Radio
- 9.3.4 I can no longer get Linn radio stream, Linn Jazz, Linn Classical, Linn Radio, station
- 9.3.5 Does the Linn DS/DSM players play BBC Radio via TuneIn?
- 9.3.6 How do I add BBC Radio stations to my Presets?
- 9.3.7 I cannot get any foreign Radio stations, I can only get UK stations
- 9.3.7.1 Does the Linn DS/DSM players play MQA?
- 9.3.7.2 Can the DS player play multi-channel files?
- 9.3.7.3 Upgrading software
- 9.3.7.4 Physical Input/Outputs
- 9.3.7.4.1 How do I add Music to play on Linn DS
- 9.3.7.4.2 Will downloaded music play on the DS players?
- 9.3.7.4.3 Can I Airplay from my Android device?
- 9.3.7.4.4 After Updating to Davaar55 I can only get audio from my Exakt outputs and not the Analogue Out
- 9.3.7.4.5 Are the Digital outputs (Toslink/SPDIF) volume controlled?
- 9.3.7.4.6 Can I add digital loudspeakers to the Linn DS/DSM?
- 9.3.7.5 General Q's
- 9.3.7.6 Linn PINS
- 9.3.7.7 Deezer on the Linn DS/DSM
- 9.3.7.8 Linn Songcast
- 9.3.7.9 There is a ! on the front panel of my Linn DS/DSM
- 9.3.7.10 The front panel of the DS is showing a flashing dot or lightening flash and I cannot see the Linn DS with Kazoo or Konfig
- 9.4 FAQ's on ALL products link
- 9.1 Series3
- 10 Troubleshooting
- 11 Technical Specifications
Product info
- Product Name: Series 3 Loudspeaker
- 301 - All-In-One Wireless speaker & digital Music player
- 302 (partner) - Exakt speaker
- Date of Introduction: October 2019
- Type: Integrated digital music player, pre-amplifier and power amplifier
- Versions:
- Shelf / table top loudspeaker
- Stand speaker with White Series3 Stand Accessory
- Features
Initial Setup
If you have just received this Linn product then you will be eager to listen to the Music. This section will show you how to unpack it, wire it up, position it and get Music playing...
The Series-3 301 speaker can be used alone for Mono playback or with the Series-3 302 speaker wired, using a CAT-5 Exakt-Link cable, for Stereo playback.
The On-line setup guide can be found https://www.linn.co.uk/setup
Unpacking
Remove the Series-3 (301) from the packing and check you have all of the accessories.
Now place the product you want it to be.
- REQUIRED CONNECTION
-
- 1. A mains power socket
Fitting/removing the grille
- The grille is held on by magnets. To remove the grille, place a fine blade between the grille and product and gently prise/lever the grille off the product. (Please be careful as too much tension can bend the grill.)
- Fitting the grill is placing a corner of the grille in the correct position and slowly applying the grille to the speaker.
Fitting the Stand
- This is a bolt on accessory for the Series3 All-in-one Loudspeaker.
- The cables can be hidden through the centre of the stand. Rubber feet, supplied, can be fitted at the bottom of the stand for added cable clearance..
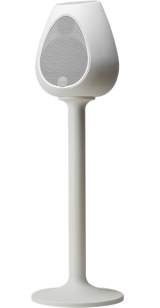
Install instructions:
1. Have all parts ready to assemble, and a clean, soft surface to work on.
- 2. Turn the stand upside-down and feed the cables you require through the stand. Pull the cables out through the hole provided at the rear of the stand.

- 3. Gently and carefully place the Series 3 speaker on its head. Line up the hole in the top of the stand with the insert in the cabinet.
a) Take the bolt and washer and start fitting the bolt by hand to ensure you are not cross threading.
b) Tighten the bolt to secure, but take care not to overtighten it, as this could crack the speaker cabinet.
- 4. Turn the stand the right way up and plug the cables into the connectors. The product is now ready to connect and install
- 5. Optional rubber bump on feet can be fitted to the base if the stand will be used on a wooden floor, to avoid scratching. Arrange the feet equally spaced around the perimeter.
Wiring
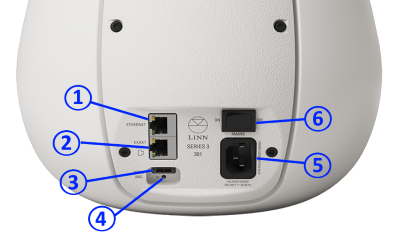
Series3-301 back panel
Information of what each connector is and a basic specification of these connectors
- ETHERNET - To connect to a network (100Base-T)- Not required if you are only using Bluetooth and/or Wifi connections
- EXAKT LINK - To connect to Exakt compatible devices (Exaktbox, Exakt Speakers, Urika II etc) - to Partner with a Series3-302
- HDMI ARC (HDMI) - To connect to a TV Audio Return Channel (ARC) connection
- FALLBACK - To put the device into Fallback mode (used when reprogramming)
- MAINS INPUT - To connect to the mains electricity supply.
- POWER SWITCH - Mains power switch
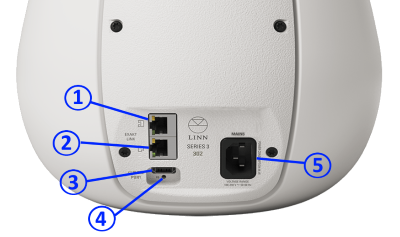
Series3-302 partner backpanel
Information of what each connector is and a basic specification of these connectors
- EXAKT-LINK - connection to Series3-301 speaker
- EXAKT LINK - To connect to Exakt compatible devices (Exaktbox, Exakt Speakers, Urika II etc) - connection to other Exakt-link applicable products
- SERVICE PORT For Linn service only
- FALLBACK - To put the device into Fallback mode (used when reprogramming)
- MAINS INPUT - To connect to the mains electricity supply.
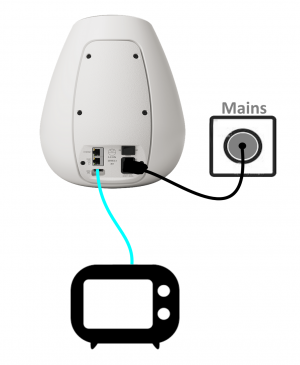
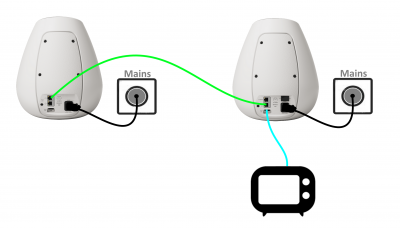
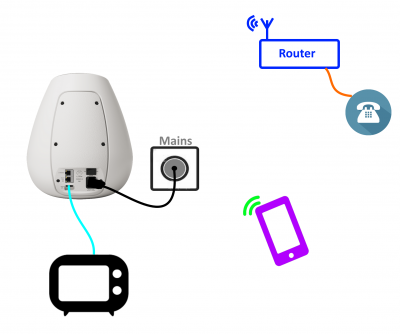
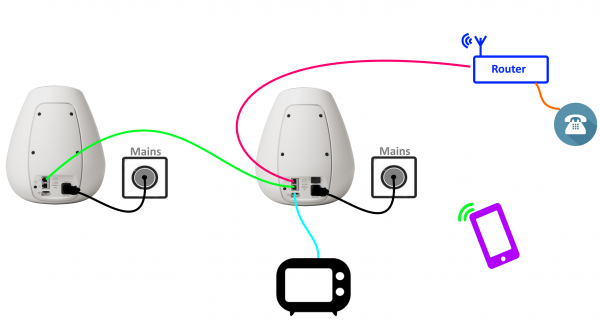
HDMI-ARC audio only setup
HDMI-ARC only (using the Series 3 as a TV Sound bar)
- This setup will allow:
- The Series3-301 to receive Mono audio and volume control from the HDMI-ARC connection from the TV. (The Series3 volume buttons will also control the volume)
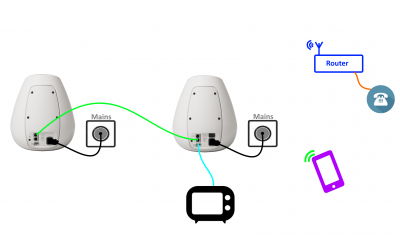
HDMI-ARC only (using the Series 3 as a Stereo TV Sound bar)
- This setup will allow:
- The Series3-301 to receive Stereo audio and volume control from the HDMI-ARC connection from the TV. (The Series3 volume buttons will also control the volume)
Pairing a 301 & 302 for use as a stereo pair
Configure for use with Series3-302 partner speaker

|
Add/Remove a Partner speaker setup procedure
(This will change the Series3-301 from MONO to STEREO and use the Series3-302 as the other STEREO channel) : | |
| 1. Connect or remove the Series3-302 speaker as required: | ||
| * Stereo mode:Connect the Series3-302 using an Exakt-link cable to the Series3-302 | ||
| * Single (mono) mode: Disconnect the Series3-302 Exakt-link from the Series3-302 | ||
2. Press and HOLD both buttons
| ||
| 3. This process is complete when the Series3-301 volume indicators are all illuminated for a few seconds and return back to volume level display. |
The On-line setup guide can be found https://www.linn.co.uk/setup
- Note
- if you disconnect the Exakt-link or do not have the Mains power going to the Series3-302 speaker and have the previously setup the Series3-301 for Stereo operation then you will only get one channel playback, (left channel only). The Series3-301 will assume that the other speaker still exists and has to be "'configured'" for Mono playback.
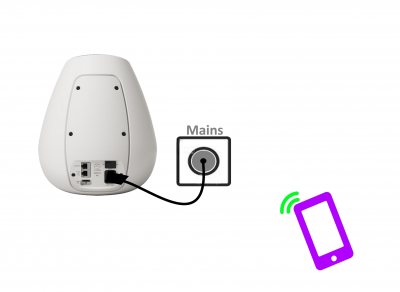
Bluetooth only setup
Bluetooth only
- This setup will allow:
- The Series3-301 as a Mono Bluetooth loudspeaker for your phone, Tablet, Alex Echo, Google Home....

|
Bluetooth Setup procedure: | |
1. On the Series3-301, press and HOLD buttons
| ||
| 2. On your Bluetooth device, setup this up for pairing and look for Linn Series 3. | ||
| 3. This Bluetooth pairing process is complete when the Series3-301 volume indicators are all illuminated for a few seconds and return back to volume level display. |
The On-line setup guide can be found https://www.linn.co.uk/setup
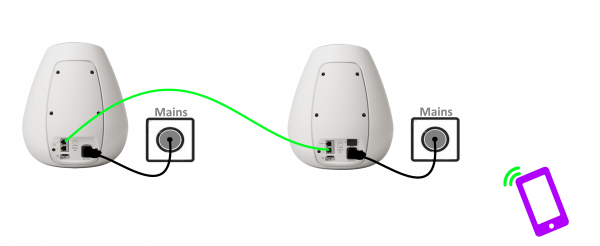
Bluetooth only with Stereo playback
- This setup will allow:
- The Series3-301 & Series3-302 as Stereo Bluetooth loudspeakers.
Configure for Bluetooth pairing

|
Bluetooth Setup procedure: | |
1. On the Series3-301, press and HOLD buttons
| ||
| 2. On your Bluetooth device, setup this up for pairing and look for Linn Series 3. | ||
| 3. This Bluetooth pairing process is complete when the Series3-301 volume indicators are all illuminated for a few seconds and return back to volume level display. |
The On-line setup guide can be found https://www.linn.co.uk/setup Configure for use with Series3-302 partner speaker

|
Add/Remove a Partner speaker setup procedure
(This will change the Series3-301 from MONO to STEREO and use the Series3-302 as the other STEREO channel) : | |
| 1. Connect or remove the Series3-302 speaker as required: | ||
| * Stereo mode:Connect the Series3-302 using an Exakt-link cable to the Series3-302 | ||
| * Single (mono) mode: Disconnect the Series3-302 Exakt-link from the Series3-302 | ||
2. Press and HOLD both buttons
| ||
| 3. This process is complete when the Series3-301 volume indicators are all illuminated for a few seconds and return back to volume level display. |
The On-line setup guide can be found https://www.linn.co.uk/setup
- Note
- if you disconnect the Exakt-link or do not have the Mains power going to the Series3-302 speaker and have the previously setup the Series3-301 for Stereo operation then you will only get one channel playback, (left channel only). The Series3-301 will assume that the other speaker still exists and has to be "'configured'" for Mono playback.
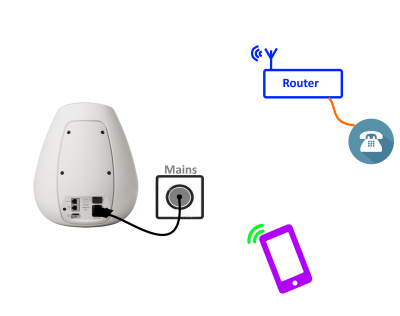
Wifi wiring & setup
Basic Wifi operation
This setup will allow:
- Stream Music, using Wifi, to the Series3 speaker(s).
- Optional Bluetooth loudspeaker operation is still available by initial setup of Bluetooth
- This is to setup the Wifi connection using the front panel buttons.

|
WPS WIFI Setup procedure: | |
| 1. On your ISP Router, press the WPS button to start the connection process. | ||
| * Check your Router manual on how start WPS pairing. | ||
2. On the Series3-301 , press and HOLD buttons
| ||
| 3. This process is complete when the Series3-301 volume indicators are all illuminated for a few seconds and return back to volume level display. |
- Or
| Alternative Wifi Setup Method via Web Browser: | |
| 1. With the Series3-301 DSM out of Sleep mode | |
| 2. Go to the Wireless settings on your device (e.g. iPad) | |
| 3. Find the Series-301 on the list of available networks. It will be called Series3- <serial number> | |
| 4. Select this as the wireless network on your device (e.g. iPad) | |
| 5. Now open a web browser on your device and type "https://setup.linn.co.uk" in the address bar | |
| 6. The Series3 Wifi Setup page should now be displayed (if you get a "..cannot find the server” error then you have not selected to Series3 Wifi channel in point 3&4) | |
| 7. Select the Wifi network you want to connect to | |
| 8. Enter the passkey for the Wifi network | |
| 9. Click on 'Set Network' |
Note: To CLEAR/REMOVE any Wifi settings On the Series3-301 , press and HOLD buttons ![]() ,
, ![]() &
& ![]() for 2 seconds and this will forget your Wifi settings.
for 2 seconds and this will forget your Wifi settings.
Wifi operation with TV audio and streaming
This setup will allow:
- Mono TV audio from the TV HDMI-ARC socket
- Stream Music, using cable ethernet, to the Series3 speaker(s).
- Optional Bluetooth loudspeaker operation is still available by initial setup of Bluetooth
- This is to setup the Wifi connection using the front panel buttons.

|
WPS WIFI Setup procedure: | |
| 1. On your ISP Router, press the WPS button to start the connection process. | ||
| * Check your Router manual on how start WPS pairing. | ||
2. On the Series3-301 , press and HOLD buttons
| ||
| 3. This process is complete when the Series3-301 volume indicators are all illuminated for a few seconds and return back to volume level display. |
- Or
| Alternative Wifi Setup Method via Web Browser: | |
| 1. With the Series3-301 DSM out of Sleep mode | |
| 2. Go to the Wireless settings on your device (e.g. iPad) | |
| 3. Find the Series-301 on the list of available networks. It will be called Series3- <serial number> | |
| 4. Select this as the wireless network on your device (e.g. iPad) | |
| 5. Now open a web browser on your device and type "https://setup.linn.co.uk" in the address bar | |
| 6. The Series3 Wifi Setup page should now be displayed (if you get a "..cannot find the server” error then you have not selected to Series3 Wifi channel in point 3&4) | |
| 7. Select the Wifi network you want to connect to | |
| 8. Enter the passkey for the Wifi network | |
| 9. Click on 'Set Network' |
Note: To CLEAR/REMOVE any Wifi settings On the Series3-301 , press and HOLD buttons ![]() ,
, ![]() &
& ![]() for 2 seconds and this will forget your Wifi settings.
for 2 seconds and this will forget your Wifi settings.
Wifi operation with Stereo TV audio and streaming
This setup will allow:
- Stereo TV audio from the TV HDMI-ARC socket
- Stereo streaming Music, using cable ethernet, to the Series3 speaker(s).
- Optional Stereo Bluetooth loudspeaker operation is still available by initial setup of Bluetooth
- This is to setup the Wifi connection using the front panel buttons.

|
WPS WIFI Setup procedure: | |
| 1. On your ISP Router, press the WPS button to start the connection process. | ||
| * Check your Router manual on how start WPS pairing. | ||
2. On the Series3-301 , press and HOLD buttons
| ||
| 3. This process is complete when the Series3-301 volume indicators are all illuminated for a few seconds and return back to volume level display. |
- Or
| Alternative Wifi Setup Method via Web Browser: | |
| 1. With the Series3-301 DSM out of Sleep mode | |
| 2. Go to the Wireless settings on your device (e.g. iPad) | |
| 3. Find the Series-301 on the list of available networks. It will be called Series3- <serial number> | |
| 4. Select this as the wireless network on your device (e.g. iPad) | |
| 5. Now open a web browser on your device and type "https://setup.linn.co.uk" in the address bar | |
| 6. The Series3 Wifi Setup page should now be displayed (if you get a "..cannot find the server” error then you have not selected to Series3 Wifi channel in point 3&4) | |
| 7. Select the Wifi network you want to connect to | |
| 8. Enter the passkey for the Wifi network | |
| 9. Click on 'Set Network' |
Note: To CLEAR/REMOVE any Wifi settings On the Series3-301 , press and HOLD buttons ![]() ,
, ![]() &
& ![]() for 2 seconds and this will forget your Wifi settings.
for 2 seconds and this will forget your Wifi settings.
Configure for use with Series3-302 partner speaker

|
Add/Remove a Partner speaker setup procedure
(This will change the Series3-301 from MONO to STEREO and use the Series3-302 as the other STEREO channel) : | |
| 1. Connect or remove the Series3-302 speaker as required: | ||
| * Stereo mode:Connect the Series3-302 using an Exakt-link cable to the Series3-302 | ||
| * Single (mono) mode: Disconnect the Series3-302 Exakt-link from the Series3-302 | ||
2. Press and HOLD both buttons
| ||
| 3. This process is complete when the Series3-301 volume indicators are all illuminated for a few seconds and return back to volume level display. |
The On-line setup guide can be found https://www.linn.co.uk/setup
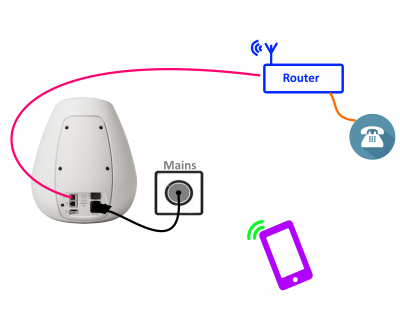
Cable network wiring & setup
Wired network operation
This setup will allow:
- Stream Music, using cable ethernet, to the Series3 speaker(s).
- Optional Bluetooth loudspeaker operation is still available by initial setup of Bluetooth
- No top plate setup required
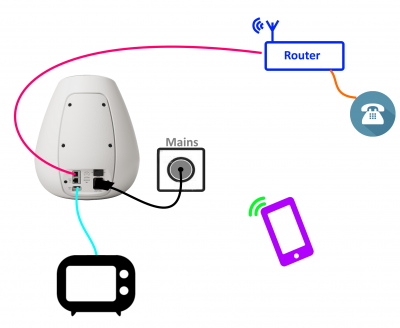
Wired network operation with TV audio and streaming
This setup will allow:
- Mono TV audio from the TV HDMI-ARC socket
- Stream Music, using cable ethernet, to the Series3 speaker(s).
- Optional Bluetooth loudspeaker operation is still available by initial setup of Bluetooth
- No top plate setup required
Wired network operation with Stereo TV audio and streaming
This setup will allow:
- Stereo TV audio from the TV HDMI-ARC socket
- Stereo streaming Music, using cable ethernet, to the Series3 speaker(s).
- Optional Stereo Bluetooth loudspeaker operation is still available by initial setup of Bluetooth
Configure for use with Series3-302 partner speaker

|
Add/Remove a Partner speaker setup procedure
(This will change the Series3-301 from MONO to STEREO and use the Series3-302 as the other STEREO channel) : | |
| 1. Connect or remove the Series3-302 speaker as required: | ||
| * Stereo mode:Connect the Series3-302 using an Exakt-link cable to the Series3-302 | ||
| * Single (mono) mode: Disconnect the Series3-302 Exakt-link from the Series3-302 | ||
2. Press and HOLD both buttons
| ||
| 3. This process is complete when the Series3-301 volume indicators are all illuminated for a few seconds and return back to volume level display. |
The On-line setup guide can be found https://www.linn.co.uk/setup
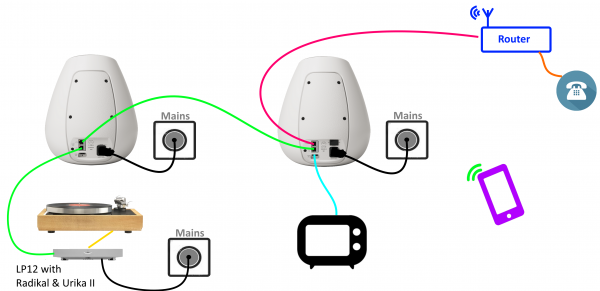
Wired network operation with LP12, TV audio and streaming, all in Stereo
This setup will allow:
- Stereo LP12 turntable playback. The Linn LP12 MUST be fitted with both URIKA-II and Radikal motor supply
- Optional:
- Stereo TV audio from the TV HDMI-ARC socket
- Stereo streaming Music, using cable ethernet or Wifi, to the Series3 speaker(s)
- Stereo Bluetooth loudspeaker operation is still available by initial setup of Bluetooth
Positioning
- Review the advised Positioning guide to ensure safe and cool operation of the Series3 speakers
Download App
The Linn DS/DSM can be done from many control points at the same time.
Note: from April 2023 : Tidal have removed support for the Linn Kazoo application on ALL platforms. We recommend trying the new Linn app (available on iOS and Android)
- The name of this control App/software is KAZOO..
- Kazoo control App/software is available for
-
| Windows Kazoo download - from April 2023 : Tidal have removed support for the Linn Kazoo application on ALL platforms. We recommend trying the new Linn app (available on iOS and Android)
-
- Kazoo control App/software is available for
MAC OSX Kazoo download- from April 2023 : Tidal have removed support for the Linn Kazoo application on ALL platforms. We recommend trying the new Linn app (available on iOS and Android)
 Android Kazoo for Android Phone/Tablet download
- from April 2023 : Tidal have removed support for the Linn Kazoo application on ALL platforms. We recommend trying the new Linn app (available on iOS and Android)
Setup and changes
Top Of Page Index
There are two ways to configure, (if required), your Linn DS/DSM player/Speakers etc:
Before you do anything you will need to have a Linn Account. This is a simple process and can only be performed using the Kazoo App or Linn App.
Details on how to create your Linn Account and how to use Manage systems can be found in the Manage Systems page.
This Konfig App can be downloaded from KONFIG App
This will allow changing the Room name, Linn DS/DSM name, input name and other settings. This can be changes by yourself and/or your Linn Retailer.
Details of most of the options are listed in the Konfig Manual, this covers many options
Konfig has been deprecated and replaced by Manage Systems.
- Note: Manage Systems has taken over from Konfig and we would prefer you to use Manage Systems to setup an configure your Linn products.
Space Optimisation
 for ALL Linn DS/DSM products |
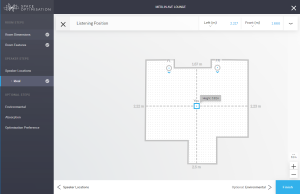 Linn Account Space Optimisation from Davaar64 ⇒ |
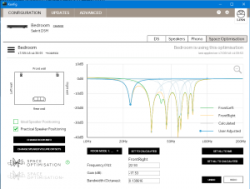 Linn Konfig Space Optimisation & Space Optimisation+ |
Linn Space Optimisation is currently configurable using either the Konfig app or the Linn Account Manage systems.
Click the above picture/icon for more information of that version of Space Optimisation.
More details of what Space Optimisation can be found can be found at www.Linn.co.uk
What are the differences between the Konfig Space Optimisation and Linn Account (Kloud Konfig) Space Optimisation?
- The new version of Space Optimisation uses highly sophisticated acoustic modelling to model the interactions between your speakers and the room; this acoustic modelling is based on the finite-difference time-domain method. A simple two-dimensional analogy to this method of acoustic modelling is of a fishing net laid over a pond; each knot in the net defines a discrete measurement location, so that when a stone is thrown into the pond, we can track the resulting ripple by measuring its height at each knot.
- The spatial discretisation employed by this method of acoustic modelling allows the new version of Space Optimisation to correctly consider the effects of:
- non-rectangular rooms;
- the placement of features like doors and windows;
- And the location and rotation of your speakers.
- Furthermore, the time-domain formulation of this method of acoustic modelling means that the new version of Space Optimisation can now reduce both the energy and decay time of any artificial distortions caused by the interactions between your speakers and the room, resulting in both a flat frequency response and a uniform decay time. :Finally, the new version of Space Optimisation has been designed to give a better balance of low- and mid-frequency energy.
What is the difference between Space Optimisation & Space Optimisation+?
- This is applicable to both Linn Konfig and Manage System/Kloud Konfig
- Space Optimisation is for NON-Exakt systems. This uses the direct analogue outputs of the Linn DS/DSM
Is the Linn Account Manage systems only available for the new Linn DSM's
- Both Applications can be used for ALL Linn Products.
- The only limitation is that the Linn DS/DSM must have Davaar64 to run Linn Account Manage systems]
Why don't you use a Microphone in Space Optimisation?
- The aim of Space Optimisation is to remove the effects of your room, to uncover the unique acoustic characteristics of your speakers; after all, this is what you fell in love with when buying your speakers. To achieve this, Space Optimisation needs to understand both the interactions between your speakers and the room and the unique acoustic characteristics of your speakers; the unique acoustic characteristics of your speakers are then subtracted from the interactions between your speakers and the room, leaving only the effects of your room.
- An acoustic measurement of the interactions between your speakers and room can have many sources of error which may affect the accuracy and repeat-ability of the measurement, including the choice of measurement stimulus, such as MLS or a log chirp; external noise, such as traffic noise and vibration; quality and calibration of the microphone, which can introduce distortion; and the microphone location, which can be sensitive to within a few centimetres. The use of acoustic modelling removes these sources of error: the model can apply an ideal impulse as stimulus; the modelling domain is free from noise; the model can use an ideal microphone; and the listening location is well-defined. It can thus be seen that acoustic modelling has a clear advantage over acoustic measurement in understanding the interactions between your speaker and the room.
- The unique acoustic characteristics of your speakers depend on many factors, including the shape and size of the drive units and ports; the constructive and destructive interference between the drive units, ports and any cabinet-edge diffraction sources; and the angle between the listening location and your speakers. Therefore, a simple on-axis anechoic measurement of your speakers is insufficient information; what is actually required is an anechoic measurement with your speakers in the same configuration as you have them in your home. While some manufacturers do publish anechoic measurements of their speakers, both on- and off-axis, it is extremely unlikely that they will have performed an anechoic measurement of your speakers in the same configuration as you have them in your home. The acoustic modelling of such a scenario is, however, straightforward; the model can simply turn your room into an anechoic chamber to obtain the unique acoustic characteristics of your speakers in the same configuration as you have them in your home. It can thus be seen that acoustic modelling once again has a clear advantage over acoustic measurement in understanding the unique acoustic characteristics of your speakers.
- From the above, it is clear that acoustic modelling is the best approach to Space Optimisation.
Can I use "Linn Account Space Optimisation" with my Exakt system?
- From November 2019 you can now use Linn Account Space Optimisation with Stereo and Surround Exakt systems.
Using in a Surround system
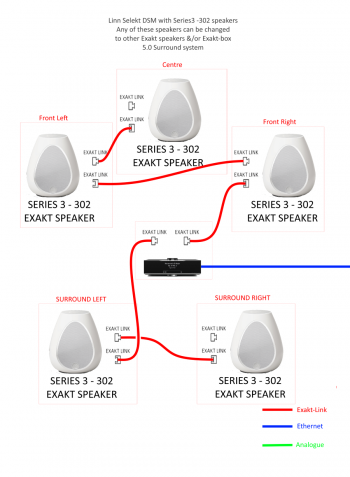
The Series3-302 is an Exakt loudspeaker. This allows the Series3 - 302 to be used with a LInn DSM/HUB with Surround capabilities.
In the example on the right, we are using all Surround channels with the Series3-302. However, you can easily replace:
- The Front LEFT/RIGHT speakers with a pair of Series5 loudspeakers &
- Centre, and add a sub, with an Exaktbox/ExaktBox-I
There are many more suggestions with Surround and Exakt speakers HERE
Note:
- You CANNOT use a Series3 - 301 in this setup
Using the Series-3 loudspeaker
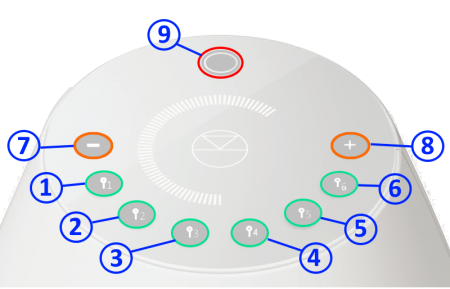
Series3-301 Touch Interface
- Buttons keys
- Any Button - Wake Series3 301 from Standby/Sleep
 Select the Favourite media/PIN# 11 or setup Self configure with button6Self Configure
 Select the Favourite media/PIN# 21 or setup WiFi with button5WPS Wifi Setup
 Select the Favourite media/PIN# 31 or setup Bluetooth with button4Bluetooth Setup
 Select the Favourite media/PIN# 41 or setup Bluetooth with button3Bluetooth Setup
 Select the Favourite media/PIN# 51 or setup WiFi with button2WPS Wifi Setup
 Select the Favourite media/PIN# 61 or setup Self configure with button1Self Configure
- Volume DOWN2 - decrease volume
- Volume UP 2 - increase volume
- Multifunction button3: Pause/Play, Mute/Unmute, Standby
- Notes
- 1 A quick press of this button will select your PIN. For more information on PINS check the FAQ-What is a PIN
- Quick press/Tap action
- Increment or decrement the volume level by one step.
- Press and HOLD
- continuously Increment or decrement the volume level until button has the volume level has reached 0 or maximum level.
- Quick press/Tap action
- Quick press/Tap action
- Toggle between Pause/Play if you are playing a Music stream such as a Playlist, Tidal, Qobuz, Spotify
- Toggle between Mute/UnMute if you are playing a Radio station, HDMI ARC input or Bluetooth connection
- Press and HOLD
- Go into Standby/Sleep mode
- Quick press/Tap action

|
Add/Remove a Partner speaker setup procedure
(This will change the Series3-301 from MONO to STEREO and use the Series3-302 as the other STEREO channel) : | |
| 1. Connect or remove the Series3-302 speaker as required: | ||
| * Stereo mode:Connect the Series3-302 using an Exakt-link cable to the Series3-302 | ||
| * Single (mono) mode: Disconnect the Series3-302 Exakt-link from the Series3-302 | ||
2. Press and HOLD both buttons
| ||
| 3. This process is complete when the Series3-301 volume indicators are all illuminated for a few seconds and return back to volume level display. |
The On-line setup guide can be found https://www.linn.co.uk/setup
- This is to setup the Wifi connection using the front panel buttons.

|
WPS WIFI Setup procedure: | |
| 1. On your ISP Router, press the WPS button to start the connection process. | ||
| * Check your Router manual on how start WPS pairing. | ||
2. On the Series3-301 , press and HOLD buttons
| ||
| 3. This process is complete when the Series3-301 volume indicators are all illuminated for a few seconds and return back to volume level display. |
- Or
| Alternative Wifi Setup Method via Web Browser: | |
| 1. With the Series3-301 DSM out of Sleep mode | |
| 2. Go to the Wireless settings on your device (e.g. iPad) | |
| 3. Find the Series-301 on the list of available networks. It will be called Series3- <serial number> | |
| 4. Select this as the wireless network on your device (e.g. iPad) | |
| 5. Now open a web browser on your device and type "https://setup.linn.co.uk" in the address bar | |
| 6. The Series3 Wifi Setup page should now be displayed (if you get a "..cannot find the server” error then you have not selected to Series3 Wifi channel in point 3&4) | |
| 7. Select the Wifi network you want to connect to | |
| 8. Enter the passkey for the Wifi network | |
| 9. Click on 'Set Network' |
Note: To CLEAR/REMOVE any Wifi settings On the Series3-301 , press and HOLD buttons ![]() ,
, ![]() &
& ![]() for 2 seconds and this will forget your Wifi settings.
for 2 seconds and this will forget your Wifi settings.

|
Bluetooth Setup procedure: | |
1. On the Series3-301, press and HOLD buttons
| ||
| 2. On your Bluetooth device, setup this up for pairing and look for Linn Series 3. | ||
| 3. This Bluetooth pairing process is complete when the Series3-301 volume indicators are all illuminated for a few seconds and return back to volume level display. |
The On-line setup guide can be found https://www.linn.co.uk/setup
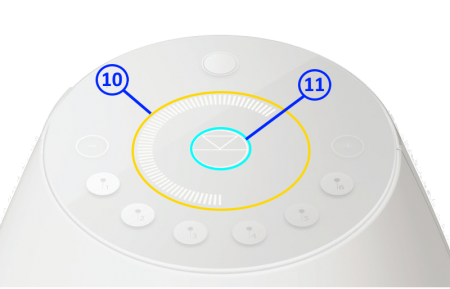
Series3 Touch Interface notifications
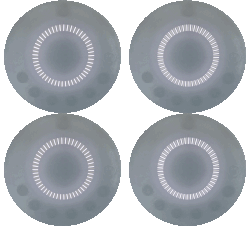
- . Primarily the outer ring is the volume level indicator.
- This also has other indications:

|
⊕ Press any of the Favourite/PIN buttons, the volume indicator will illuminate beside this button to show that it has been selected |

|
Bluetooth scan in progress |

|
WiFi scan in progress |
Normal operation with the Series 3 playing music
Linn symbol has a lower brightness level the Series3 speakers are MUTED
If you do not have a live Wifi/network/LAN connection to the Series 3 then the Linn symbol on the dial will go red.
If you select the HDMI-ARC input or Bluetooth to the Series 3 speaker this red light will go out
- If your network cable is plugged in and your network/LAN is alive then check that you have the network/LAN cable plugged into the LAN socket and NOT the Exakt socket.
Control of the Linn DS/DSM using a PC/MAC/Tablets & Phones
Initial installation
- Linn App
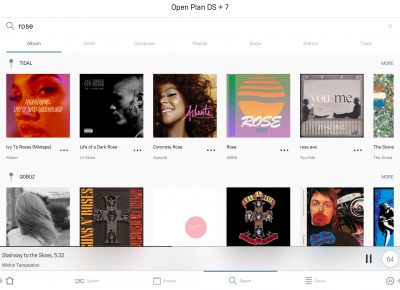
The Linn DS/DSM can be done from many control points at the same time.
- The name of this control App/software is Linn App
or
- Kazoo (Aug 2023 - Ceased all development)
The Linn DS/DSM can be done from many control points at the same time.
Note: from April 2023 : Tidal have removed support for the Linn Kazoo application on ALL platforms. We recommend trying the new Linn app (available on iOS and Android)
- The name of this control App/software is KAZOO..
- Kazoo control App/software is available for
-
| Windows Kazoo download - from April 2023 : Tidal have removed support for the Linn Kazoo application on ALL platforms. We recommend trying the new Linn app (available on iOS and Android)
-
- Kazoo control App/software is available for
MAC OSX Kazoo download- from April 2023 : Tidal have removed support for the Linn Kazoo application on ALL platforms. We recommend trying the new Linn app (available on iOS and Android)
 Android Kazoo for Android Phone/Tablet download
- from April 2023 : Tidal have removed support for the Linn Kazoo application on ALL platforms. We recommend trying the new Linn app (available on iOS and Android)
Using the Linn DS/DSM control software
- For full operation of Kustom DSM you will need to use Linn App and/or Kazoo 4.13.64 >
As you can see from the above section there are multiple software/Apps for different control devices. Although Kazoo has the same style of control in each device, there are minor differences depending on what your control device is. This is why we have different Manuals.
These manuals should only be used as a basic guide for what the buttons can do. We would recommend just using the App/Software and only using the guide if you are having difficulty or want to see what more features are available.
These guides may show some features that are not available, or not have not be configured to work in your system. If you required more information then please contact your Retailer or Linn Support Site
- iPad / iPhone / Android Linn App
- Windows Kazoo
- from April 2023 : Tidal have removed support for the Linn Kazoo application on ALL platforms. We recommend trying the new Linn app (available on iOS and Android)
- Windows7
- Windows 8 / 10 / 11
- MAC/MACBook Kazoo
- from April 2023 : Tidal have removed support for the Linn Kazoo application on ALL platforms. We recommend trying the new Linn app (available on iOS and Android)
- up to Yosemite (OSX 10.10)]
- El Capitan (10.11 >)
- Kazoo User Guide for iMac El Capitan (10.11 >) onwards.. (including OSX Catalina 10.15)
- iPad/iPhone Kazoo
- from April 2023 : Tidal have removed support for the Linn Kazoo application on ALL platforms. We recommend trying the new Linn app (available on iOS and Android)
- Android Kazoo
- from April 2023 : Tidal have removed support for the Linn Kazoo application on ALL platforms. We recommend trying the new Linn app (available on iOS and Android)
FEATURES
Wifi
 Wifi Specification
Supports IEEE 802.11a/b/g/n/ac PSK/CCMP 1-CH
[ 2.4G (b/g) & 5G (n) Standards]
Single or Stereo operation
- The Series3-301 can be configured for Single playback. (This is when left and right hand channel audio is mixed together to give one speaker)
- Or connect a Series3-302 partner speaker for Stereo playback. (One speaker for Left hand channel and one speaker for Right hand channel)
- The Series3-302 partner speaker requires its own mains power cable and a CAT-5 Exakt-link cable to hook up to the Series3-301
Example:
Configure for use with Series3-302 partner speaker

|
Add/Remove a Partner speaker setup procedure
(This will change the Series3-301 from MONO to STEREO and use the Series3-302 as the other STEREO channel) : | |
| 1. Connect or remove the Series3-302 speaker as required: | ||
| * Stereo mode:Connect the Series3-302 using an Exakt-link cable to the Series3-302 | ||
| * Single (mono) mode: Disconnect the Series3-302 Exakt-link from the Series3-302 | ||
2. Press and HOLD both buttons
| ||
| 3. This process is complete when the Series3-301 volume indicators are all illuminated for a few seconds and return back to volume level display. |
The On-line setup guide can be found https://www.linn.co.uk/setup
- Check Setup > Wiring for more example
Exakt
![]()
Exakt technology has enabled Linn to completely revolutionise the design and manufacture of music systems. Extending the lossless digital signal path further than ever before, Exakt eliminates sources of noise and distortion that exist in the traditional analogue hi-fi chain.
Exakt turns the loudspeaker into an intelligent, connected, software-upgradeable product. This enables a wide range of performance- and personalisation-enhancing capabilities, guaranteeing a performance that eliminates distortion, corrects for variation and is personalised for your home.
Exakt-links connects the Linn DS/DSM to the Exakt speaker/Tunbox via a single CAT5 cable. This single cable will transport 8 channels of audio and sync information to ensure that all channel playback is in perfect timing.
- www.Linn.co.uk - Exakt
- Klimax Exakt System
- Akurate Exakt System
- Akurate ExaktBox connections
- Klimax ExaktBox connections
- Exakt link connections/cables
- Exakt Optimisation
Streaming Services
Bluetooth Audio
Bluetooth Specification
Reception of Bluetooth Audio:
Series 3, Selekt DSM, Majik DSM (2020 variant) & Klimax DSM (2020 variant) implements Bluetooth v4.2
- Audio is transferred using SBC encoding
- This is not natively compatible with Googlecast.
 Bluetooth Specification
Reception of Bluetooth Audio:
Series 3, Selekt DSM, Majik DSM (2020 variant) & Klimax DSM (2020 variant) implements Bluetooth v4.2
- Audio is transferred using SBC encoding
- This is not natively compatible with Googlecast.
This is a recent update and available on the Series3-301, Selekt DSM (running Davaar 75+ firmware) and Klimax DSM/3 (2020 Variant), Majik DSM (2020 variant) products
Initial Bluetooth pairing

|
Bluetooth Setup procedure: | |
1. On the Series3-301, press and HOLD buttons
| ||
| 2. On your Bluetooth device, setup this up for pairing and look for Linn Series 3. | ||
| 3. This Bluetooth pairing process is complete when the Series3-301 volume indicators are all illuminated for a few seconds and return back to volume level display. |
The On-line setup guide can be found https://www.linn.co.uk/setup
- Questions
- Does Bluetooth degrade the sound quality?
- The quality of the Bluetooth source will vary depending on the connection quality between the Bluetooth sender and Linn product.
Tidal
- Tidal is supported in countries listed HERE on the Tidal website
Qobuz
- Qobuz Streaming CD or Hi-Res quality music
- Check for Qobuz FAQ's with LInn DS/DSM
Calm Radio
- Calm Radio "Music that helps you get through the day "
Spotify Connect
- Spotify Connect can now be used on Linn products using firmware Davaar59 (Aug 2017) or later firmware. (That is, if your Linn DS/DSM has had a software update after Aug 2017 then you can use Spotify connect)
- This allows you to select and play your Spotify music on your Linn DS/DSM players and use the internal volume control on the Linn DS/DSM.
- To connect your Spotify account to the Linn DS/DSM:
- On your control device, iPad/Android/PC/MAC etc, connect to the same computer network as your Linn DS/DSM
- Start your Spotify app, (if it is already open then close the App, wait a few seconds, and open the App)
- Now check the Spotify Speakers icon to find your Linn DS. (In some cases you may have to power cycle your Linn DS/DSM before this is seen)
- Select your Linn product, and you can now play to the Linn DS/DSM from the Spotify account and control the Linn DS/DSM volume.
This is web controlled and if your Linn DS/DSM has already been paired with your Spotify account you will be able to control even if you are not on the same ethernet network.(So be careful that if you accidentally select the Linn DS/DSM as a Spotify speaker and put the volume up high, and you are not at home)
- Check FAQ Spotify Connect for more information.
Roon
|
- Change Roon Protocol to Roon Ready in Manage Systems > Music tab.

- This will also allow you to decide, if the Linn DS/DSM supports has the DACs to support DSD playback, which products decode the DSD. Either Roon decoding or Linn DS/DSM direct playback.
All Linn DS/DSM ARE ROON CERTIFIED devices
The Linn DS/DSM requires Davaar63 (May 2018) or later firmware to work with Roon V1.5 and above.(That is, if your Linn DS/DS/HUB has had a software update after May 2018 then you can use Roon)
This allows full hi-res audio, (192k/24bit) playback controlled by the Roon system
Roon Tested Setup
On Linn DS proxy setups, Linn DS with Linn Kontrol preamplifier connected with RS232, the Roon volume control will not control the Linn Kontrol volume.
A Roon Core is required in your network system to allow Roon to control your Linn DS/DSM.
ENABLE the Linn DS/DSM player in the Roon - Settings - Audio - NETWORKED section.
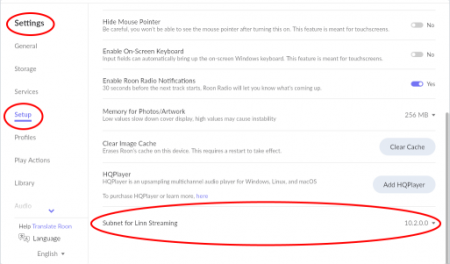
In the Settings > Setup make sure that the Subnet of Linn Streaming is the same as the network that the Linn DS is on. Otherwise, they will not show in the Audio
Control
Primary control is through Roon.
:Transport IR is disabled on the Linn DS/DSM when the Roon input is selected from Linn DS firmware release Davaar80 (Nov 2020)
Issues
Roon uses the Linn DS/DSM as a media player, the control interface IS Roon.
- • I cannot see any Linn DS in the Audio list...
-
- If you cannot see any Linn DS product in the Audio list then check that with the setup the correct Linn Streaming subnet (network address range).
- E.g. if your Linn DS has IP address 192.168.1.34 then its subnet is 192.168.1.0
- • I am only getting Airplay quality audio from the Linn DS using Roon
-
- In Roon: Settings - Audio setup page, you will have devices listed with "via Linn Streaming" and devices listed with "via Airplay".
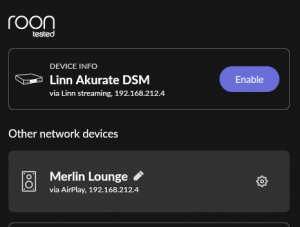
- Pressing this ENABLE button on "via Linn Streaming" will bring this Linn DS player alive.
- When you press ENABLE, this will then allow you to rename this Linn DS, otherwise it will be its default name. E.g. below the "Linn Akurate DSM" - "via Linn Streaming" has been enabled and I have renamed it "Merlin Lounge".
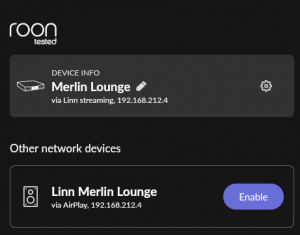
- The Linn DS/DSM products have to be declared as "Roon Tested", networked devices in the Roon Core settings. (The "AIRPLAY" option for the Linn DS/DSM must be disabled within the Roon Core).
- Click on the Roon Ready - Enable and give a name to the Linn DS/DSM. (In the example below, this has been named Merlin Lounge)
- The Linn DS/DSM products have to be declared as "Roon Tested", networked devices in the Roon Core settings. (The "AIRPLAY" option for the Linn DS/DSM must be disabled within the Roon Core).
- • I press STOP and the Roon starts playing again...
-
- Transport (play / pause / stop) and Volume can be controlled using Kazoo or Ir handset. Although later versions of Roon will counteract these commands. Only use the Roon controller software to control what is playing.
- Linn DS Firmware Davaar80 onwards will disable transport controls whilst on the Roon input of the Linn DS/DSM
- • If I select an external source whilst playing Roon, I need to reselect the source to get it playing.
-
- This can be due to a confusion, as the Roon will send a stop command to the Linn DSM as you exit the Roon source. However, as the Linn DSM will probably have changed to this new source, then this new source is stopped by Roon. On external sources, this can only be recovered by selecting another source and going back to the originally selected source.
- The solution is to Stop or Pause the Roon source BEFORE you change to a different input on the Selekt DSM.
- This can also be reduced by going into Konfig or Manage systems and disabling the "AutoPlay" option.
Deezer
- This can now be used on Linn products using firmware Davaar82 (July 2021) or later firmware.
- To create and add Deezer tracks to a Linn DS/DSM playlist you require the Linn App
- This function is NOT available on the Kazoo or Kinsky Apps
- The Deezer is broadcast from the Internet straight to the Linn DS/DSM and you use the Linn App to select and play the Music on the Linn DS/DSM.
AIRPLAY
- AirPlay is a Apple protocol that allows wireless streaming media.
- The Linn DS/DSM/HUB can take the audio stream via the "Netlink" input.
- AirPlay is a Apple protocol that allows wireless streaming media.
- Check <HERE> for any issues with Airplay
AIRPLAY2
From Linn DS/DSM firmware Davaar 108 (Oct 2024)
- AirPlay2 is an Apple protocol that allows wireless streaming media.
- It is only available Linn DS products with CORE4 , or higher, processors.
- The Linn DSM/HUB can take the audio stream via the "NetAux" input.
- Airplay2 allows you to Group multiple Airplay2 devices (including Linn DS HomePod, Apple TV) to play in sync using iOS, Siri, Homekit, iTunes desktop (Windows & MacOS)....
- From Linn DS/DSM firmware Davaar 108 this will no longer allow you to Songcast an Airplay stream to other Linn DS/DSM products. . (Airplay2 supports mixing and matching with other Airplay2 devices and not required to Songcast).
- It is only available Linn DS products with CORE4 , or higher, processors.
- AirPlay2 is an Apple protocol that allows wireless streaming media.
Products supporting Airplay2 from Davaar 108 (October 2024)
HDMI ARC
- HDMI Audio Return Channel is the audio returned from the same HDMI cable feeding A/V to the television.
- This is only supported on the HDMI-2 board and on the Selekt DSM and on the Series 3.
- This input can ONLY be used with a television. If any other HDMI source is connected to this input, then no audio will occur. (The HDMI ARC communication is different to standard HDMI communications)
- This HDMI ARC input is declared as a separate input on the Linn DSM/HUB control. This can be set to automatically switch to this HDMI-ARC input when you have just switched on your television. More information on how to set this up are in the Konfig manual
- General limitations with ARC are that it doesn't communicate with the playback device, in this case the Linn DSM, what Surround formats that it supports, if any. You need to check within the TV setup that the HDMI-ARC connection will only output in a format/codec that the Linn DSM will support. (2-ch/stereo PCM for a standard Linn DSM/HUB and 5.1ch Surround sound for one with a Linn Surround module).
- This does NOT support DSD audio
General products manuals and information
Top Of Page Index
Controlling the product User Guide
Product setup:Manage Systems user manual
Third Party Software Copyright
FAQ's
Series3
Does the Series 3 have an IR handset?
No, this control is performed by the top plate and via iPhone/iPad, Android, Windows10 and MAC Apps.
If you have the Series 3 connected to a TV then the TV Remote can control the Series 3 volume. For example check HERE
Can I swap left and right hand channels on Series 3 pairs?
- To do this you will need to use either
- Konfig click Exakt and change the Channels. Hit APPLY when complete
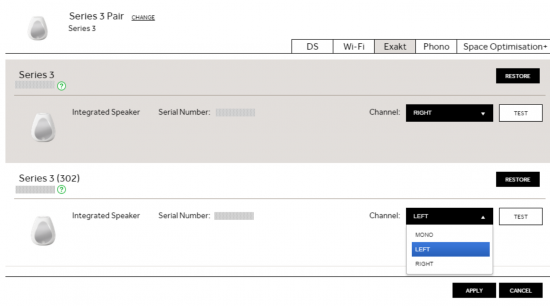
- or
- Manage systems and click the > to adjust the settings for the Series 3-301 and the Series 3-302
- Only adjust these settings when you want to change the channel assignment on you Series3 301 & 302 loudspeakers.
- Otherwise we recommend just using the configurationusing the Series3 top button presses
How do I do a "hard reset"/"Restore to Factory defaults" on the Series 3?
- This can only be performed using the Konfig
- Go into the Konfig ADVANCED tab and RESTORE the Series 3 product
Does the Series3 allow Wireless Stereo?=
- No, the Series3-301 & Series3-302 must be connected using a CAT-5 Exakt-Link cable to get Stereo playback.
Can I use two Series3-301s for Stereo operation?
- No, the Series3-301 is a Linn DSM within a loudspeaker. The Series3-302 is an Exakt loudspeaker.
- The Exakt-link on a Series3-301 is designed to either get audio from an LP12 Urika-II and/or drive Exakt loudspeakers.
Can I use a Series3-301 with an LP12 turntable?
Yes, but this will only work with an Exakt-link. This requires the LP12 to be installed with a Urika-II and Radikal
Check HERE for more information.
Can I use the Series3 speakers in a Surround system?
The Series3-302 is an Exakt loudspeaker. This will connect, via a CAT-5 Exakt-link cable, to a Linn DSM.
ARC - Audio Return Channel information
Common issues for the lack of ARC audio:
- 1. The standard Linn DSM can only playback stereo audio. If the TV is set to output Dolby Digital or other Surround format then the Linn DSM will not play this audio and stay silent.
- > Make sure the audio output is set to "STEREO"'
- > If you are using an built-in service to the TV, such as Netflix, Amazon Prime etc, that you control from the TV handset then try a standard aerial TV channel or an external Satellite receiver and find out if you get any audio back from these TV sources.
- 2. The TV audio setup may be conflicting with itself.
- > If possible do an "AV RESET" or equivalent on your TV, then setup for Audio format - Stereo and CEC-enabled (CEC can go by different names AnyNet+, Veiralink, SimpLink, Sony Bravia Sync,RIHD, Kuro Link..... etc. Check what your TV call it)
- > In the worst case the simplest solution is to do a FACTORY DEFAULT/RESET on the TV. There may be a conflicting hidden setting that is causing all these issues, a Factory default will clear this and allow a fresh connection.
- > If possible do an "AV RESET" or equivalent on your TV, then setup for Audio format - Stereo and CEC-enabled (CEC can go by different names AnyNet+, Veiralink, SimpLink, Sony Bravia Sync,RIHD, Kuro Link..... etc. Check what your TV call it)
- 3. You are connected to the wrong socket on your TV.
- > Check the Linn DSM HDMI output is connected to the TV socket that states "ARC"
- > Check the Linn DSM HDMI output is connected to the TV socket that states "ARC"
- 4. Sony TV's and SKY-Q: It has been reported that this configuration can cause lack of ARC audio. When it does work,sometimes there is a crack/bang noise from the speaker when the system is put to Sleep/Standby.
- > The solution is to disable HDMI control on the SKY-Q box and power cycle all of the products. (This is primarily an issue between Sky-Q and Sony Tv's communications)
- 5 Playstation5 (PS5): This can confuse the TV and what it is controlling the volume of, (the Linn DSM or PS5).
- > The solution is In the PS5 setting go into HDMI > Enable HDMI Device Link > Off .
Common issues for the lack of ARC audio periodically muting:
- 1. Due to the introduction of eARC, some TV have this implements in different ways. The solution is:
- > if your Linn DSM has the "eARC Mode" option in then turn this OFF
- > If your TV has the option to disable the eARC functionality, then also turn this OFF
General Linn DS/DSM/HUB Wifi 
The Wifi module used with the Linn DS/DSM/HUB supports IEEE 802.11a/b/g/n/ac PSK/CCMP 1-CH
this supports both 2.4G & 5G communications.
Wifi History
2.4G
- This was the first Wifi defined in 1997, 802.11b, generally used with 11, or 13 channels depending on your country. Each channel could each supply a data rate of 11MBit/s .
- This data rate was then expanded to 54MBit/s in 2003, with the 802.11g. However, this still used 2.4G and instead of using 1channel to communicate it now uses 3-channels to communicate.This reduced your number of usable channels as other device communicating on a channel next door would now encroach into your channel(s).
- This means that 2.4G band can have a lot of noise and interference. Coupled with fact that this same frequncy is used by DECT phones, Microwave ovens, Baby mointors, Taxi Radio, Bluetooth.... These can inject a lot if noise and interfere with Wifi streaming link to the Linn DS/DSM/HUB as it may force the LInn product off the Wifi network and it will have to retry the connection, this takes time and may cause your Linn product to keeping muting the Music
5G
- A newer standard, 802.11n, allows usage of both 2.4G and 5G to give an even bigger data rate of up to 600Mbit/s.
- As standards improve the 802.11ac that the Linn DSM/Series3 supports is a data rato of up to 1,300MBit/s.
- 5GHz is a much cleaner radio space with a lot less interence compare with 2.4G. The only negative is a slightly reduced range.
- Some Wireless-Access-Points, WAPs and Router allow you to setup a seperate SSID, (Service Set IDintifier. this is name for a Wi-Fi network.)
Advice on use
We recommend that you configure your Wifi network to have seperate SSID for 2.4G and a different SSID for 5G wifi. Then configure the Linn DSM/Series-3 to only use the 5G network.
This will then allow the music stream to work on a cleaner transport/Wifi and stop any device from interfering with the music that you are listening to.
- There are Apps available to show you what is on your Wifi and your network
Disable Wifi
To totally disable the Wifi, go into the Konfig:About tab and disable the Wi-Fi option.
- NOTE: In the Konfig:WIFI tab, setting to NONE will only disconnect it from any Wifi network. The DSM will still broadcast its presence on the Wifi network.
Wired LAN connections
If you have connected a LAN cable to your Linn DS/DSM/HUB/SERIES3 then this take priority over the Wifi connection. This means that the Wifi connection is still on but ignored when a there is a live connection on the products LAN socket. When the LAN connection is removed then the connection returns to Wifi.
Common FAQ's
How do I Update, or recover, the software on a Linn DS/DSM
This procedure is not difficult. The first step is finding out which software/firmware you are using to minimise the steps required.
- From Software version Davaar 104, Konfig has retired from providing software update AFTER this software/Davaar version.
KONFIG will ONLY update to Davaar 104.
- If you have updated the Linn DS/DSM using Linn App this will be the latest Davaar version. Ignore this Konfig update.
- When you open Konfig this will only show the update as Davaar 104. This may be an earlier version of Davaar than currently installed on your Linn DS/DSM, (probably by Linn App). We recommend that you double check the current Davaar version installed on your Linn DS/DSM before updating using Konfig
- To check what version of Software you are running on your Linn DSM, you can either:
- 1. Use the IR Handset
- On older products: early Majik, Akurate, early Klimax and Kiko:
- * If this action states, "Your Software is up-to-date" or "Software update available...." then you are running Davaar99 or higher.
- * If there is an update available, you will be able to authorise the Linn DS/DSM by pressing the the joystick UP then joystick RIGHT buttons.
- * If this states anything else, then you are on Davaar 97 or lower
- On older products: early Majik, Akurate, early Klimax and Kiko:
- 1. Use the IR Handset
- On newer products: New Majik, Any Selekt DSM & new Klimax DSM:
- This will show "Device" on the front panel display. Hit the RIGHT cursor button and this will show you the product information including the software version. (Check point 2, below, on how to decode this version.)
- If there is an update available, you will be able to perform this update by following the instructions on the Linn DS/DSM screen.
- On newer products: New Majik, Any Selekt DSM & new Klimax DSM:
- 2: Use Konfig and select your Linn DS/DSM. The Software version is structured as a Software family(4=Davaar) :
- Major Release version, (this is the key number to use) : Minor version of software (Ignore this just now)
4:99.491 relates to 4=Davaar, 99=Major software version, 491=Minor version. Therefore, is Davaar-99
- Note: Konfig can still be used for these actions, it must still be used as a stepping stone to the latest Linn DS/DSM software.
- 2: Use Konfig and select your Linn DS/DSM. The Software version is structured as a Software family(4=Davaar) :
- 3. Open Manage Systems and the Firmware is listed on the product configuration page (top right). The Firmware version is decoded in the same manner as the Konfig setup.
Up to Davaar 97
To update, using Konfig and your current Linn DS/DSM firm is Davaar 97 or lower
1.Start Konfig (after ensuring you have latest version)
- a) Go into KONFIG Settings and check that Konfig is set to the same network as your Linn DS/DSM.
2. Click on the UPDATES tab. If there is a software update for your Linn DS/DSM it will be listed after clicking UPDATES. If there is no firmware update available for the Linn DS/DSM then it will not be listed under this tab.
- Note: on the Selekt DSM & new Majik DSM they will need to be power cycled and wait appox 30minutes before checking the Konfig UPDATES tab

3.Select the UPDATE button against the Linn DS/DSM you want to update.
- a) A message will appear on the Konfig screen stating the major changes that this software update may incur. (This will be dependant on your present version of software loaded into the Linn DS/DSM)
- b) If you want to continue with this update then scroll down to the bottom of the message and select UPDATE.
- c) For your Privacy we ask if you agree to collecting Anonymous data on usage of the Linn DS. This will aid any fault reporting and also any activity to help Linn enhance the software and product operation.
- d) Select I AGREE or more options to change what information Linn Products Ltd can receive.
4. Konfig will download the firmware update and proceed to updating the selected Linn DS/DSM player.
5.Once complete you will see an Update Completed Successfully message and your DS player will be re-started
6. Update complete
If you encounter any problems, please contact your Linn Specialist or Contact Linn.
From Davaar 99 onwards
To UPDATE, using Linn App, and your current Linn DS/DSM is Davaar 99 or higher
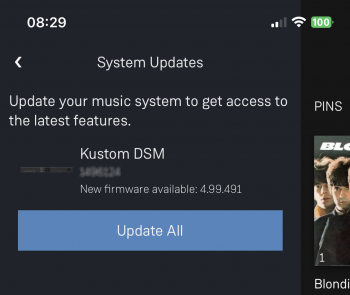
Linn Ds/DSM software updates using Linn App
|
To RECOVER, using Linn App, and your current Linn DS/DSM is Davaar 99 or higher
This is only valid for Linn DS/DSM that have already been loaded with Davaar 99, or higher, firmware (from approx April 2023). Otherwise, use the Konfig procedure.
- If, for any reason, the update process has failed, (for example, you have left this UPDATE running for 2 hours and the Linn DS appears to be stuck), we would suggest doing the following:
- 1. Power OFF the Linn DS/DSM
- 2. Power ON the Linn DS/DSM and press the FALLBACK recessed button on the back of the Linn DS/DSM.
- (This sometime has the FB label beside a recessed button near the Linn DS/DSM Ethernet socket.)
- This should bring a lightening flash symbol on the Linn DS/DSM display.
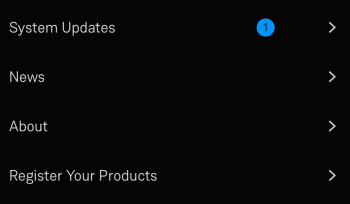
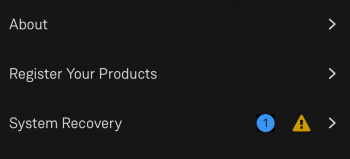
- 3 Now open Linn App, click on the
 icon, and you should now see the System Recovery option
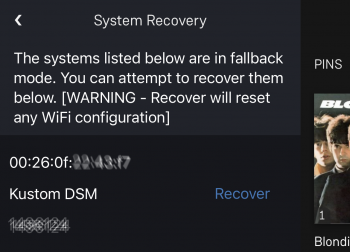
- 4:Press the > and this will open the product list of products awaiting a RECOVERY.
- if no product is listed, then either the Linn App is on the wrong network or the Linn DS/DSM is NOT running Davaar99 or higher firmware. Use Konfig software to recover this Linn DS/DSM.
- 5: Press the RECOVER button to start the recovery process of this Linn DS/DSM
- The button should now state "Recovering" and this may take several minutes to complete.
- 6.After a few minutes go back to the HOME page, (ignore the recovering button message as this may not have refreshed itself)
- Your Linn DS/DSM has been recovered and reset back to factory default setting. I.e. It will be called "Main Room"
- Note: Kustom DSM's will not show as a room(s), but are available to be added to your Linn Account in the next step...
- 7. Within the Linn App, go into the Settings
- a) Click on the Linn Account.
- b) click on the Add/Remove products.
- c) Scroll down the list of products and search for "Main Room" or Kustom DSM. Double check that the serial number listed matches your Linn DS/DSM serial number and hit the + to add it to your Linn account.
- 8. Proceed to Manage_Systems to rename and set up your Linn DS/DSM
To update, using an IR handset, and your current Linn DS/DSM is Davaar 99 or higher
- Use the IR Handset
- On older products, early Majik, Akurate, early Klimax and Kiko,
- On the REM 022 use the SHUFFLE key, Press and HOLD this key for 2 seconds
- On the REM 020 use the # key, Press and HOLD for 2 seconds,
- With older products, early Majik, Akurate, early Klimax and Kiko, If there is a software update it will tell you to press the IR handset UP arrow followed by the RIGHT arrow. The update will now start.
- On newer products: New Majik, Any Selekt DSM & new Klimax DSM:
- On the IR Handset, or Dial, press the UP joystick key. This will open the setup menu
- On the IR Handser, or Dial, press the DOWN joystick key a few times and press the RIGHT joystick key. If there are any software updates on this page it will then give you instructions on how to update the product.
- On older products, early Majik, Akurate, early Klimax and Kiko,
Music formats
What audio formats do the DS players support?
- DS products support
- FLAC Up to 192k 24bit
- WAV
- AIFF
- AIFC
- MP3
- AAC
- WMA (lossy)
- OGG VORBIS
- OGG FLAC
- ALAC (Apple Lossless) upto 192K 24bit (If these ALAC files were generated by an early version of dBpowerAmp the Linn DS will not recognise these. Transcode these files to ALAC using the latest version of dBPowerAmp to fix this.)
- DSD - limited to some products in a certain configuration. Check DSD Support for more informaiton
- Linn recommends FLAC.
- DRM protected files cannot be played on the DS products
Why does Linn recommend FLAC?
- FLAC is a free open format. It is non-proprietary, which means your music collection is safeguarded for the future, can be played through any open digital music player, and is not tied to a particular manufacturer or product. The specification is published for all to see. In contrast, SACD has failed to achieve significant success because it requires proprietary music content and disc players with proprietary hardware inside.
- FLAC allows even better than CD quality encoding and decoding. Linn Records provides studio master quality downloads in FLAC, at the same quality as SACD.
- FLAC supports metadata, or tags, so that useful information about a piece of music can be stored with the music; for example, album, artist, genre, cover art, sleeve notes, etc. User interfaces can make good use of these tags. Two examples of applications that support tag editing are: Mp3tag (Windows) and Tag (Mac)
- Because it is open and free, there are an extensive set of players, tools, transcoders (to convert between other formats and FLAC), tag editors, and other programs for FLAC.
Can the Linn DS/DSM play DSD music?
Products that will play stereo DSD audio:
- Linn DS/DSM players with Katalyst DACs, running firmware from Davaar 60, can play stereo DSD audio files.
- All ORGANIK DACs within the Linn DSM can play DSD audio files.
- Klimax DSM (2020 variant)
- Selekt DSM with Organik, Katalyst or Standard DACs
- > Only supported on SLOT #1 of the Selekt DSM. Selekt DSM slots 2 & 3 will not play DSD audio.
- Linn DS/DSM players with Katalyst DACs, running firmware from Davaar 60, can play stereo DSD audio files.
- Some important points on DSD playback on the Linn DS/DSM:
- DSD audio is ONLY available on the analogue outputs
- DSD audio is NOT supported on:
- DSD audio is ONLY available on the analogue outputs
- Exakt-link to Exakt speakers or Exaktbox. That is, DSD files will NOT play on Exakt speakers or Exaktboxes.
- Digital outputs. (TOSLINK, SPDIF)
- Songcast to other Linn DS/DSM players
- Exakt-link to Exakt speakers or Exaktbox. That is, DSD files will NOT play on Exakt speakers or Exaktboxes.
- Supports DSD64 (2.8224MHz) and DSD128 (5.6448MHz) sample rates.
- DSD256 is only supported on Klimax DSM (2020 variant) and Selekt Edition.
- These in the following formats:
- DSF - Sony format that supports ID3 tags
- DFF - old Philips mastering format (aka DSDIFF)
- DSF - Sony format that supports ID3 tags
- Supports DSD64 (2.8224MHz) and DSD128 (5.6448MHz) sample rates.
- DSD is NOT supported on external inputs such as HDMI, Toslink or USB
- No digital signal processing is possible.
- This means:
- No balance control is possible to DSD audio file playback.
- No Space Optimisation is applied to DSD audio file playback
- Maximum volume is restricted to 80 (unity gain) on DSD audio file playback. However if you have raised to volume to a higher level e.g. 90, this higher volume is applied to any tracks that are NOT DSD audio files.
- No balance control is possible to DSD audio file playback.
- No digital signal processing is possible.
- Linn DS/DSM volume control MUST be enabled
- If the DSM volume control is disabled you will hear "click"s on the loudspeaker when Play/Pause buttons are pressed or a change in bit-rate on change in tracks
- Linn DS/DSM volume control MUST be enabled
- Linn Kazoo Server supports the index and serving of DSD files. Non-indexed DFF files that have no metadata can be browsed by file name using the Kazoo Server Removable drives option.
- Asset UPnP server and Minimserver support DSD index and serving to the Linn DS/DSM.
Can I change the audio quality of the Tunein Radio
- NO, the Linn DS/DSM.HUB only plays the Radio stream provided by Tunein.
I can no longer get Linn radio stream, Linn Jazz, Linn Classical, Linn Radio, station
- From June 2022 TuneIn have removed these Linn Radio streams from their supported list.
- These stations are now available using the
 radio. click <HERE> for more information on how to change your LInn DS/DSM radio to
Does the Linn DS/DSM players play BBC Radio via TuneIn?
- Yes, the Linn DS/DSM/HUB will continue to use TuneIn to access and play the BBC radio stations.
- From the 30th September 2019 BBC radio made changes to what can access their Radio stations via TuneIn. This is mainly for devices that can support using the BBC Sounds App. The Linn DS products do not support the Sounds App can will continue to have BBC Radio playback rights using Tunein.
- Check the BBC Sounds >HELP< section for more information.
How do I add BBC Radio stations to my Presets?
- Select the TuneIn button in Kazoo /Linn App and find the BBC, or any other Radio station you wish to add in selection tree
- Press the three dots on the right hand side of the station and enable/disable the Favourite, (TuneIn > Favourite in Linn App).
- Complete
I cannot get any foreign Radio stations, I can only get UK stations
- Due to a legal case between TuneIn and Sony Music, Warner Music. on licences. UK radio stations have licences for UK wecasting. However, non-UK based radio stations were not licensed to webcast music within the UK,
- This is a TuneIn issue we are waiting for them to resolve. The alternative is to configure the Linn DS/DSM with airable internet radio
Does the Linn DS/DSM players play MQA?
- No, check this link "MQA is bad for Music" for more information
Can the DS player play multi-channel files?
- No, the Klimax DS, Akurate DS, Majik DS, Majik DSI, Sneaky Music DS, Sekrit DS, Sneaky DSM, Sekrit DSM and Sekrit DSi are stereo audio only.
- Klimax DSM, Selekt DSM, Akurate DSM & Majik DSM can play multi-channel audio from their HDMI inputs if they are using Davaar55 or later software.
Upgrading software
How do I upload new software into the Linn DS/DSM
- First of all you need a PC or MAC and install the KONFIG app.
- After you have installed KONFIG go to the ADVANCED tab. If your Linn DS/DSM requires an update it will be listed here.
- If an update is available for that Linn DS/DSM then press the UPDATE' button
More detailed instructions are listed HERE
Physical Input/Outputs
How do I add Music to play on Linn DS
- If your Music is on a CD then this must be RIPPED from the CD first.
- This can be using a PC or MAC with CD-ROM drive or from a Network attached Storage device/NAS with inbuilt ripper.
- If you are using a PC or MAC you can use software listed HERE
- The "Ripped" Music can be held on the PC/MAC of on a Network attached Storage device/NAS. The NAS is the better option as this is a low power device that can be left on all of the time.
- The PC/MAC/NAS requires UPnP Media Server software to share the Music for the Linn DS/DSM to play.
Will downloaded music play on the DS players?
- Yes, so long as it is not protected by Digital Rights Managemant (DRM) restrictions and is in one of the supported formats, or transcoded to such a format.
Can I Airplay from my Android device?
- The newer products with Bluetooth allow Android devices to play on a Bluetooth device, that is, the Linn DSM.
- Otherwise without ROOTING, the android device there is no way to stream to the Linn DS (Airplay AOA Service).
- All other apps take the media file and stream it via UPnP.
- Streaming local files can be done use Skifta and “Double Twist Player”
After Updating to Davaar55 I can only get audio from my Exakt outputs and not the Analogue Out
- Check Konfig > Device > "Dual Analogue/Exakt Stereo Output" has been enabled.
- If you have declared your Exakt speakers as 'Front Left'/'Front Right' and the analogue outputs to be 'Front Left'/'Front Right' (Stereo). ensure that this option in Konfig is enabled. The audio in the Exakt outputs will be out of sync by approx 45mS compared to the analogue outputs.
Are the Digital outputs (Toslink/SPDIF) volume controlled?
- This depends on the Digital Output mode. On some products, the SPDIF Input can be changed to an output and configured for Post EQ
- The Digital outputs will always produce the front Left & Right of the audio source that is playing on the Analogue or Exakt outputs.
Can I add digital loudspeakers to the Linn DS/DSM?
- This depends on the Digital Output mode. On some products, the SPDIF Input can be changed to an output and configured for Post EQ
General Q's
Can I stop the kids from playing with the front panel buttons?
- Yes on of the Majik & Akurate DS/DSM/HUB. If you go into Konfig > Display settings you can define "Front Panel buttons" to be OFF. This will stop the front panel buttons from doing anything. You can still control the Linn DS/DSM by IR handset and the Kazoo App.
- (Just remember if you have disabled the front panel buttons and think that the Linn DS/DSM is broken!)
How do I achieve gapless playback for live albums?
- To guarantee gapless playback, you will need to rip your music tracks into a lossless format (i.e. FLAC). You must also ensure that you are using ripping software that does not add gaps between tracks when ripping (i.e. DBPoweramp). Most ripping software will offer the option to turn this feature off.
- Also make that that you have selected the PLAYLIST input and NOT the UPnPAV input
Linn PINS
What is a PIN, check HERE for more detailed information.
PIN FAQs:
- We currently support pinning from Kazoo Server (V4.9.8 onwards) , Tidal, Qobuz, TuneIn, CalmRadio, DS radio presets, and Linn DSM external inputs
- This is only applicable with Linn DS/DSM players with Davaar 64 or higher firmware
- This currently does NOT support Pins to external pre-amplifier inputs, such as Akurate Kontrol, Kisto etc.
- PINs use discrete IR codes and are not used with any other Linn Product control.
- PINS for Radio stations are wrongly created with Kazoo V4.13.21, this has been fixed with next version 4.13.22. If you have created a Radio station PIN and it doesn't work, check you have a later version of Kazoo and re-assign this PIN to the correct radio station.
Deezer on the Linn DS/DSM
- This can now be used on Linn products using firmware Davaar82 (July 2021) or later firmware.
- To create and add Deezer tracks to a Linn DS/DSM playlist you require the Linn App
- This function is NOT available on the Kazoo or Kinsky Apps
- The Deezer is broadcast from the Internet straight to the Linn DS/DSM and you use the Linn App to select and play the Music on the Linn DS/DSM.
Linn Songcast
- Songcast is the method of transport for streaming STEREO audio data between a Songcast sender, (Linn DS/DSM, Songcast App), and Songcast receivers, (other Linn DS/DSM players listening to that sender DS - multiroom operation.)
- The Songcast stream contains the raw unprocessed music stream, the metadata information for the Music playing and timing information.
- The raw music data is the same data as received by the sending Linn DS. This maintains the same music stream is processed by ALL Linn DS players, (sender and receivers).
- As this Songcast music stream is untouched this leaves the receiving Linn DS/DSM to do its own volume control.
- Volume, Space Optimisation and Exakt processing, if used, are all performed as a final process to minimise any digital processing.
- The raw music data is the same data as received by the sending Linn DS. This maintains the same music stream is processed by ALL Linn DS players, (sender and receivers).
- The timing information is used to ensure that the Linn DS/DSM players are in sync with the music sender.
There is a ! on the front panel of my Linn DS/DSM
There is a speaker setup issue on the Linn DS/DSM Surround Sound Rules
The front panel of the DS is showing a flashing dot or lightening flash and I cannot see the Linn DS with Kazoo or Konfig
This is the Linn DS either in "startup" mode or in "Waiting for Software" mode.
- "Startup": The flashing dot is the startup mode trying to connect to you ethernet network. This mode will typically occur when you first apply power to the Linn DS/DSM. This will typically take 30seconds and go into standard use mode.
- "Waiting for Software": The lightening flash is the Linn DS/DSM waiting or getting a software update.
If you have any problems getting the Linn DS on an Ethernet network, (dot continuously flashing), try the following options:- Option1
- Power off the EVERYTHING connected to the Ethernet system, (PC, Printers, DS, Routers/DHCP servers).
- Leave everything powered off for at least 10seconds.
- Switch everything back on.
- Retry the system
You will find that some of the devices in the system get confused and cause system confusion. The power cycling will do a reset of the system and recover most issues.
Option2
- Use fresh Ethernet cables, (replace existing cables).
- If the Linn Ds is more than 3M (10ft) from the DHCP/Server. Move the Linn DS right beside the Router/DHCP server and patch using a short Ethernet cable (1M), the Linn DS to the DHCP server/Router
- Retry the system
Option3
- Build a totally separate system with only a DHCP/Server and Linn DS.
- Retry the system
Some networks only have a limited number of DHCP address’s. if you have already connected some PC’s to this system, your Router/DHCP server can remember these devices, (even though no longer connected) and will not allocated these previously assigned IP addresses to newly connected products. So the case of unplugging one device to free up an IP address for the DS to use will NOT work with most Routers/DHCP servers if there are no free DHCP IP addresses available.
This will give a better idea as to what is causing the problem. (98% of the time, this is due to a local network issue).
If you always get the flashing dot then the lightening flash symbol then the Linn DS/DSM needs to be programmed. Check the Konfig Manual > Updates section or contact your Linn Retailer to get assistance.
FAQ's on ALL products link
Click HERE for FAQ on ALL products
Troubleshooting
Top Of Page Index
For information on: troubleshooting, Surround options, "Ripping" Cd's , Exakt system then this next section will provide the information that you need:
Technical Specifications
| Linn Series 3 | ||
| Series 3 - 301 | Series 3 partner - 302 | |
| Overview | Wireless integrated Linn DSM player, On board amps, Exakt digital crossover | On board amps, Exakt digital crossover |
| Dimensions | (H) 296 mm x (W) 250 mm x (D) 206mm (H) 11.65 inches x (W) 9.84 inches x (D) 8.1 inches | |
| Weight | 6.9 kg / 15.2 lb | |
| Mains supply voltage | (auto ranging)
| |
| Power consumption Sleep | 11W | n/a |
| Power consumption | 95W (max) | |
| Accessories | Bolt on white Series3 Stand | |
| Supported file types | FLAC, WAV, MP3, AAC, AIFF/AIFC, ALAC, OGG/VORBIS, WMA | |
| Resolution | 7.35 k, 8 k, 11.025 k, 12 k, 14.7 k, 16 k, 22.05 k, 24 k,29.4 k, 32 k, 44.1 k, 48 k, 88.2 k, 96 k, 176.4 k, 192 k | |
| Control protocol | Compatible with UPnP™ media servers, UPnP™ AV 1.0 control points | n/a |
| inputs | 1off Exakt-Link (Urika-II) |
|
| 1off Ethernet (100Base-T) | ||
| 1off Wifi | ||
| 1off Bluetooth | ||
| 1off HDMI-ARC | ||
| Sources | LAN Internet radio Tidal Qobuz Calm Radio Spotify Connect NetAux
|
Exakt-link |
| Ethernet | 100Base-T RJ45 | n/a |
| Wifi | IEEE 802.11a/b/g/n/ac PSK/CCMP 1-CH | n/a |
| Bluetooth | Bluetooth v4.2 | n/a |
| Max SPL | 101dB | |
| Cabinet finish | Augmented infiniate baffle | |
| Cabinet volume | 6.5 litres | |
| On-Board Amplifiers | 2 * 100W class D | |
| Speaker type | 2-way Tweeter : 19mm silk dome | |
| Crossover | Exakt linear phase digital | |
| Max SPL | 101 dB continuous | |
| Frequency response | 42 Hz to >22 kHz +/- 3 dB | |
