Difference between revisions of "Klimax DSM /0 (2011 Variant)"
m |
m (→Product info) |
||
| (16 intermediate revisions by the same user not shown) | |||
| Line 1: | Line 1: | ||
{{HIDE_PAGE_TITLE}} | {{HIDE_PAGE_TITLE}} | ||
| − | + | {{:Tab-Dropdown:Klimax DSM variants}} | |
| − | + | {{Title_Text | [[Klimax_Products|KLIMAX]] DSM<br>(Original version)}} | |
| − | |||
[[Image:KlimaDS 3Q 02 low res.jpg|right|435x143px]] | [[Image:KlimaDS 3Q 02 low res.jpg|right|435x143px]] | ||
== '''Product info''' == | == '''Product info''' == | ||
| − | * ''Product Name:'' Klimax DSM (2011 Variant) | + | * ''Product Name:'' [[Klimax_Products|Klimax]] DSM (2011 Variant) |
::Other variants of this product can be found at<u> [[Klimax_DSM_Variants|Klimax DSM Variants]]</u><br> | ::Other variants of this product can be found at<u> [[Klimax_DSM_Variants|Klimax DSM Variants]]</u><br> | ||
| Line 17: | Line 16: | ||
** [http://docs.linn.co.uk/wiki/index.php/Why_Linn_DS_is_the_best_way_to_play_CDs DS Design] | ** [http://docs.linn.co.uk/wiki/index.php/Why_Linn_DS_is_the_best_way_to_play_CDs DS Design] | ||
** [http://docs.linn.co.uk/wiki/index.php/Dynamik Dynamik Power Supply] | ** [http://docs.linn.co.uk/wiki/index.php/Dynamik Dynamik Power Supply] | ||
| − | ** 96k/24bit Analogue to Digital | + | ** 96k/24bit Analogue to Digital conversion for Analogue input |
<br><br><u><b>Hardware Upgrades</b></u><br> | <br><br><u><b>Hardware Upgrades</b></u><br> | ||
| − | HDMI 2.0 Upgrade<br> | + | <!--:[[HDMI#HDMI_2.0|<u>HDMI 2.0</u>]] Upgrade<br>---> |
| − | <br> | + | :[[Organik_DAC|<u>Organik Upgrade</u>]] [[Category:Organik Upgrade]]<br> |
| + | :[[PSU:UTOPIK#UTOPIK_POWER_SUPPLY_UPGRADE|<u>UTOPIK Power Supply upgrade</u>]]: Improved power supply<br> | ||
''Note: It should be noted that information may at times be out of date and should not be used as a current list of what upgrades are available.'' | ''Note: It should be noted that information may at times be out of date and should not be used as a current list of what upgrades are available.'' | ||
| Line 56: | Line 56: | ||
# {{link:ETHERNET}} | # {{link:ETHERNET}} | ||
# '''SPDIF IN''' - To connect sources with Spdif digital outputs. | # '''SPDIF IN''' - To connect sources with Spdif digital outputs. | ||
| − | # '''BALANCED IN RIGHT, LEFT''' - To connect sources with balanced (XLR) outputs. | + | # '''BALANCED IN RIGHT, LEFT''' <sup>1 2</sup> - To connect sources with balanced (XLR) outputs. |
| − | # '''BALANCED OUT RIGHT, LEFT''' - To connect to a preamplifier (or power amplifier when internal volume control is enabled) with balanced (XLR) analogue inputs | + | # '''BALANCED OUT RIGHT, LEFT''' .<sup>2,3</sup> - To connect to a preamplifier (or power amplifier when internal volume control is enabled) with balanced (XLR) analogue inputs |
| − | # '''UNBALANCED OUT RIGHT, LEFT''' - To connect to a preamplifier (or power amplifier when internal volume control is enabled) with unbalanced (RCA) analogue inputs. | + | # '''UNBALANCED OUT RIGHT, LEFT''' <sup>4</sup> - To connect to a preamplifier (or power amplifier when internal volume control is enabled) with unbalanced (RCA) analogue inputs. |
# '''EARTH GROUND''' - For connecting the unit to an earthing terminal if no mains earth is available or for joining the earths of other products in the system to improve perfromance in areas of poor/noisy electrical earth conditions. | # '''EARTH GROUND''' - For connecting the unit to an earthing terminal if no mains earth is available or for joining the earths of other products in the system to improve perfromance in areas of poor/noisy electrical earth conditions. | ||
# '''HDMI IN 1, 2, 3''' - To connect sources with HDMI outputs. | # '''HDMI IN 1, 2, 3''' - To connect sources with HDMI outputs. | ||
| Line 65: | Line 65: | ||
<BR> | <BR> | ||
'''<sup>1</sup>''' XLR to RCA adaptors are supplied for connecting sources with unbalanced outputs.<br> | '''<sup>1</sup>''' XLR to RCA adaptors are supplied for connecting sources with unbalanced outputs.<br> | ||
| − | '''<sup>2</sup>''' Set to DELAY mode > DIRECT to pass through an Analogue volume control to the Analogue out. | + | '''<sup>2</sup>''' Set to DELAY mode > DIRECT to pass through an Analogue volume control to the Analogue out.<br> |
| + | '''<sup>3</sup>''' Output voltage 4 V RMS (0 dBFS , vol. 80) - Output impedance 300 Ω<br> | ||
| + | '''<sup>4</sup>''' Output voltage 2 V RMS (0 dBFS , vol. 80) - Output impedance 300 Ω<br> | ||
| + | |||
<br> | <br> | ||
| Line 97: | Line 100: | ||
:* [[FAQ-Linn_DS/DSM#Klimax_DS.2FDSM|'''<u>FAQ Klimax DS/DSM</u>''']] | :* [[FAQ-Linn_DS/DSM#Klimax_DS.2FDSM|'''<u>FAQ Klimax DS/DSM</u>''']] | ||
| − | + | ==Technical Specifications== | |
| + | {{:Technical_Specification:Klimax DSM/0|Technical Specifications}} | ||
For further assistance, try our [http://www.linn.co.uk/linn_customer_support customer support] pages | For further assistance, try our [http://www.linn.co.uk/linn_customer_support customer support] pages | ||
[[Category:Linn_DSM]] | [[Category:Linn_DSM]] | ||
| + | [[Category:Family: Klimax]] | ||
| + | [[Category:CORE1]] [[Category:UTOPIK Upgrade]] | ||
Latest revision as of 10:23, 30 October 2025
- Klimax DSM/0 (2011 Variant)
- Klimax DSM/1 (2014 Variant)
- Klimax DSM/2 (2016 Variant)
- Klimax DSM/3 (2020/21 Variant)
KLIMAX EXAKT DSM
Klimax DSM-upgrades
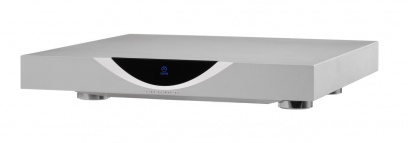
KLIMAX DSM
(Original version)
Contents
Product info
- Product Name: Klimax DSM (2011 Variant)
- Other variants of this product can be found at Klimax DSM Variants
- Other variants of this product can be found at Klimax DSM Variants
- Date of Introduction: October 2011 - May 2014
- Replaced by Klimax DSM/1
- Replaced by Klimax DSM/1
- Type: Integrated digital music player and preamplifier
- Features
- DS Design
- Dynamik Power Supply
- 96k/24bit Analogue to Digital conversion for Analogue input
Hardware Upgrades
- Organik Upgrade
- UTOPIK Power Supply upgrade: Improved power supply
Note: It should be noted that information may at times be out of date and should not be used as a current list of what upgrades are available.
Support
Latest software
Details of latest Product release software
Manuals
Controlling the product User Guide
Product setup:Manage Systems user manual
Third Party Software Copyright
HDMI Setup
Network Setup
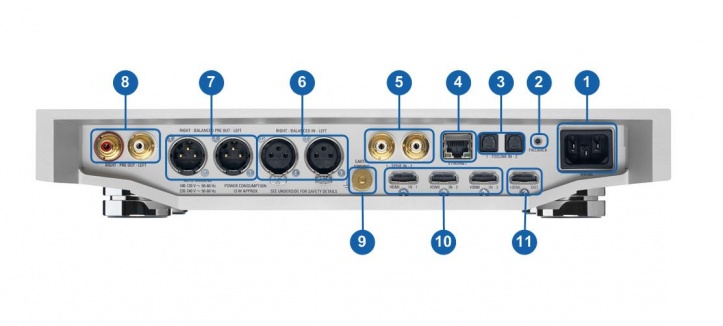
Back Panel Connections
- MAINS INPUT - To connect to the mains electricity supply.
- FALLBACK - To put the device into Fallback mode (used when reprogramming)
- TOSLINK IN- To connect sources with Toslink (optical) digital outputs.
- ETHERNET - To connect to a network (100Base-T)
- SPDIF IN - To connect sources with Spdif digital outputs.
- BALANCED IN RIGHT, LEFT 1 2 - To connect sources with balanced (XLR) outputs.
- BALANCED OUT RIGHT, LEFT .2,3 - To connect to a preamplifier (or power amplifier when internal volume control is enabled) with balanced (XLR) analogue inputs
- UNBALANCED OUT RIGHT, LEFT 4 - To connect to a preamplifier (or power amplifier when internal volume control is enabled) with unbalanced (RCA) analogue inputs.
- EARTH GROUND - For connecting the unit to an earthing terminal if no mains earth is available or for joining the earths of other products in the system to improve perfromance in areas of poor/noisy electrical earth conditions.
- HDMI IN 1, 2, 3 - To connect sources with HDMI outputs.
- HDMI OUT - To connect to a display device with HDMI inputs.
1 XLR to RCA adaptors are supplied for connecting sources with unbalanced outputs.
2 Set to DELAY mode > DIRECT to pass through an Analogue volume control to the Analogue out.
3 Output voltage 4 V RMS (0 dBFS , vol. 80) - Output impedance 300 Ω
4 Output voltage 2 V RMS (0 dBFS , vol. 80) - Output impedance 300 Ω
Front Panel
- DISPLAY
- ON / OFF SWITCH
Installation
Please read the following carefully before installing the unit in your system – your unit may need to be reconfigured by your Linn retailer.
Features
Tidal
- Tidal is supported in countries listed HERE on the Tidal website
Qobuz
- Qobuz Streaming CD or Hi-Res quality music
- Check for Qobuz FAQ's with LInn DS/DSM
Calm Radio
- Calm Radio "Music that helps you get through the day "
Spotify Connect
- Spotify Connect can now be used on Linn products using firmware Davaar59 (Aug 2017) or later firmware. (That is, if your Linn DS/DSM has had a software update after Aug 2017 then you can use Spotify connect)
- This allows you to select and play your Spotify music on your Linn DS/DSM players and use the internal volume control on the Linn DS/DSM.
- To connect your Spotify account to the Linn DS/DSM :
- On your control device, iPad/Android/PC/MAC etc, connect to the same computer network as your Linn DS/DSM
- Start your Spotify app, (if it is already open then close the App, wait a few seconds, and open the App)
- Now check the Spotify Speakers icon to find your Linn DS. (In some cases you may have to power cycle your Linn DS/DSM before this is seen)
- Select your Linn product, and you can now play to the Linn DS/DSM from the Spotify account and control the Linn DS/DSM volume.
This is web controlled and if your Linn DS/DSM has already been paired with your Spotify account you will be able to control even if you are not on the same ethernet network.(So be careful that if you accidentally select the Linn DS/DSM as a Spotify speaker and put the volume up high, and you are not at home)
- Check FAQ Spotify Connect for more information.
|
September 2025:We do intend to support Spotify Lossless:
|
WiiM solution to Spotify Lossless
Currently, a solution for Spotify lossless on the Linn DSM's, you can use a WiiM media streamer .
This setup will play at the quality of your Linn DSM – playback uses the Linn DSM’s audio clock, meaning that jitter from the source device’s clock will be removed.
Note: This will ONLY work with Linn DSM, not a Linn DS.
Plug a TOSLINK optical cable from the WiiM media streamer SPDIF OUT digital output directly into a Linn DSM TOSLINK digital input, and use the superior audio DAC of the Linn DSM. This will give you the full Spotify lossless, and any other WiiM supported streaming services into the Linn DSM.
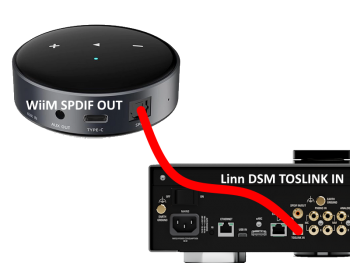
Set up of the WiiM for use with the Linn DSM is easy
- 1. On the WiiM control app, go into Devices, select your WiiM and the select the gear cog on the bottom right, this will bring you into the WiiM setup page.
- 2. In the Sound submenu:
- a).Audio Settings:
- i) We would advise turning "Fixed Volume Output:" ON. This will give the Linn DSM full volume control options
- ii) Optical Output Resolution: set to "Sample rate:" 192kHz & Bit depth: 24bit
- b) .Audio Output:
- i) Change to Optical Out
- a).Audio Settings:
To use the WiiM with the Linn DSM and Spotify:
- 1. Select the TOSLINK input on the Linn DSM
- 2. Open Spotify and Connect to the WiiM *** or the name you have given the WiiM.
- 3. Double check, in your Spotify User profile setting that "Audio Streaming quality" is set to Lossless, Up to 1GB/hr
- 4. Now play Spotify music.
Roon
|
- Change Roon Protocol to Roon Ready in Manage Systems > Music tab.

- This will also allow you to decide, if the Linn DS/DSM has a DAC that supports DSD playback, which products decode the DSD. Either Roon decoding or Linn DS/DSM direct playback.
All Linn DS/DSM ARE ROON CERTIFIED devices
The Linn DS/DSM requires Davaar63 (May 2018) or later firmware to work with Roon V1.5 and above.(That is, if your Linn DS/DS/HUB has had a software update after May 2018 then you can use Roon)
This allows full hi-res audio, (384k/24bit) playback controlled by the Roon system
Roon Tested Setup
- On Linn DS proxy setups, Linn DS with Linn Kontrol preamplifier connected with RS232, the Roon volume control will not control the Linn Kontrol volume.
- A Roon Core is required in your network system to allow Roon to control your Linn DS/DSM.
- ENABLE the Linn DS/DSM player in the Roon - Settings - Audio - NETWORKED section.
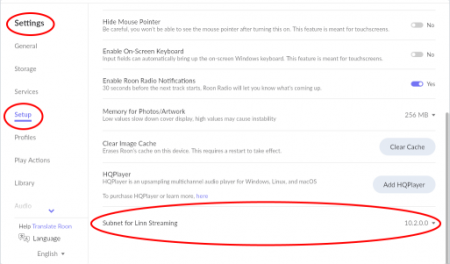
- In the Settings > Setup make sure that the "Subnet of Linn Streaming" is the same as the network that the Linn DS is on. Otherwise, they will not show in the Audio
- On Linn DS proxy setups, Linn DS with Linn Kontrol preamplifier connected with RS232, the Roon volume control will not control the Linn Kontrol volume.
Control
Primary control is through Roon.
Transport IR is disabled on the Linn DS/DSM when the Roon input is selected from Linn DS firmware release Davaar80 (Nov 2020)
Issues
Roon uses the Linn DS/DSM as a media player, the control interface IS Roon.
- • I cannot see any Linn DS in the Audio list...
-
- If you cannot see any Linn DS product in the Audio list then check that with the setup the correct Linn Streaming subnet (network address range).
- E.g. if your Linn DS has IP address 192.168.1.34 then its subnet is 192.168.1.0
- In the Settings > Setup make sure that the "Subnet of Linn Streaming" is the same as the network that the Linn DS is on. Otherwise, they will not show in the Audio tab. You can find the IP address by pressing the * button on the IR handset
- • I am only getting Airplay quality audio from the Linn DS using Roon
-
- In Roon: Settings - Audio setup page, you will have devices listed with "via Linn Streaming" and devices listed with "via Airplay".
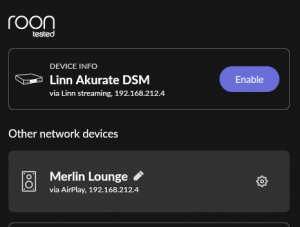
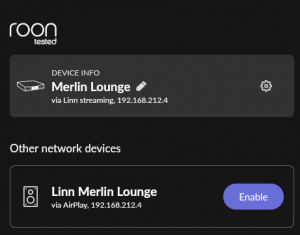
- Pressing this "ENABLE" button on "via Linn Streaming" will bring this Linn DS player alive.
- When you press ENABLE, this will then allow you to rename this Linn DDS; otherwise it will be its default name. E.g. below the "Linn Akurate DSM" - "via Linn Streaming" has been enabled, and I have renamed it "Merlin Lounge".
- The Linn DS/DSM products have to be declared as "Roon Tested", networked devices in the Roon Core settings. (The "AIRPLAY" option for the Linn DS/DSM must be disabled within the Roon Core).
- Click on the Roon Ready - Enable and give a name to the Linn DS/DSM. (In the example below, this has been named Merlin Lounge)
- The Linn DS/DSM products have to be declared as "Roon Tested", networked devices in the Roon Core settings. (The "AIRPLAY" option for the Linn DS/DSM must be disabled within the Roon Core).
- • I press STOP and the Roon starts playing again...
-
- Transport (play / pause / stop) and Volume can be controlled using Kazoo or Ir handset. Although later versions of Roon will counteract these commands. Only use the Roon controller software to control what is playing.
- Linn DS Firmware Davaar80 onwards will disable transport controls whilst on the Roon input of the Linn DS/DSM
- • If I select an external source whilst playing Roon, I need to re-select the source to get it playing.
-
- This can be due to a confusion, as the Roon will send a stop command to the Linn DSM as you exit the Roon source. However, as the Linn DSM will probably have changed to this new source, then this new source is stopped by Roon. On external sources, this can only be recovered by selecting another source and going back to the originally selected source.
- The solution is to Stop or Pause the Roon source BEFORE you change to a different input on the Selekt DSM.
- This can also be reduced by going into Konfig or Manage systems and disabling the "AutoPlay" option.
Deezer
- This can now be used on Linn products using firmware Davaar82 (July 2021) or later firmware.
- To create and add Deezer tracks to a Linn DS/DSM playlist you require the Linn App
- This function is NOT available on the Kazoo or Kinsky Apps, only with Linn App
- The Deezer is broadcast from the Internet straight to the Linn DS/DSM and you use the Linn App to select and play the Music on the Linn DS/DSM.
- From firmware Davaar 110, Jan 2025, Deezer has been updated to the latest driver. Check the Deezer FAQ's for more information and assistance.
- From firmware Davaar 110, Jan 2025, Deezer has been updated to the latest driver. Check the Deezer FAQ's for more information and assistance.
- Check for Deezer FAQ's with Linn DS/DSM
AIRPLAY
- AirPlay is a Apple protocol that allows wireless streaming media.
- The Linn DS/DSM/HUB can take the audio stream via the "Netlink" input.
- AirPlay is a Apple protocol that allows wireless streaming media.
- Check <HERE> for any issues with Airplay
FAQ's
Check:
Technical Specifications
| Overview |
|
| Dimensions |
(H) 90 mm x (W) 350 mm x (D) 355 mm |
| Weight | 8.6 kg / 19 lb |
| Mains supply voltage | (auto ranging)
|
| Power consumption | Sleep 9 W |
| Power continuous | 22W max |
| Supported file types | FLAC, WAV, MP3, AAC, AIFF/AIFC, ALAC, OGG/VORBIS, WMA, DSD (DSF and DFF) |
| Audio sample rates | 7.35 k, 8 k, 11.025 k, 12 k, 14.7 k, 16 k, 22.05 k, 24 k,29.4 k, 32 k, 44.1 k, 48 k, 88.2 k, 96 k, 176.4 k, 192 k |
| Word depths | 16–24 bits |
| Control protocol | Compatible with UPnP™ media servers, UPnP™ AV 1.0 control points |
| Ethernet | 100Base-T RJ45 |
| EXAKT | None |
| Volume Control |
Digital Gain Range -80db to +20dB Digital Gain Resolution 1dB |
| INPUTS |
1off Ethernet |
|
1off XLR Balanced Line Level
| |
2off Toslink
| |
2off SPDIF
| |
3off HDMI
| |
| Sources | LAN Internet radio Tidal Qobuz Calm Radio Spotify Connect NetAux Roon |
| OUTPUTS |
1off RCA Output
|
1off XLR Output
| |
1 x HDMI
|
For further assistance, try our customer support pages
