Difference between revisions of "Konfig Manual"
(→Known Issues) |
m (→Mac) |
||
| (401 intermediate revisions by 8 users not shown) | |||
| Line 1: | Line 1: | ||
| + | <font style="color:red">Konfig is no longer maintained. <big><u>There will be no future releases.</u></big><br> | ||
| + | <b>However, it can still be used but any future updates to the Linn DS/DSM <u>WILL NOT</u> not be available in the Konfig app</b>. Changes in the Exakt system may not be available in this Konfig App.<br> | ||
| + | To continue receiving product and Exakt firmware updates, and to access the improved version of Space Optimisation, you should use Konfig to update to at least up date your Linn DS/DSM to [[ReleaseNotes#Davaar_99_Build_491_.284.99.491.29_Released_on_30_Mar_2023Click_to_view_more..|<u>Davaar99</u>]] and then use [[Manage Systems | <u>Manage_Systems</u>]] option within your Linn Account for configuration and upgrades.</font> | ||
| + | |||
| + | <span style="color:red"><u>'''Konfig will ONLY update your Linn DS/DS to <big>Davaar104</big>. If your Linn DS/DSM has a later version of Davaar firmware Konfig will bring this back to Davaar 104'''</u></span> | ||
| + | __TOC__ | ||
= Introduction = | = Introduction = | ||
| + | <span style="color:red"><u>'''Konfig is primarily for use of Retailers and Installers for setting up and software updates of the Linn DS products. If you have any doubt of the operation of this software please do not use and call you Retailer/installer for assistance.'''</u></span> | ||
| + | |||
Konfig provides advanced configuration of a Linn DS, notification and updating of a Linn DS to the latest firmware, restoring Linn DS settings back to factory defaults and manual updating of a Linn DS firmware. | Konfig provides advanced configuration of a Linn DS, notification and updating of a Linn DS to the latest firmware, restoring Linn DS settings back to factory defaults and manual updating of a Linn DS firmware. | ||
| + | |||
| + | Konfig can also be run from a web-browser with all functions except the software update. Get the IP address of the Linn DS/DSM from the front panel using either the:<br> | ||
| + | :[http://docs.linn.co.uk/wiki/index.php/REM_020 REM 020 Remote control] by pressing and holding the # button <br>or with the <br> | ||
| + | :[http://docs.linn.co.uk/wiki/index.php/DS_%26_REM_019 REM 019 Remote control] by pressing DVD then the INFO buttons. | ||
| + | |||
| + | When you are in DS web page select Control, this will give you the same options (except Software update) as below | ||
| + | |||
| + | ==Konfig release history== | ||
| + | [https://cloud.linn.co.uk/applications/konfig/history.html#/platform/macosx MAC Konfig History]: Shows the history for OSX Konfig<br> | ||
| + | [https://cloud.linn.co.uk/applications/konfig/history.html#/platform/win32 Windows Konfig History]:: Shows the history for Windows Konfig | ||
= Installation = | = Installation = | ||
== System Requirements == | == System Requirements == | ||
=== Windows === | === Windows === | ||
| − | * Windows XP | + | * Windows 10 / 11 ('''NOT Windows XP, Windows 7 or 8''') |
| − | * | + | * IE9 or later |
* 32 or 64-bit hardware | * 32 or 64-bit hardware | ||
| + | * Internet connection when using Exakt Systems | ||
| + | * Minimum screen resolution 1024x768 | ||
=== Mac === | === Mac === | ||
| − | * Mac OS X | + | * Mac OS X Mountain Lion 10.13 High Sierra to 10.16 Monterey |
* 32 or 64-bit hardware | * 32 or 64-bit hardware | ||
| + | * Internet connection when using Exakt Systems | ||
| + | * Minimum screen resolution 1024x768 | ||
== Installing == | == Installing == | ||
=== Windows === | === Windows === | ||
| − | * | + | * [[File:Download_ICON.png|30px|link=//cloud.linn.co.uk/applications/konfig/releases/Davaar/Konfig_4.37.175_win.exe]] Click [//cloud.linn.co.uk/applications/konfig/releases/Davaar/Konfig_4.37.175_win.exe to download] |
| − | * Double click the downloaded .exe file | + | * Double-click the downloaded .exe file |
| − | * Follow the on screen instructions in the installer program | + | * Follow the on-screen instructions in the installer program |
| + | * In the CONFIGURATION tab, click on the <u>CHANGE</u> button and see if your Linn DS is listed. | ||
| + | :If it is not listed, click on the [[image:Konfig_Gear-Icon.jpg|25px]] and check the network settings are the same network as your Linn DS/DSM. | ||
| + | |||
| + | |||
| + | * An earlier version of Konfig can be found [//cloud.linn.co.uk/applications/konfig/releases/Davaar/Konfig_4.37.123_win.exe <u>HERE</u>] | ||
=== Mac === | === Mac === | ||
| − | * | + | * [[File:Download_ICON.png|30px|link=//cloud.linn.co.uk/applications/konfig/releases/Davaar/Konfig_4.37.175_osx.pkg]] Click [//cloud.linn.co.uk/applications/konfig/releases/Davaar/Konfig_4.37.175_osx.pkg to download] |
| − | * Double click the downloaded .pkg file | + | * Double-click the downloaded .pkg file |
| − | * Follow the on screen instructions in the installer program | + | * Follow the on-screen instructions in the installer program. |
| + | * In the CONFIGURATION tab, click on the <u>CHANGE</u> button and see if your Linn DS is listed. | ||
| + | :If it is not listed, click on the [[image:Konfig_Gear-Icon.jpg|25px]] and check the network settings are the same network as your Linn DS/DSM. | ||
| + | |||
| + | |||
| + | * An earlier version of Konfig can be found [//cloud.linn.co.uk/applications/konfig/releases/Davaar/Konfig_4.37.124_osx.pkg<u>HERE</u>] | ||
== Uninstalling == | == Uninstalling == | ||
| Line 36: | Line 68: | ||
== Updating == | == Updating == | ||
| − | Konfig for Mac and Windows will automatically check for new software updates. Checking for available updates can also be performed manually as described below. Alternatively, Konfig can be updated by manually downloading the installation packages from the [http://www.linn.co.uk | + | Konfig for Mac and Windows will automatically check for new software updates. Checking for available updates can also be performed manually as described below. Alternatively, Konfig can be updated by manually downloading the installation packages from the [http://www.linn.co.uk/software#konfig download] page and installing them using the method described in the [[#Installing| Installing]] section above. |
= Operation = | = Operation = | ||
| − | Konfig has | + | Konfig has three main views, [[#Configuration| Configuration]], [[#Updates| Updates]] and [[#Advanced| Advanced]] |
| − | + | == Configuration == | |
| − | + | Click the '''Change''' button to slide a list of available devices in from the left. Selecting a device from the list will show it's configuration page in the right hand pane. | |
[[File:Configuration.png|740px|Configuration Page]] | [[File:Configuration.png|740px|Configuration Page]] | ||
| − | + | === Help for every Setting === | |
| − | + | For dynamic help information on any given setting, click on the question mark icon next to the setting. | |
| + | [[File:ParameterHelp.png|740px|Configuration Page]] | ||
| + | <br><br> | ||
| − | === | + | === Digital Output Mode === |
| − | [[ | + | On products with an SPDIF or TOSLINK output socket, you can define the output sample rate. |
| − | [[ | + | The options available are: |
| + | :'''Raw''', the sample rate of the playback music dictates the output sample rate | ||
| + | :'''Fixed Sample Rate: 88/96kHz''', this will upsample, maintain or downsample the playback to either 88kHz or 96kHz | ||
| + | :'''Fixed Sample Rate: 192kHz''', this will upsample or maintain the playback to 192kHz | ||
| + | :'''Disabled''', this will disable all S/PDIF and Toslink outputs | ||
| + | |||
| + | === Privacy === | ||
| + | ==== Send anonymous usage data to Linn ==== | ||
| + | Select Yes to allow your Linn DS/DSM to send usage data to Linn. This will help us decide where to allocate time for new features or improvements. | ||
| + | |||
| + | '''NOTE: No personal information is sent to Linn as a result of this option being checked.''' | ||
| + | |||
| + | ==== Send Crash Data ==== | ||
| + | Select Yes to allow your Linn DS/DSM to send crash data to Linn in the event of a failure. This will help us in diagnosing and fixing existing issues. This is used by the Linn Helpline and Service department to check and what has caused the Linn DS/DSM to reboot itself. | ||
| + | |||
| + | If you select No this makes it more difficult to help diagnose remotely what has happened to your product. | ||
| + | |||
| + | '''NOTE: No personal information is sent to Linn as a result of this option being checked.''' | ||
| + | |||
| + | === Delay Setup === | ||
| + | {{Info:Songcast_Delay_Mode}} | ||
| + | |||
| + | <br> | ||
| + | |||
| + | === RS232 (proxy) Preamp Connection Setup === | ||
| + | If you have a Linn Pre-amplifier (RS232 controlled) this can be setup to be controlled by the Kazoo control software. | ||
| + | |||
| + | * Connect any Linn DS RS232 port to the Linn Preamp RS232 IN port using a Linn RS232 cable | ||
| + | * Connect the Linn DS audio output to the Linn preamp audio input. See [http://docs.linn.co.uk/wiki/index.php/Systems example system setups] for more information | ||
| + | * Copy the text in the '''Name''' field from the '''Device''' tab | ||
| + | [[file:DsName.png|600px]] | ||
| + | * Select the '''RS232 Connections''' tab | ||
| + | * Select the Linn preamp and the Linn DS com port number it is wired to. | ||
| + | [[file:Rs232Connection.png|600px]] | ||
| + | * Reboot the Linn DS | ||
| + | * Once rebooted, click on the ''Change'' button (upper left of application) and select the Preamp device from the list | ||
| + | * From the source tab, select the Input that the Linn DS is connected to (i.e. Analog 1) and paste the Linn DS name copied before into the '''Name''' field | ||
| + | [[file:ProxyName.png|600px]] | ||
| + | * If setup correctly, your system will be controllable as a single device from a Linn control point | ||
| + | <br> | ||
| + | |||
| + | === Startup Behavior === | ||
| + | A number of different settings can be applied to customise the way your device starts up | ||
| + | * '''Startup Mode''': normally your device will power up in '''Sleep''' (aka standy). Select '''Active''' to skip sleep mode and go straight to playback mode on power up | ||
| + | * '''Auto Play''': normally you must press play to start playing audio. Change this setting to '''On''' to make your device play audio immediately when a source is selected (only relevant to Playlist, Radio, and Songcast) | ||
| + | * '''Startup Source''': normally your device will startup on the last source you were listening to. You can change this setting to make sure the device starts up on a specific source instead | ||
| + | * '''Startup Volume''': this setting allows you to select the volume level applied on startup | ||
| + | * As an example, with Startup Mode set to Active, Auto Play set to On, Startup Source set to Radio, and Startup Volume set 50, your device would automatically play Radio at Volume 50 when the power is switched on. | ||
| + | <br> | ||
| + | |||
| + | === TuneIn Radio Setup === | ||
| + | You can interact with TuneIn radio on your device in different ways | ||
| + | * '''Kazoo''': you can browse TuneIn using Kazoo's rich interface by logging in to the dedicated TuneIn tile. Make sure '''TuneIn''' is enabled from the '''Streaming Services''' tab | ||
| + | * '''Presets''': you can make use of your own TuneIn presets using Kazoo or the handset. Select the '''Radio''' source from the '''Sources''' tab and enter your '''TuneIn Username''' | ||
| + | * '''Best of both''': if you login to the Kazoo TuneIn tile with the same username used for radio presets, then you can browse TuneIn from Kazoo and save new stations to your preset list. | ||
| + | <br> | ||
| + | |||
| + | === Notes === | ||
| + | |||
| + | * Toslink/SPDIF outputs are NOT Volume controlled | ||
| + | * Output Attenuation has NO effect on the Exakt output | ||
| + | * Setting an RS232 preamp connection automatically sets Internal Volume Control to Off as the preamp will be used instead | ||
| + | * Akurate Kontrol/1: Room name (Devices tab) must match the corresponding Room name of your Linn DS/DSM. Source name should match the Linn DS/DSM device name (similar to RS232 setup) | ||
| + | * Marking a source invisible does not disable it, but simply hides it from control points | ||
| + | * The Source Transformer is to provide galvanic isolation for sources with direct coupling. If you are using a source that already has an audio transformer, such as a ''URIKA'' XLR output, this should be disabled. | ||
| + | <br> | ||
| + | |||
| + | |||
| + | ==<b>Wi-Fi</b> tab == | ||
| + | <div class="toccolours"> | ||
| + | {{Setup:Konfig-Wifi}} | ||
| + | </div> | ||
| + | |||
| + | ==<b>Phono</b> tab == | ||
| + | This is to show the <u>[[Urika_II|URIKA II]]</u> setup: | ||
| + | === Urika II setup === | ||
| + | <font style="color:blue"><b><u>Exakt Input</u></b></font> - Relates to the Exakt input number shown in the Sources list. <br> | ||
| + | : 1 - <font style="color:blue">EXAKT1</font> | ||
| + | : 2 - <font style="color:blue">EXAKT2</font> | ||
| + | <br> | ||
| + | <div class="toccolours"> | ||
| + | <big><u>Cartridge Settings</u></big><br> | ||
| + | Select the '''<u>CHANGE</u>''' to select the cartridge that you want the Urika II to support. <BR><span style="color:red">'''ENSURE THAT THE PLATTER IS ROTATING (POWERED ON USING THE RADIKAL) BEFORE ANY CARTRIDGES ARE SELECTED OR SETTINGS MADE'''.</span><br><br> | ||
| + | If the cartridge is not listed select "'''Other Moving Coil Cartridge'''" this will allow you to select the Gain(44dB, 50dB, 56dB, 64dB), input resistance (31R -1k0) and input capacitance (0.5nF-2nF). <br><br> | ||
| + | There is nothing to stop you adjusting these settings from the preset cartridge settings and fine tuning to your own music preference. | ||
| + | <br><br> | ||
| + | The Exakt input will allow you to assign the Urika II to one of the two Exakt inputs available. This will allow you to have two turntables setup linked to the same Linn DS/DSM and allow an AB dem. | ||
| + | |||
| + | [[file:Konfig-Urika.jpg|centre|700px]] | ||
| + | </div> | ||
| + | |||
| + | == <b>Space Optimisation</b> == | ||
| + | |||
| + | See the [[Space Optimisation|Space Optimisation]] article for more detailed instructions. | ||
| + | |||
| + | '''An Internet connection is required when using Exakt Systems and Space Optimisation''' | ||
| + | |||
| + | ==== Exakt System ==== | ||
| + | If you have selected an Exakt system, you will see four configuration tabs. | ||
| + | |||
| + | =====Exakt===== | ||
| + | Allows you to assign an audio channel (i.e. Left, Right, Centre, Surround....) to an Exakt speaker.<br> | ||
| + | If you are using both the Exakt outputs and the analogue outputs in a non-Surround setup then make sure that Konfig > Device > '''"Dual Analogue/Exakt Stereo Output"''' has been enabled. (Davaar55 onwards) <br> | ||
| + | If you want to use a Sub-woofer with the Stereo speaker you can add these as a "Front Left", "Front Right" or "Mono" channel. If you declare this as "LFE" then this output will only be available with HDMI surround playback.(When set to MONO then this is fed LFE plus Front Left and Front Right audio)<br> | ||
| + | Note: using both Analogue and Exakt output then the analogue output will occur approx 45-65mS BEFORE the Exakt playback.<br> | ||
| + | |||
| + | [[File:KonfigExaktTab.png|740px|Exakt Tabs]] | ||
| + | |||
| + | <br>'''"Exakt.Design Filters"''' & '''<u>Sign-in to Exakt.Design</u>''' are for allow sharing of filters generated by Manufacturers and Retailers. <br>To use these filters you will need to have a Exakt.Design login and have the Exakt design shared with your login by the filter designer (email on Exakt.Design speakers page). <br><br> | ||
| + | If you have "Show Speaker variant versions" enabled in Konfig settings then this will show you different downloads that are available. information on these Exakt filters can be found [[Exakt_filters|HERE]] | ||
| + | |||
| + | '''Note: Surround channels are only possible with Linn DSM products and the HDMI connections are enabled.''' | ||
| + | <br><BR> | ||
| + | [[File:ExaktTabPreview.jpg|740px|Exakt Tabs]] | ||
| + | Once you have selected your speakers and assigned them to channels (Front Left, Front Right etc) hit the APPLY button<br> | ||
| + | Note: The PREVIEW button is only available via a Exakt.Design accont and this button will only temporarily setup this speaker configuration and only meant for a preview of the configuration. <br> | ||
| + | <u>'''Once the Linn DS/DSM is put into Standby any settings done in the PREVIEW mode are lost'''</u> | ||
| + | |||
| + | =====Space Optimisation+===== | ||
| + | Provides a listener focused way of applying room optimisation. | ||
| + | |||
| + | [[File:KonfigSpacePlusTab.png|740px|Exakt Tabs]] | ||
| + | |||
| + | ====Non-Exakt System==== | ||
| + | If you have selected a DS system, you will see two configuration tabs. | ||
| + | |||
| + | =====Space Optimisation===== | ||
| + | Provides a listener focused way of applying room optimisation. | ||
| + | |||
| + | [[File:KonfigSpaceTab.png|740px|Exakt Tabs]] | ||
| + | |||
| + | =====Speakers===== | ||
| + | Only supported speaker types will work with Space Optimisation.<br> | ||
| + | The current list of supported speakers can be found [https://www.linn.co.uk/uk/technology/space-optimisation#search-product-form | here]<br> | ||
| + | <br> | ||
| + | |||
| + | ===HDMI=== | ||
| + | '''ARC''' -'''A'''udio '''R'''eturn '''C'''hannel allows the Linn DSM HDMI output to receive audio returned from the TV. The Linn DSM will allow you to select this HDMI output as an audio input. This connection will not tell the TV what audio formats are supported so make sure that your TV is only set to Stereo PCM ARC.<br> | ||
| + | '''CEC''' - '''C'''onsumer '''E'''lectronics '''C'''ontrol. When you have the ARC enabled on your TV and the Linn DSM is listening to your TV via the HDMI ARC input, this will pass through the Volume, Mute & Standby commands from your TV Remote to control the Linn DSM. | ||
| + | |||
| + | ARC/CEC is only possible on Linn DSM's with the HDMI2 board. | ||
| + | |||
| + | '''Turn HDMI Off in Sleep''' - When the Linn DSM in sleep the DSM HDMI output will be dead and will not pass any Audio or Video information to the TV. | ||
| + | |||
| + | ''Below Refers to Linn DSM with HDMI2 boards only''<br> | ||
| + | |||
| + | '''Cec Auto Source Select''' - With Cec enabled,this option turned ON and TV ARC enabled, when you bring you TV out of Standby this will automatically switch the Linn DSM to the HDMI ARC input. | ||
| + | |||
| + | '''eARC Mode''' - This disables the eARC communications and reverts back to ARC communications | ||
| + | |||
| + | <b>HDMI Debug mode</b> - This optio should <b><u>ONLY</u></b> be enabled before a "Report to Linn" support request is initiated in the <u>[[Kazoo|Kazoo App]] </u> / <u>[[Linn_App_Manual|Linn App]] </u>relating to HDMI issues and turned <b><u>OFF</u></b> afterwards | ||
| + | |||
| + | ===Surround sound=== | ||
| + | |||
| + | :<b>Exakt</b> Speakers setup for "<b>6 x channel passthrough</b>" or "<b>6 x channel passthrough</b>" | ||
| + | :For Konfig Surround speaker setup click [[ExaktSurround|<u>Exakt surround</u>]] | ||
| + | |||
| + | ===Dolby/DTS=== | ||
| + | This is for setup of the [[Surround_Sound_Variations#Linn_Surround_Module|Linn Surround Module]] from HDMI / HDMI-ARC / HDMI eARC / TOSLINK / SPDIF inputs and <br> | ||
| + | allows control of: | ||
| + | {| width="100%" cellspacing="0" cellpadding="0" border="0" align="top" | ||
| + | | width="60%"| | ||
| + | :* '''Decode Mode''' | ||
| + | :** '''Off''' - No up-mixing performed | ||
| + | :** '''Auto''' - PCM streams up-mixed using DTS Neo 6 Auto algorithm | ||
| + | :** '''DTS Neo 6 Music''' - PCM streams up-mixed using DTS Neo 6 Music algorithm | ||
| + | :** '''DTS Neo 6 Cinema''' - PCM streams up-mixed using DTS Neo 6 Movie algorithm | ||
| − | |||
| − | + | For all modes above downmixing if required will then be performed based on the number of speakers in the system. | |
| − | |||
| − | + | :* '''Dynamic Range Compression''' - Midnight Movie options | |
| + | :* '''Speaker Setup''' - If Space Optimisation has been disabled then this will allow you to setup the speaker positioning dimensions | ||
| − | + | |width="40%"|[[File:Konfig_Dolby-DTS_setup.jpg|270px]] | |
| + | |} | ||
| − | + | ===ExaktBox Surround Channel selection=== | |
| + | {{Info:ExaktBoxCHAssign}} | ||
| − | == | + | ===Channel trim (Volume Offsets)=== |
| + | Within the Space Optimisation page, below the room map, you will find a '''"CHANGE SPEAKER VOLUME OFFSETS"''', select this option to trim the channel levels. <br> | ||
| + | Note: this works in Stereo and Surround modes. | ||
| + | {| width="100%" cellspacing="0" cellpadding="0" border="0" align="top" | ||
| + | | width="40%"| | ||
| + | :1. Select the Channel PLAY icon to start the White noise on that channel | ||
| + | :2. Use the + / - buttons to trim these levels | ||
| + | :3. Use the channel STOP button tostop the white noise on this channel. | ||
| + | :4. Repeat for all channels required. | ||
| + | :5. Hit APPLY to save this setup to the Linn DSM. | ||
| − | [[ | + | |width="60%"|[[file:Konfig-Offset_Trim.jpg|600px|right]] |
| + | |} | ||
| − | + | == Updates == | |
| + | <!-- | ||
| + | [[File:Updates.png|740px|Updates Page]]<br> | ||
| + | <span style="color:red"><u>'''Konfig is primarily for use of Retailers and Installers for setting up and software updates of the Linn DS products. If you have any doubt of the operation of this software please do not use and call you Retailer/installer for assistance.'''</u></span> | ||
| − | + | The Updates tab indicates the number of Linn devices that currently have a newer software version available, as shown in the screenshot above. | |
| − | + | Each device that has an update available will be in the list of updatable devices. Each device has information about the update version available as well as a link to the release notes. | |
| − | ''' | + | --> |
| + | To update a device click the 'Update' button. If you have more than one device to update you can click the 'Update All' button to update all the devices at the same time. | ||
| + | |||
| + | {{Konfig:Update_DS_Firmware}} | ||
| + | |||
| + | {{Issues:Konfig2}} | ||
== Advanced == | == Advanced == | ||
| Line 87: | Line 306: | ||
The Advanced page allows a user to restore a Linn device back to the original factory settings. It also allows a user to manually updating a Linn device's firmware to a locally stored firmware bundle. | The Advanced page allows a user to restore a Linn device back to the original factory settings. It also allows a user to manually updating a Linn device's firmware to a locally stored firmware bundle. | ||
| − | === | + | [[File:AdvanceSelekt.jpg|740px]] |
| + | |||
| + | On some of the Linn Products, such as the Selekt DSM, the software is directly loaded into to Linn DS/DSM from the Internet. <br> | ||
| + | <!--The RECOVER button will tell the Linn DS/DSM to reload and force the Linn DS/DSM to load the a recovery firmware --> | ||
| + | |||
| + | === RESTORE Factory Settings === | ||
Click the 'Restore' button associated with the desired Linn device to start the process of restoring the Linn device to its factory default settings. | Click the 'Restore' button associated with the desired Linn device to start the process of restoring the Linn device to its factory default settings. | ||
| + | |||
| + | === RECOVER product === | ||
| + | {{Konfig:System Recover}} | ||
| + | |||
| + | === Participate in beta program === | ||
| + | Whether Konfig automatically checks for beta releases of firmware for available Linn devices. | ||
=== Updating Linn Device Firmware === | === Updating Linn Device Firmware === | ||
| + | '''This is only available for products WITHOUT the <u>RECOVER</u> function'''<br> | ||
| + | <span style="color:red"><u>'''Konfig is primarily for use of Retailers and Installers for setting up and software updates of the Linn DS products. If you have any doubt of the operation of this software please do not use and call you Retailer/installer for assistance.'''</u></span> | ||
| + | |||
| + | * Press the FALLBACK button on the Linn DS/DSM | ||
| + | * Download the desired firmware from <span class="plainlinks" style="color:red">[https://s3-eu-west-1.amazonaws.com/linn-artifacts-firmware/index.html#VersionInfo/Downloads/Releases// <b><u>>HERE<</u></b>]</span> (Make sure [[File:Bucket_Open.png|80px]] is hlighlighted to show the full file listing).<br> | ||
| + | * In Konfig, go to the Advanced page, locate the DS product to be updated and click on 'Browse'<br> | ||
| + | * Locate the downloaded firmware zip file andselect 'OPEN'<br> | ||
| + | : If you moving to an earlier version of Firmware we would suggest ticking the"Device Recovery" box | ||
| + | * Click on 'Update'<br> | ||
| + | |||
| − | + | [[File:992px-Advanced-update.jpg|740px|Advanced Page]] | |
| − | |||
| − | '''NOTE: On Mac the downloaded firmware is automatically unzipped by the OS and so the location is a directory unlike on Windows where the location is the downloaded zip file.''' | + | '''NOTE: On a Mac the downloaded firmware is automatically unzipped by the OS and so the location is a directory, unlike on Windows where the location is the downloaded zip file. To Stop this, go into Safari settings > Preferences > General and uncheck "Open safe files after downloading" ''' |
| − | + | :On products with the note of component change, if the Linn DS/DSM was manufactured before 2017 try the "original" version. If Konfig tells you it is the wrong version then try the "Component change version". (Konfig will not allow you to install the wrong variant of software to the Linn DS/DSM)<br> | |
| + | {{Table:Davaar_Firmware}} | ||
=== Device Recovery === | === Device Recovery === | ||
| − | This option should only be used if your are having problems updating your Linn DS through the standard methods, i.e. | + | This option should only be used if your are having problems updating your Linn DS through the standard methods, i.e. manually as described in the previous section. |
| − | After a 'Device Recovery' update has been performed any Linn device settings changed by the user will be set back to factory defaults. | + | <b>After a 'Device Recovery' update has been performed any Linn device settings changed by the user will be set back to <u><big>factory defaults</big></u>.</b> |
== Settings == | == Settings == | ||
[[File:Settings.png|740px|Settings Page]] | [[File:Settings.png|740px|Settings Page]] | ||
| + | |||
| + | ==== REQUEST SUPPORT button ==== | ||
| + | This to only be used if you are having diffculty with '''<u>Konfig</u>''' setting up your Linn DS/DSM | ||
=== Application Updates === | === Application Updates === | ||
| Line 115: | Line 358: | ||
Whether Konfig automatically checks for newer versions of Konfig. | Whether Konfig automatically checks for newer versions of Konfig. | ||
==== Participate in beta program ==== | ==== Participate in beta program ==== | ||
| − | + | This option will check if a Beta version of Konfig is available and do you want to install?.<br> | |
| + | If you have unchecked the Beta application release of Konfig this only stops checking to see if a beta release exists. It does NOT revert you back to the official release. <br> | ||
| + | If you want to install the official release then go to [https://www.linn.co.uk/software www.Linn.co.uk/software] and redownload/install the current version of Konfig. | ||
| + | |||
| + | ==== Show Speaker variant versions ==== | ||
| + | This is only for Exakt speakers and users wish to go back to an earlier version of Exakt profile for their speaker. (This may not always be possible as the Exakt compilers and firmware may not support these profiles and therefor not listed)<br> | ||
| + | After enabling this go into the Exakt tab of your Linn DS/DSM and select <u>CHANGE</u>. This will now show you the Exakt speaker variants available for the version of Firmware loaded in to you Linn DS/DSM.<br> | ||
| + | Basic information on any filter changes can be found [[Exakt_filters|HERE]] | ||
| + | |||
==== Check For Updates ==== | ==== Check For Updates ==== | ||
Force Konfig to check for newer versions of Konfig, taking into account whether 'Participate in beta program' is checked. | Force Konfig to check for newer versions of Konfig, taking into account whether 'Participate in beta program' is checked. | ||
=== Device Updates === | === Device Updates === | ||
| − | + | <!--=== Diagnostics === | |
| − | |||
| − | |||
| − | === Diagnostics === | ||
==== Automatically send DS crash information to Linn ==== | ==== Automatically send DS crash information to Linn ==== | ||
Whether to automatically send Linn device crash information to Linn for analysis (recommended to be checked). | Whether to automatically send Linn device crash information to Linn for analysis (recommended to be checked). | ||
| − | '''NOTE: No personal information is sent to Linn as a result of this option being checked.''' | + | '''NOTE: No personal information is sent to Linn as a result of this option being checked.''' --> |
| − | |||
| − | |||
| − | |||
| − | |||
| − | |||
| − | |||
| − | |||
=== Network === | === Network === | ||
| Line 140: | Line 381: | ||
Which network to use to locate Linn DSs. | Which network to use to locate Linn DSs. | ||
| − | |||
| − | === | + | ===FEED OVERRIDE === |
| + | For Development purpose only | ||
| + | <br><br> | ||
| − | + | = GATEWAY API = | |
| + | This is the interface/gateway to give more functionality to third-party control systems, such as Control4, Crestron etc. If you are not using any of these control system this can disabled (default state)<br> | ||
| + | ===Tidal=== | ||
| + | This defines the Tidal credentials that are can be used and the Tidal login status status of the attached Linn DS/DSM products. <br> | ||
| + | Press '''Login''' to log these Linn DS/DSM players this the defined account | ||
| − | === | + | ===Qobuz=== |
| + | This defines the Qobuz credentials that are can be used and the Qobuz login status status of the attached Linn DS/DSM products.<br> | ||
| + | Press '''Login''' to log these Linn DS/DSM players this the defined account | ||
| − | ''' | + | ===TUNEIN=== |
| + | This defines the TUNEIN credentials that are can be used and the TUNEIN login status status of the attached Linn DS/DSM products.<br> | ||
| + | Press '''Login''' to log these Linn DS/DSM players this the defined account | ||
| − | + | ===CALM RADIO=== | |
| − | + | This defines the Calm Radio credentials that are can be used and the Calm Radio login status status of the attached Linn DS/DSM products.<br> | |
| − | + | Press '''Login''' to log these Linn DS/DSM players this the defined account | |
| − | |||
| − | |||
| − | |||
| − | |||
| − | |||
| − | |||
| − | |||
| − | === | + | ===ADVANCED=== |
| + | This allows you to try out some of the WebSocket commands to the Kazoo Server gateway. | ||
| − | + | ;Now embedded within these products: | |
| + | {{block indent|<categorytree mode="all" >Gateway API</categorytree> }} | ||
| − | + | ==Gateway API trouble shooting== | |
| + | {{FAQ:Gateway API Troubleshooting}} | ||
| − | + | = Troubleshooting = | |
| − | + | {{FAQ:Konfig FAQ}} | |
| − | + | <!-- Replaced NeilP 23rd Oct 2018--> | |
| − | |||
| − | |||
| − | |||
| − | |||
| − | |||
| − | |||
| − | |||
| − | |||
| − | |||
| − | |||
| − | |||
| − | |||
| − | |||
| − | |||
| − | |||
| − | |||
| − | |||
Latest revision as of 06:30, 3 July 2024
Konfig is no longer maintained. There will be no future releases.
However, it can still be used but any future updates to the Linn DS/DSM WILL NOT not be available in the Konfig app. Changes in the Exakt system may not be available in this Konfig App.
To continue receiving product and Exakt firmware updates, and to access the improved version of Space Optimisation, you should use Konfig to update to at least up date your Linn DS/DSM to Davaar99 and then use Manage_Systems option within your Linn Account for configuration and upgrades.
Konfig will ONLY update your Linn DS/DS to Davaar104. If your Linn DS/DSM has a later version of Davaar firmware Konfig will bring this back to Davaar 104
Contents
- 1 Introduction
- 2 Installation
- 3 Operation
- 4 GATEWAY API
- 5 Troubleshooting
- 5.1 When I select Music it does not play and there is no coverart shown
- 5.2 When I install Konfig on my Windows10 machine it will not open
- 5.3 Konfig update reports "... but Konfig failed to update the privacy options..."
- 5.4 When I click on Space Optimisation Konfig reports "this device is not compatible with space optimization"
- 5.5 Konfig crashes after 10-20secs
- 5.6 On Windows10 all of the screen text is huge and cannot access all controls
- 5.7 Issues programming an Exakt products
- 5.8 After Davaar55 update my Speaker assignments have changed
- 5.9 After Davaar55 I only get Exakt audio, no analogue audio
- 5.10 In Space Optimisation I cannot enter any information
- 5.11 Konfig states DS and Exakt products are incompatible state
- 5.12 Konfig cannot see any of my DS
- 5.13 Konfig will not let me do a Space Optimisation
- 5.14 SPACE OPTIMISATION only lists "Unknown" speakers
- 5.15 Konfig cannot load Assets
- 5.16 After the software update the Linn DS is not working correctly or losing settings
- 5.17 Konfig does not run on my Mac - the icon bounces in the dock and then goes away
- 5.18 What if I have problems updating?
- 5.19 Recovery Procedure
- 5.20 What if I want to revert to older versions of firmware?
- 5.21 What if I have problems updating my Exakt devices?
- 5.22 Why does Konfig not show Space Optimisation for my DS?
- 6 Known Issues
Introduction
Konfig is primarily for use of Retailers and Installers for setting up and software updates of the Linn DS products. If you have any doubt of the operation of this software please do not use and call you Retailer/installer for assistance.
Konfig provides advanced configuration of a Linn DS, notification and updating of a Linn DS to the latest firmware, restoring Linn DS settings back to factory defaults and manual updating of a Linn DS firmware.
Konfig can also be run from a web-browser with all functions except the software update. Get the IP address of the Linn DS/DSM from the front panel using either the:
- REM 020 Remote control by pressing and holding the # button
or with the - REM 019 Remote control by pressing DVD then the INFO buttons.
When you are in DS web page select Control, this will give you the same options (except Software update) as below
Konfig release history
MAC Konfig History: Shows the history for OSX Konfig
Windows Konfig History:: Shows the history for Windows Konfig
Installation
System Requirements
Windows
- Windows 10 / 11 (NOT Windows XP, Windows 7 or 8)
- IE9 or later
- 32 or 64-bit hardware
- Internet connection when using Exakt Systems
- Minimum screen resolution 1024x768
Mac
- Mac OS X Mountain Lion 10.13 High Sierra to 10.16 Monterey
- 32 or 64-bit hardware
- Internet connection when using Exakt Systems
- Minimum screen resolution 1024x768
Installing
Windows
 Click to download
- Double-click the downloaded .exe file
- Follow the on-screen instructions in the installer program
- In the CONFIGURATION tab, click on the CHANGE button and see if your Linn DS is listed.
- If it is not listed, click on the
 and check the network settings are the same network as your Linn DS/DSM.
- An earlier version of Konfig can be found HERE
Mac
 Click to download
- Double-click the downloaded .pkg file
- Follow the on-screen instructions in the installer program.
- In the CONFIGURATION tab, click on the CHANGE button and see if your Linn DS is listed.
- If it is not listed, click on the
 and check the network settings are the same network as your Linn DS/DSM.
- An earlier version of Konfig can be found HERE
Uninstalling
Windows
- Open the Windows Control Panel and double click "Programs and Features"
- Select "Konfig" in the list of programs and click the "Uninstall" button
- Follow the on screen instructions in the uninstall window
Mac
- Using Finder drag the Konfig icon from Applications/Konfig to the waste bin
Updating
Konfig for Mac and Windows will automatically check for new software updates. Checking for available updates can also be performed manually as described below. Alternatively, Konfig can be updated by manually downloading the installation packages from the download page and installing them using the method described in the Installing section above.
Operation
Konfig has three main views, Configuration, Updates and Advanced
Configuration
Click the Change button to slide a list of available devices in from the left. Selecting a device from the list will show it's configuration page in the right hand pane.
Help for every Setting
For dynamic help information on any given setting, click on the question mark icon next to the setting.
Digital Output Mode
On products with an SPDIF or TOSLINK output socket, you can define the output sample rate. The options available are:
- Raw, the sample rate of the playback music dictates the output sample rate
- Fixed Sample Rate: 88/96kHz, this will upsample, maintain or downsample the playback to either 88kHz or 96kHz
- Fixed Sample Rate: 192kHz, this will upsample or maintain the playback to 192kHz
- Disabled, this will disable all S/PDIF and Toslink outputs
Privacy
Send anonymous usage data to Linn
Select Yes to allow your Linn DS/DSM to send usage data to Linn. This will help us decide where to allocate time for new features or improvements.
NOTE: No personal information is sent to Linn as a result of this option being checked.
Send Crash Data
Select Yes to allow your Linn DS/DSM to send crash data to Linn in the event of a failure. This will help us in diagnosing and fixing existing issues. This is used by the Linn Helpline and Service department to check and what has caused the Linn DS/DSM to reboot itself.
If you select No this makes it more difficult to help diagnose remotely what has happened to your product.
NOTE: No personal information is sent to Linn as a result of this option being checked.
Delay Setup
- Select the input you wish to delay from the Sources tab
- Make sure Digital Features is set to On.
- This only applies to Analog inputs on certain devices. Off provides an analog bypass audio path, which means SPACE optimistation, songcast, and delay can not be used with the input.
- Note: This feature is only available with an analogue only playback with DSM products with the necessary circuitry. If you connect Exakt speakers or Exakt-box this feature is disabled.
- Select the relevant option for Delay Mode
- Minimal: the smallest delay the device can offer (typically 10-15ms)
- Songcast Sync: fixed delay which guarantees Songcast remains in-sync (150ms)
- Video sync: traditional user-adjustable lipsync setting (Songcast will also be in-sync for delays greater than 150ms)
- For Video sync, the Delay value must also be set. This can be found on the Device tab. It can also be adjusted using the right and left handset keys when the given input is selected.
RS232 (proxy) Preamp Connection Setup
If you have a Linn Pre-amplifier (RS232 controlled) this can be setup to be controlled by the Kazoo control software.
- Connect any Linn DS RS232 port to the Linn Preamp RS232 IN port using a Linn RS232 cable
- Connect the Linn DS audio output to the Linn preamp audio input. See example system setups for more information
- Copy the text in the Name field from the Device tab
- Select the RS232 Connections tab
- Select the Linn preamp and the Linn DS com port number it is wired to.
- Reboot the Linn DS
- Once rebooted, click on the Change button (upper left of application) and select the Preamp device from the list
- From the source tab, select the Input that the Linn DS is connected to (i.e. Analog 1) and paste the Linn DS name copied before into the Name field
- If setup correctly, your system will be controllable as a single device from a Linn control point
Startup Behavior
A number of different settings can be applied to customise the way your device starts up
- Startup Mode: normally your device will power up in Sleep (aka standy). Select Active to skip sleep mode and go straight to playback mode on power up
- Auto Play: normally you must press play to start playing audio. Change this setting to On to make your device play audio immediately when a source is selected (only relevant to Playlist, Radio, and Songcast)
- Startup Source: normally your device will startup on the last source you were listening to. You can change this setting to make sure the device starts up on a specific source instead
- Startup Volume: this setting allows you to select the volume level applied on startup
- As an example, with Startup Mode set to Active, Auto Play set to On, Startup Source set to Radio, and Startup Volume set 50, your device would automatically play Radio at Volume 50 when the power is switched on.
TuneIn Radio Setup
You can interact with TuneIn radio on your device in different ways
- Kazoo: you can browse TuneIn using Kazoo's rich interface by logging in to the dedicated TuneIn tile. Make sure TuneIn is enabled from the Streaming Services tab
- Presets: you can make use of your own TuneIn presets using Kazoo or the handset. Select the Radio source from the Sources tab and enter your TuneIn Username
- Best of both: if you login to the Kazoo TuneIn tile with the same username used for radio presets, then you can browse TuneIn from Kazoo and save new stations to your preset list.
Notes
- Toslink/SPDIF outputs are NOT Volume controlled
- Output Attenuation has NO effect on the Exakt output
- Setting an RS232 preamp connection automatically sets Internal Volume Control to Off as the preamp will be used instead
- Akurate Kontrol/1: Room name (Devices tab) must match the corresponding Room name of your Linn DS/DSM. Source name should match the Linn DS/DSM device name (similar to RS232 setup)
- Marking a source invisible does not disable it, but simply hides it from control points
- The Source Transformer is to provide galvanic isolation for sources with direct coupling. If you are using a source that already has an audio transformer, such as a URIKA XLR output, this should be disabled.
Wi-Fi tab
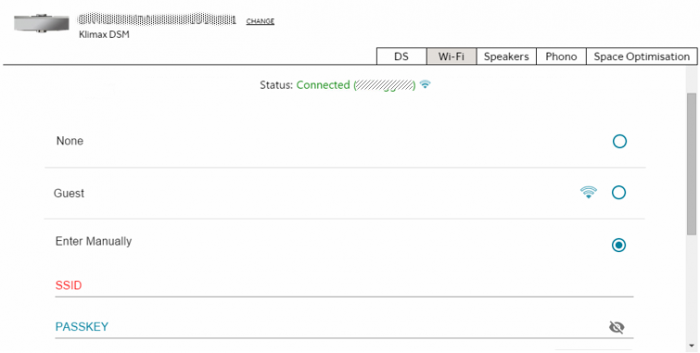
Konfig Wi-Fi Settings
The top Status tells you what Wifi is currently selected and in use.
- Select the Wi-Fi you wish to connect to and it will then ask for the PASSKEY for that Wi-Fi SSID.
- If your SSID is hidden then you can manually enter the SSID and PASSKEY for that network.
Phono tab
This is to show the URIKA II setup:
Urika II setup
Exakt Input - Relates to the Exakt input number shown in the Sources list.
- 1 - EXAKT1
- 2 - EXAKT2
Cartridge Settings
Select the CHANGE to select the cartridge that you want the Urika II to support.
ENSURE THAT THE PLATTER IS ROTATING (POWERED ON USING THE RADIKAL) BEFORE ANY CARTRIDGES ARE SELECTED OR SETTINGS MADE.
If the cartridge is not listed select "Other Moving Coil Cartridge" this will allow you to select the Gain(44dB, 50dB, 56dB, 64dB), input resistance (31R -1k0) and input capacitance (0.5nF-2nF).
There is nothing to stop you adjusting these settings from the preset cartridge settings and fine tuning to your own music preference.
The Exakt input will allow you to assign the Urika II to one of the two Exakt inputs available. This will allow you to have two turntables setup linked to the same Linn DS/DSM and allow an AB dem.
Space Optimisation
See the Space Optimisation article for more detailed instructions.
An Internet connection is required when using Exakt Systems and Space Optimisation
Exakt System
If you have selected an Exakt system, you will see four configuration tabs.
Exakt
Allows you to assign an audio channel (i.e. Left, Right, Centre, Surround....) to an Exakt speaker.
If you are using both the Exakt outputs and the analogue outputs in a non-Surround setup then make sure that Konfig > Device > "Dual Analogue/Exakt Stereo Output" has been enabled. (Davaar55 onwards)
If you want to use a Sub-woofer with the Stereo speaker you can add these as a "Front Left", "Front Right" or "Mono" channel. If you declare this as "LFE" then this output will only be available with HDMI surround playback.(When set to MONO then this is fed LFE plus Front Left and Front Right audio)
Note: using both Analogue and Exakt output then the analogue output will occur approx 45-65mS BEFORE the Exakt playback.
"Exakt.Design Filters" & Sign-in to Exakt.Design are for allow sharing of filters generated by Manufacturers and Retailers.
To use these filters you will need to have a Exakt.Design login and have the Exakt design shared with your login by the filter designer (email on Exakt.Design speakers page).
If you have "Show Speaker variant versions" enabled in Konfig settings then this will show you different downloads that are available. information on these Exakt filters can be found HERE
Note: Surround channels are only possible with Linn DSM products and the HDMI connections are enabled.
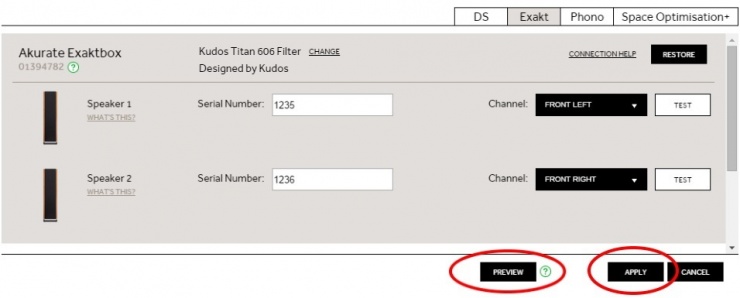 Once you have selected your speakers and assigned them to channels (Front Left, Front Right etc) hit the APPLY button
Note: The PREVIEW button is only available via a Exakt.Design accont and this button will only temporarily setup this speaker configuration and only meant for a preview of the configuration.
Once the Linn DS/DSM is put into Standby any settings done in the PREVIEW mode are lost
Space Optimisation+
Provides a listener focused way of applying room optimisation.
Non-Exakt System
If you have selected a DS system, you will see two configuration tabs.
Space Optimisation
Provides a listener focused way of applying room optimisation.
Speakers
Only supported speaker types will work with Space Optimisation.
The current list of supported speakers can be found | here
HDMI
ARC -Audio Return Channel allows the Linn DSM HDMI output to receive audio returned from the TV. The Linn DSM will allow you to select this HDMI output as an audio input. This connection will not tell the TV what audio formats are supported so make sure that your TV is only set to Stereo PCM ARC.
CEC - Consumer Electronics Control. When you have the ARC enabled on your TV and the Linn DSM is listening to your TV via the HDMI ARC input, this will pass through the Volume, Mute & Standby commands from your TV Remote to control the Linn DSM.
ARC/CEC is only possible on Linn DSM's with the HDMI2 board.
Turn HDMI Off in Sleep - When the Linn DSM in sleep the DSM HDMI output will be dead and will not pass any Audio or Video information to the TV.
Below Refers to Linn DSM with HDMI2 boards only
Cec Auto Source Select - With Cec enabled,this option turned ON and TV ARC enabled, when you bring you TV out of Standby this will automatically switch the Linn DSM to the HDMI ARC input.
eARC Mode - This disables the eARC communications and reverts back to ARC communications
HDMI Debug mode - This optio should ONLY be enabled before a "Report to Linn" support request is initiated in the Kazoo App / Linn App relating to HDMI issues and turned OFF afterwards
Surround sound
- Exakt Speakers setup for "6 x channel passthrough" or "6 x channel passthrough"
- For Konfig Surround speaker setup click Exakt surround
Dolby/DTS
This is for setup of the Linn Surround Module from HDMI / HDMI-ARC / HDMI eARC / TOSLINK / SPDIF inputs and
allows control of:
ExaktBox Surround Channel selection
E.g. But NOT a LFE AND MONO on the same Exaktbox |
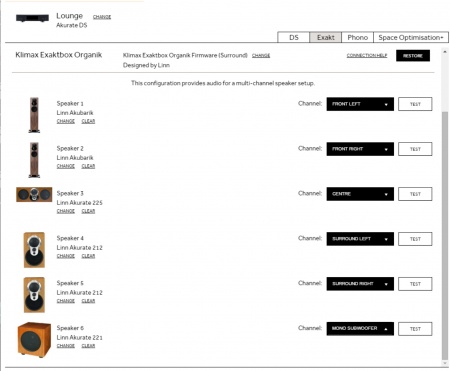
above is an Exaktbox configured for "6 channel passthrough" |
Channel trim (Volume Offsets)
Within the Space Optimisation page, below the room map, you will find a "CHANGE SPEAKER VOLUME OFFSETS", select this option to trim the channel levels.
Note: this works in Stereo and Surround modes.
|
Updates
To update a device click the 'Update' button. If you have more than one device to update you can click the 'Update All' button to update all the devices at the same time.
Your Linn DS player will be offline for a few minutes while it updates. If you encounter any problems, please contact your Linn Specialist or Linn
Upgrade Linn DS player(s)
1.Start Konfig (after ensuring you have latest version)
- a) Go into KONFIG Settings and check that Konfig is set to the same network as your Linn DS/DSM.
2. Click on the UPDATES tab. If there is a software update for your Linn DS/DSM it will be listed after clicking UPDATES. If there is no firmware update available for the Linn DS/DSM then it will not be listed under this tab.
- Note: on the Selekt DSM & new Majik DSM they will need to be power cycled and wait appox 30minutes before checking the Konfig UPDATES tab

3.Select the UPDATE button against the Linn DS/DSM you want to update.
- a) A message will appear on the Konfig screen stating the major changes that this software update may incur. (This will be dependant on your present version of software loaded into the Linn DS/DSM)
- b) If you want to continue with this update then scroll down to the bottom of the message and select UPDATE.
- c) For your Privacy we ask if you agree to collecting Anonymous data on usage of the Linn DS. This will aid any fault reporting and also any activity to help Linn enhance the software and product operation.
- d) Select I AGREE or more options to change what information Linn Products Ltd can receive.
4. Konfig will download the firmware update and proceed to updating the selected Linn DS/DSM player.
5.Once complete you will see an Update Completed Successfully message and your DS player will be re-started
6. Update complete
If you encounter any problems, please contact your Linn Specialist or Contact Linn.
If the message "The DS update was successful but Konfig failed to update the privacy options. These can be manually updated via the Configuration page." appears don't worry. The DS update was successful but Konfig failed to update the privacy options.
This is only a precautionary warning that the Privacy settings could not be updated automatically.
Go into Konfig > Device tab and set "Send Usage Data" and "Send Crash Data" to your preferred settings. (These are used to find out how the Linn DS is used and report any product crashes anonymously to Linn Products Ltd for diagnostic use.
Advanced
The Advanced page allows a user to restore a Linn device back to the original factory settings. It also allows a user to manually updating a Linn device's firmware to a locally stored firmware bundle.
On some of the Linn Products, such as the Selekt DSM, the software is directly loaded into to Linn DS/DSM from the Internet.
RESTORE Factory Settings
Click the 'Restore' button associated with the desired Linn device to start the process of restoring the Linn device to its factory default settings.
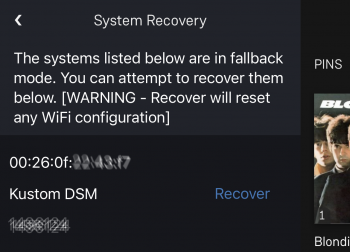
RECOVER product
This used to reload a recovery firmware into the older Linn DS/DSM. This is ONLY used if the Linn DS is non-functional and told to try this by the Linn Helpline/Support team.
- Click on the product style below to find how to recover your Linn DS/DSM
|
|
The Recovery for these products is:
NOTE: On a Mac the downloaded firmware is automatically unzipped by the OS. |
The Recovery for these products uses the Linn App to do the recovery.
|
|
The Recovery for these products uses the Linn App to do the recovery
This is only valid for Linn DS/DSM that have already been loaded with Davaar 99, or higher, firmware (from approx April 2023).
|
Participate in beta program
Whether Konfig automatically checks for beta releases of firmware for available Linn devices.
Updating Linn Device Firmware
This is only available for products WITHOUT the RECOVER function
Konfig is primarily for use of Retailers and Installers for setting up and software updates of the Linn DS products. If you have any doubt of the operation of this software please do not use and call you Retailer/installer for assistance.
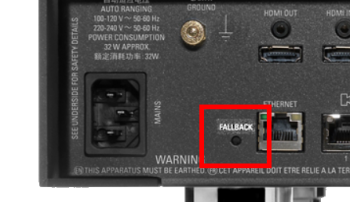
- Press the FALLBACK button on the Linn DS/DSM
- Download the desired firmware from >HERE< (Make sure
 is hlighlighted to show the full file listing).
 - In Konfig, go to the Advanced page, locate the DS product to be updated and click on 'Browse'
- Locate the downloaded firmware zip file andselect 'OPEN'
- If you moving to an earlier version of Firmware we would suggest ticking the"Device Recovery" box
- Click on 'Update'
NOTE: On a Mac the downloaded firmware is automatically unzipped by the OS and so the location is a directory, unlike on Windows where the location is the downloaded zip file. To Stop this, go into Safari settings > Preferences > General and uncheck "Open safe files after downloading"
- On products with the note of component change, if the Linn DS/DSM was manufactured before 2017 try the "original" version. If Konfig tells you it is the wrong version then try the "Component change version". (Konfig will not allow you to install the wrong variant of software to the Linn DS/DSM)
Software version for Linn DS/DSM:
| Linn DS/DSM Products | Davaar >=37 software name | Davaar 50=> software name | Notes |
|---|---|---|---|
| Akurate DS/0 | up to AkurateDs_4.37.1671 | from AkurateDsMk1_4.50.110 | |
| Akurate DS/1 | up to AkurateDs_4.37.1671 | from AkurateDsMk2_4.50.110 | |
| Akurate DS/2 | up to AkurateDs_4.37.1671 | from AkurateDsMk3_4.50.110 | Exakt |
| Akurate DS/3 | none | from AkurateDsMk4_4.61.196 | Katalyst |
| Akurate DSM/0 | up to AkurateDsm_4.37.1671 1 | from AkurateDsmMk1_4.50.110 | |
| Akurate DSM/1 | up to AkurateDsm_4.37.1671 1 | from AkurateDsmMk2_4.50.110 | Exakt |
| Akurate DSM/2 | None | from AkurateDsmMk2_4.50.110 | Exakt + HDMI2 |
| Akurate DSM/3 | None | from AkurateDsmMk3_4.62.200 | Katalyst |
| Akurate Exakt DSM/0 | up to AkurateExaktDsm_4.37.1671 | from AkurateExaktDsm_4.50.110 | Exakt |
| Akurate Exakt DSM/1 | none | from AkurateExaktDsm_4.50.110 | Exakt + HDMI2 |
| none | from AkurateExaktDsmMk2_4.62.200 | Component change | |
| Kiko | up to KikoDsm_4.37.1671 | from KikoDsm_4.54.135 | HDMI1 only |
| None | from KikoDsmMk2_4.62.200 | HDMI1 only + Component change | |
| Klimax DS/0 | up to KlimaxDs_4.37.1671 | from KlimaxDsMk1_4.50.110 | |
| Klimax DS/1 | up to KlimaxDs_4.37.1671 | from KlimaxDsMk2_4.50.110 | |
| Klimax DS/2 | up to KlimaxDs_4.37.1671 | from KlimaxDsMk3_4.50.110 | Exakt |
| Klimax DS/3 | None | from KlimaxDsMk4_4.50.110 2 | Exakt + KATALYST |
| None | from KlimaxDsMk5_4.63.223 2 | Component change | |
| Klimax DSM/0 | up to KlimaxDsm_4.37.1671 1 | from KlimaxDsmMk1_4.50.110 | |
| Klimax DSM/1 | up to KlimaxDsm_4.37.1671 1 | from KlimaxDsmMk2_4.50.110 | Exakt |
| Klimax DSM/2 | None | from KlimaxDsmMk3_4.50.110 2 | Exakt + KATALYST + HDMI2 |
| None | from KlimaxDsMk4_4.63.223 2 | Component change | |
| Klimax Exakt DSM/0 | up to KlimaxExaktDsm_4.37.1671 1 | from KlimaxExaktDsm_4.50.110 | |
| Klimax Exakt DSM/1 | None | from KlimaxExaktDsm_4.50.110 | HDMI2 |
| None | from KlimaxExaktDsmMk2_4.63.223 | Component change | |
| Majik DS/0 | up to MajikDs_4.37.1671 | from MajikDsMk1_4.50.110 | |
| Majik DS/1 | up to MajikDs_4.37.1671 | from MajikDsMk1_4.50.110 | |
| Majik DS/2 | up to MajikDs_4.37.1671 | from MajikDsMk2_4.50.110 | Exakt |
| none | from MajikDsMk3_4.62.200 | Component change | |
| Majik DSI | up to MajikDsi_4.37.1671 | from MajikDsi_4.50.110 | |
| Majik DSM/0 | up to MajikDsm_4.37.1671 | from MajikDsmMk1_4.50.110 | no HDMI |
| Majik DSM/1 | up to MajikDsm_4.37.1671 1 | from MajikDsmMk2_4.50.110 | HDMI initial |
| Majik DSM/2 | up to MajikDsm_4.37.1671 1 | from MajikDsmMk3_4.50.110 | Exakt |
| Majik DSM/3 | None | from MajikDsmMk3_4.50.110 | Exakt + HDMI2 |
| None | from MajikDsmMk4_4.62.200 | Component change | |
| Sekrit DSI | up to SekritDsi_4.37.1671 | from SekritDsi_4.50.110 | |
| Sekrit DSM | up to SekritDsm_4.37.1671 | from SekritDsm_4.54.135 | original |
| none | from SekritDsmMk2_4.62.200 | Component change | |
| Sneaky DS | up to SneakyMusicDs_4.37.1671 | from SneakyMusicDs_4.54.135 | |
| Sneaky DSM | up to SneakyDsm_4.37.1671 | from SneakyDsm_4.54.135 | |
| Sekrit DS | None | from SekritDs_4.57.178 | original |
| None | from SekritDsMk2_4.62.200 | Component change |
Note:
1 original HDMI1 boards only, upgrade HDMI2 boards will only work with Davaar50+
2 Only support HDMI2 boards
Device Recovery
This option should only be used if your are having problems updating your Linn DS through the standard methods, i.e. manually as described in the previous section.
After a 'Device Recovery' update has been performed any Linn device settings changed by the user will be set back to factory defaults.
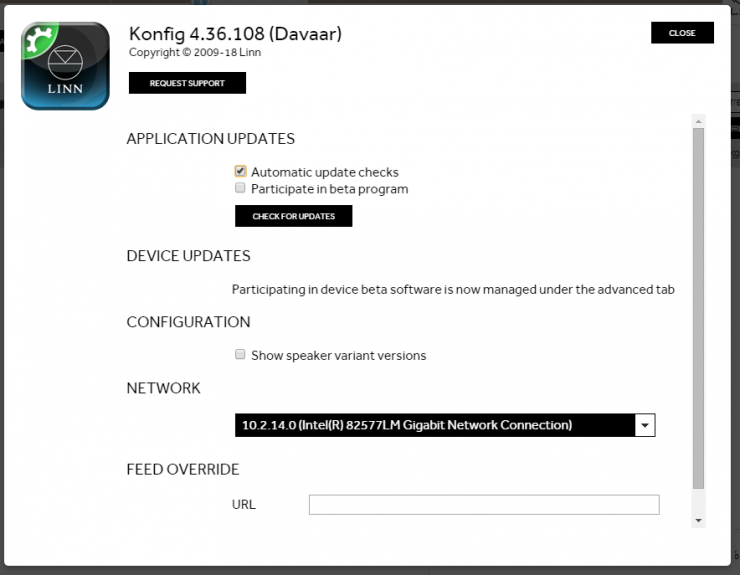
Settings
REQUEST SUPPORT button
This to only be used if you are having diffculty with Konfig setting up your Linn DS/DSM
Application Updates
Automatic update checks
Whether Konfig automatically checks for newer versions of Konfig.
Participate in beta program
This option will check if a Beta version of Konfig is available and do you want to install?.
If you have unchecked the Beta application release of Konfig this only stops checking to see if a beta release exists. It does NOT revert you back to the official release.
If you want to install the official release then go to www.Linn.co.uk/software and redownload/install the current version of Konfig.
Show Speaker variant versions
This is only for Exakt speakers and users wish to go back to an earlier version of Exakt profile for their speaker. (This may not always be possible as the Exakt compilers and firmware may not support these profiles and therefor not listed)
After enabling this go into the Exakt tab of your Linn DS/DSM and select CHANGE. This will now show you the Exakt speaker variants available for the version of Firmware loaded in to you Linn DS/DSM.
Basic information on any filter changes can be found HERE
Check For Updates
Force Konfig to check for newer versions of Konfig, taking into account whether 'Participate in beta program' is checked.
Device Updates
Network
Which network to use to locate Linn DSs.
FEED OVERRIDE
For Development purpose only
GATEWAY API
This is the interface/gateway to give more functionality to third-party control systems, such as Control4, Crestron etc. If you are not using any of these control system this can disabled (default state)
Tidal
This defines the Tidal credentials that are can be used and the Tidal login status status of the attached Linn DS/DSM products.
Press Login to log these Linn DS/DSM players this the defined account
Qobuz
This defines the Qobuz credentials that are can be used and the Qobuz login status status of the attached Linn DS/DSM products.
Press Login to log these Linn DS/DSM players this the defined account
TUNEIN
This defines the TUNEIN credentials that are can be used and the TUNEIN login status status of the attached Linn DS/DSM products.
Press Login to log these Linn DS/DSM players this the defined account
CALM RADIO
This defines the Calm Radio credentials that are can be used and the Calm Radio login status status of the attached Linn DS/DSM products.
Press Login to log these Linn DS/DSM players this the defined account
ADVANCED
This allows you to try out some of the WebSocket commands to the Kazoo Server gateway.
- Now embedded within these products
Gateway API trouble shooting
.
Troubleshooting
When I select Music it does not play and there is no coverart shown
Go into Kazoo Server settings and check the Network settings.
If Kazoo Server is setup for a different network then the Music and coverart link are for this different network. Double check that Kazoo Server network settings are same the Linn DS/DSM network
When I install Konfig on my Windows10 machine it will not open
We suspect that Windows10 Security has blocked this installation.
The solution is to
- Uninstall Konfig, (right click on the shortcut and uninstall).
- Download Konfig BUT DO NOT RUN or INSTALL YET
- Go into Windows Explorer and open the folder that the konfig_latest_win.exe has been downloaded into.
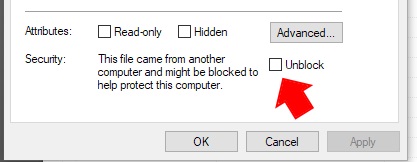
- Right click on the konfig_latest_win.exe file and select properties.
- At the bottom of the "General" tab under Security, if you get asked if you want to "Unblock" this file then select UNBLOCK and Apply.
- At the bottom of the "General" tab under Security, if you get asked if you want to "Unblock" this file then select UNBLOCK and Apply.
- Now run the konfig_latest_win.exe to install Konfig and Konfig should now run
Note: If you have previously run the konfig_latest_win.exe then the unblock option will not be shown. You will need to delete and re-download this file, unblock and then run.
If this does not fix it then something in the Windows operating system is stopping it from working.
To get more information:
- Try and run Konfig again and take note of the time you tried to run it.
- Click on the Windows Search bar and search for EVENT VIEWER and run this App.
- Open "Windows Logs" > "Applicaiton" and check around the "Date and Time" that you tried tio start Konfig and look for any Errors. Check the Details and pass this on the Linn helpline for more assistance.
Konfig update reports "... but Konfig failed to update the privacy options..."
This is only a precautionary warning that the Privacy settings could not be updated automatically.
Go into Konfig > Device tab and set "Send Usage Data" and "Send Crash Data" to your preferred settings. (These are used to find out how the Linn DS is used and report any product crashes anonymously to Linn Products Ltd for diagnostic use.
When I click on Space Optimisation Konfig reports "this device is not compatible with space optimization"
- This is means that the Space Optimistation in this product has been created using the Kloud Konfig webapp. The Kloud Konfig Space Optimisation is a more advanced version of the Konfig version. More information on this subject can be found HERE
Konfig crashes after 10-20secs
This will occus if there has been a corruption in the download of data for Konfig operation. This will do a "clear cache" of Konfig fileCache folder.
On OSX/MAC
- Open Finder
- From the Menu bar at the top select 'Go' then 'Go to Folder'
- Type in "~/Library/Application Support/Linn/Konfig/FileCache" and click Go
- Select all the files in that folder and delete
- Now reboot your MAC and rerun Konfig
On a Windows PC
- Using My computer, go into C:\Users\<username>\AppData\Roaming\Linn and delete the Konfig folder. (You may have to go into "Tools > Folder Options > View" and enable "Show hidden files, folders, or drives")
- Now reboot your PC and rerun Konfig
On Windows10 all of the screen text is huge and cannot access all controls
Suspect that you have a hi-resolution display. The solution is:
- Right click the Konfig application icon and click on Properties
- Click on the Compatibility tab
- Click on “Change high DPI settings”
- Check the box that says Override high DPI scaling behavior
- From the drop down menu select Scaling performed by System
- Hit OK
- Back at the Compatibility tab, click Apply
- Hit OK to exit Properties
- Log out or reboot your PC
This will fix the screen size issue.
Issues programming an Exakt products
If the device fails to program:
1 - Make sure that the Linn DS/DSM and Exakt speakers are ON
2 - press fallback on each Exakt speaker/ExaktBox
3 - run Konfig, go into the Linn DS/DSM > Exakt page and select <RESTORE> to programme each speaker.
- When a failure is reported, DO NOT press FALLBACK at any time:
- - Quit Konfig
- - Power cycle (Mains power OFF then ON), the Linn DS/DSM
- - Bring the Linn DS/DSM out of Sleep/Standby
- - Run Konfig, in Linn DS/DSM > Exakt page and each speaker should be showing the <RESTORE> button. Click <RESTORE> to restore these speakers
4 - device should now be reprogrammed correctly. If it doesn't please contact Linn Products with details of all product serial numbers and what the original software version (Davaar version was installed in the LinnDS/DSM
After Davaar55 update my Speaker assignments have changed
Davaar55 now supports Surround mode with Exakt speakers and local analogue outputs.
By default the Konfig software will look in the Linn DS/DSM for its configuration. If it finds one it will use this configuration. If, however, in previous versions of Davaar these configuration settings were only saved in the Exakt speakers if they were present.
The solution is:
- Power off the Linn DS/DSM,
- Disconnect the Exakt-link cables to the Exaktbox or Exakt speakers
- Restart Konfig, this will now only show the Linn DS/DSM configuration in the Speakers tab.
- Clear all speakers in the Speakers tab and hit APPLY.
- Power off the Linn DS/DSM and reconnect the Exakt-link connections
- Restart Konfig and your configuration on your Exakt speakers will now be visible.
Note: This issue should only occur if the Linn DS/DSM had previously been configured with Space Optimisation when no Exakt speakers have been present.
After Davaar55 I only get Exakt audio, no analogue audio
If you have Exakt speakers and the Linn DSM analogue outputs set for Stereo playback (front Left/right on two sets of speakers), this, by default is disabled. This is because the Exakt audio is approx 45mS out of sync with the analogue outputs.
To enable the analogue outputs go into Konfig and select your DSM > Device > "Dual Analogue/Exakt Stereo Output" and Enable this option
In Space Optimisation I cannot enter any information
Check that your PC has Internet Explorer 11 installed (As per Script error above) Konfig will not work with Windows XP as this will only support Internet Explorer9
Konfig states DS and Exakt products are incompatible state
This is stating that the software running on the Linn DS/DSM is not configured to work with the Exakt devices (due to improvements in communications and Exakt protocol).
This will typically give you the option to update the Linn DS/DSM or the Exakt products or both Linn DS/DSM and Exakt products. Select the best option an press the UPDATE button against that option.
Note: If you are, or have been using BETA software this may get a little confusing. We suggest to do the procedure below to get this back into a working state.
If only the Linn DS/DSM is shown but no Exakt speakers it looks like the difference is too large. The solution is to;
- Ensure that the Linn DS/DSM is out of Standby and the speakers/Exaktboxes are power on
- Press the FALLBACK button on all of the Exakt speakers and/or Exaktboxes. This will add the Exakt speakers/Exaktbox to the KONFIG > UPDATES page
- Now press UPDATE against each Exakt product to bring these product to the correct software level.
- Setup the Exakt speakers as required and you are ready to Rock'n'Roll
Konfig cannot see any of my DS
Check within Settings that the Network connection is correct.
In older versions of Konfig you only had to select the network card, (wired, wireless etc). Now Konfig asks you for the Network IP range, this is to simplify the connection as this can use BOTH the wired and wireless connections if they are connected to the same Network.
If your PC/MAC has changed Ethernet networks (for installation, Home-Work etc), the Konfig may be setup for a different address range and not see any DS products. So if your Konfig cannot see your Linn DS products, go into Settings and check that the correct Network address has been selected (click on the drop down box to see what is available)
If you are using Wifi we suggest disabling this and using a wired connection to the PC/MAC and select this new network connection. This will tell you if the Wifi / Wifi network adaptor or Router is causing the issue. (The Linn DS/DSM is found using UPnP protocol, if your Wifi does not support UPnP or Multicasting this can cause this issue).
Check Firewalls
Some Anti-virus Suites also have additional Firewalls that will block a lot of communications. If Konfig used to work and now does not find any products then check if your Anti-Virus suite has recently had a major update. This update may require the Konfig for have "firewall exceptions".
Windows has it own firewalls you can check the settings by:
- Control Panel > Windows Firewall > Advanced Settings
- then select Inbound Rules and check that ALL of the entries for Konfig are enabled
- They should have a green check/tick on all entries.
- If they have a red restriction symbol then they have been blocked. You can change this:
- Select the restricted Konfig's Rules
- In the General tab enable the "Allow the connection"
- repeat this for All Konfig Rules with the Restriction symbol & restart Konfig
Konfig will not let me do a Space Optimisation
Konfig must have the Room Dimension, each Wall construction type, Listening position and Speakers used with the IDEAL POSITION entered. If you only have the Practical position entered Konfig will have no reference to the best sounding position in this room.
SPACE OPTIMISATION only lists "Unknown" speakers
or
Konfig cannot load Assets
When Konfig is first run it will download the speaker setups for all supported speakers. If this is still being loaded (from a slow internet connection), this will only show unknown speakers.
The solution is to leave Konfig running for a few minutes and wait until it has file has been downloaded and available for Konfig to use.
- If this is an update from a previous version of Konfig this may be a little confused during the update:
- 1. Quit the Konfig software
- 2. Delete the Konfig settings (This will only require the options of Konfig to be re-configured)
- On a Windows PC
- Using My computer, go into C:\Users\<username>\AppData\Roaming\Linn and DELETE the KONFIG folder. (You may have to into Tools > Folder Options > View and enable "Show hidden files, folders, or drives")
- On a Apple MAC
- Using Finder, GO > Go to Folder "~/Library/Application Support/Linn" and delete the Konfig folder
- 3. Restart Konfig. This may take a short time to update itself from your internet connection.
After the software update the Linn DS is not working correctly or losing settings
This can be due to a configuration conflict with the last software version:
- From Konfig, under the Advanced page, select your DS
- Select the RESTORE button, this will reset the Linn DS back its factory defaults
- Reconfigure your DS to your preferred setting. (As this is configuration is performed in the same software version this should remove any previous conflicts).
Konfig does not run on my Mac - the icon bounces in the dock and then goes away
- Open Finder
- From the Menu bar at the top select 'Go' then 'Go to Folder'
- Type in "~/Library/Application Support/Linn/Konfig" and click Go
- Select 'settings.json' file and delete
What if I have problems updating?
Don't panic, the update process is safe, so you should always be able to recover your device
- Restart Konfig. If your device reports the expected version, the update was successful and you are done
- If your device does not report the expected version, retry the update process (if you were updating over wireless, try updating over a wired connection)
- If this fails, power cycle your device and try again
- If this fails, try the Recovery Procedure below
If you are updating a system with Exakt devices (Exakt Speakers or Exaktbox)
- Disconnect the Exakt-link(s) from the Linn DS/DSM
- Restart Konfig
- Update the Linn DS/DSM
- Reconnect the Exakt-link(s)
- Put the Linn DS/DSM in to Sleep/Standby, wait 10seconds
- Bring the Linn DS/DSM out of Standby and check both the Konfig > Linn DS/DSM Speakers tab and press the RESTORE button against these Exakt devices
Recovery Procedure
- Download the latest version of software for your product from >HERE< (Make sure
 is hlighlighted to show the full file listing).[If you dont know the file to download then please ask the Linn Helpline and provide themwith your Linn DS/DSM serial number)
 - Save this .zip file to a known location on your hard drive
- Open Linn Konfig
- Go to the ‘Advanced’ page
- Make sure the Linn DS/DSM/HUB is powered on and connected to the network
- Press the fallback button on the Linn DS/DSM/HUB product
- The DS should appear in Konfig with a lightning symbol beside it
- Click the 'Browse' button beside the Linn DS/DSM/HUB in Konfig
- Locate the .zip file that you just saved and select this
- Select the ‘Device Recovery’ option (this will revert all user settings to factory defaults)
- Click on ‘Update’
- The unit should update successfully
- If the update fails then contact your Linn retailer for further support
NOTE: On a Mac the downloaded firmware is automatically unzipped by the OS.
To stop this, go into Safari Settings > Preferences > General > uncheck "Open safe files after downloading"
What if I want to revert to older versions of firmware?
We only support the latest firmware release and do not recommend running old firmware on any Linn DS.
We only archive released versions of firmware.
- Put your device into fallback mode from the button on the back of the device
- Download and install the compatible version of Konfig from the release download site (i.e. Cara Konfig if you are reverting to Cara firmware, Davaar for Davaar, etc)
- Download the version of firmware (zip file) you wish to use from the release download site (only firmware for your device model will work)
- From Konfig, under the Advanced page, enter the downloaded firmware location for your Linn device
Keep in mind, only compatible control points will work with your device (i.e. Cara with Cara, Davaar with Davaar, etc)
What if I have problems updating my Exakt devices?
Don't panic, the update process is safe, so you will always be able to recover your device
- Normally, your Exakt devices will update seamlessly as part of the standard DS/DSM update process.
- Make sure that your PC/MAC is connected via a WIRED network connection to the LAN. (Wi-Fi connections can be unreliable).
- Put the Linn DS/DSM into Standby, wait 30 seconds and bring the Linn DS/DSM out of Standby
- Open your Linn DS/DSM in Manage Systems . If your Exakt device appears in the GENERAL tab, then the update was successful, and you are done.
- If this fails, follow the device recovery process below:
- Replace the current Exakt cables, from Linn DS/DSM to each speaker, with CAT5 or CAT6a cables. DO NOT CAT7, CAT8 or any specialist audio cables
- Put BOTH your Exakt device and connected DS/DSM into fallback (from the buttons on the back of the devices).
- Go through the Linn App RECOVERY procedure. Click HERE.
- After the RECOVER you will have to relink the Linn DS/DSM to your Linn Account.
- After attaching to your Linn Account, now open Manage Systems and reset your Linn System.
Why does Konfig not show Space Optimisation for my DS?
Space Optimisation for DS was introduced in Davaar 25.
To enable Space Optimisation on your DS you will need to install Davaar 25 or later firmware on your DS.
Known Issues
Konfig reporting "Update failure" when trying to download the firmware from the Cloud
- Check that you are using Konfig 4.37.174 or later and using Windows 10 or 11 (or MAC).
- The file transfer protocol used in previous versions of Windows and Konfig have now been discontinued and no longer supported.
Konfig not reverting to non-Beta Application version
If you have unchecked the Beta application release of Konfig this only stops checking to see if a beta release exists. It does NOT revert you back to the official release.
If you want to install the official release, then go to www.Linn.co.uk/software and redownload/install the current version of Konfig.
If you start Konfig and only get a white screen or only shows toolbar with no "Show devices" button:
- Windows
- 1. Go into Google Chrome - Settings - Show advance settings
- 2. Select Privacy - Content settings
- a) If ""JavaScript is "Do not allow any site to run JavaScript" change this to "Allow all sites to run JavaScript"
- 3. OK, out of this & restart Konfig
- MAC OSX
- 1. Go into Preferences - Java
- 2 Go to Security and reduce the security level from Very High to High
- 3 OK, out of this and restart Konfig
- If this does not cure the issue then in MAX OSX
- 1. Run Konfig
- 2. Open Internet Explorer/Safari
- 3. Type in http://localhost:5011 into the IE address bar
- 4. If Safari reports "Safari can’t open the page “http://localhost:5011” because the server "localhost” is missing" then
- Open the Utilities/Terminal App and type sudo nano /etc/hosts you should see some text. It should look like this:
## # Host Database # # localhost is used to configure the loopback interface # when the system is booting. Do not change this entry. ## 127.0.0.1 localhost 255.255.255.255 broadcasthost ::1 localhost
- if this file/box is empty then enter the information shown above, into the /etc/host box and exit by using the "CTRL" X keys then Y to confirm the save. We want to save the fie in Mac format, so press the Esc (Escape) key and then press M (this is what the M- means in the help bar).
- 5. Reboot your MAC to ensure that these new settings are being used and retry Konfig.
- After the update, some PC/MAC cannot find any Linn DS/DSM products:
Do the following procedure:
- 1. If you are using Norton Anti-virus, make sure that the new Konfig is added an exception
- 2. Restart your PC/MAC and retry Konfig 10
- a) Press the SHOW DEVICES button
- b) If a number appears beside the Updates tab (top of Konfig screen,
- i) Press the Updates tab and press UPDATE beside your Linn DS/DSM name
- ii) Wait until the update is finished and Press the SHOW DEVICES button. Your DS should now appear.
If your Linn DS/DSM is not listed
- 3. Press the ADVANCED tab and see if your Linn DS/DSM is listed here
- If neither of these two options work
- Follow the Konfig 10 diagnostics
- If doing an Advanced download, Konfig reports "cannot find directory.."
- Check that
- 1. You can type the correct file location and file name in to the download field
- 2. Konfig 4.10.5-4.11.2 needs internet access before doing the file update. Make sure that you have an Internet link BEFORE opening Konfig
- When entering the room dimensions in Space Optimisation, clicking the tick box deletes the values entered
- Use the 'Enter' key or the 'Tab' key instead of the tick box.
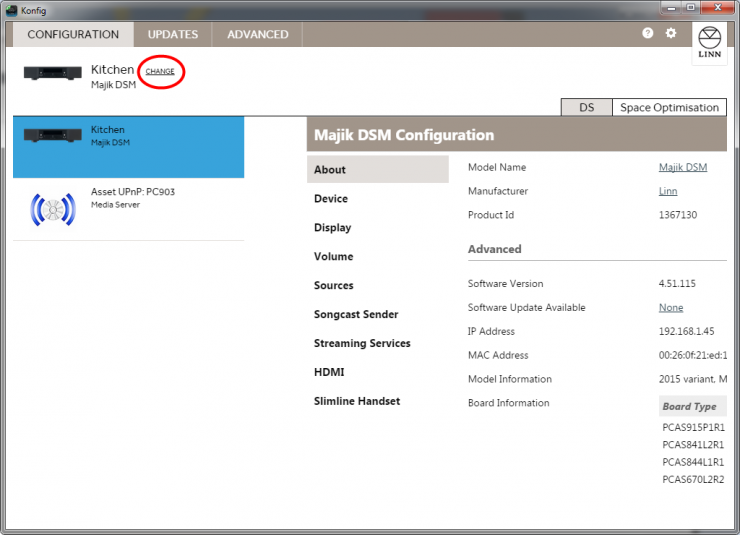
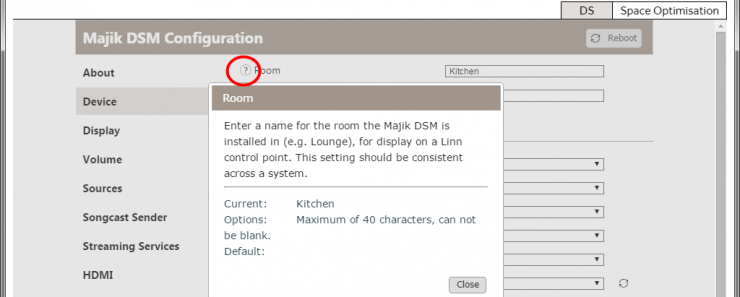
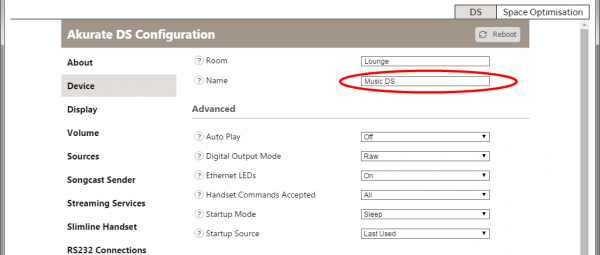
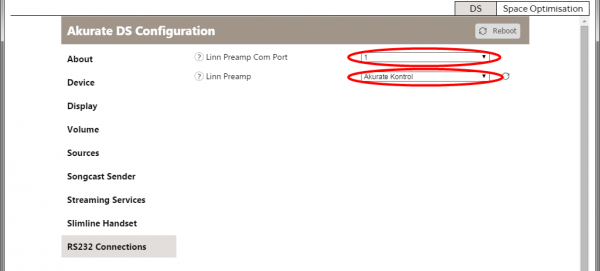

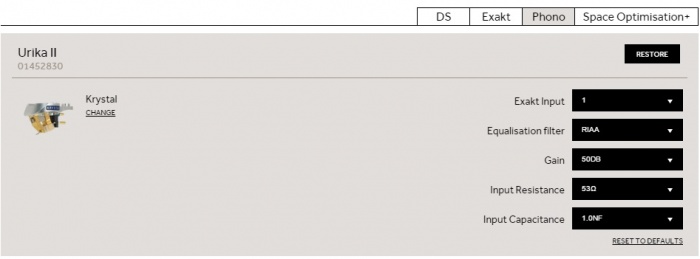
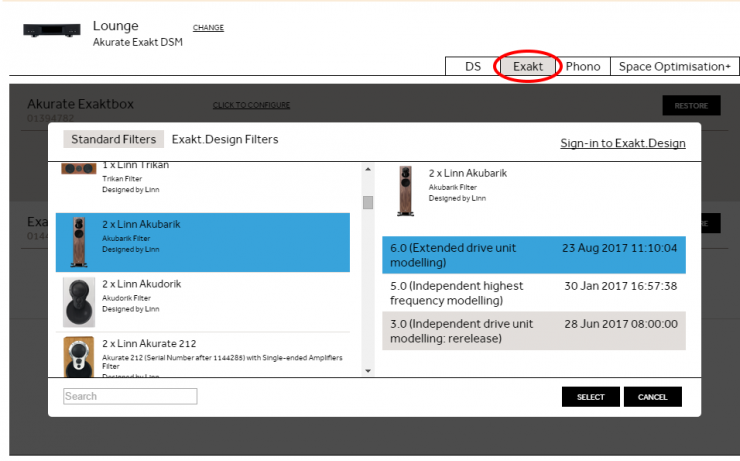


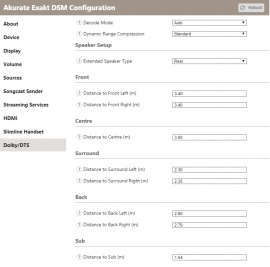
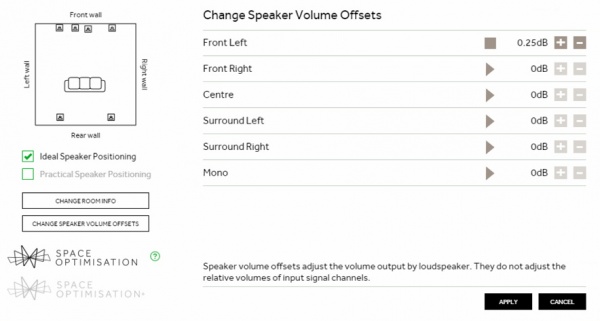


 icon, this will proceed to the Recovery page