Difference between revisions of "Series 3 Setup"
m |
m (→Bluetooth) |
||
| Line 242: | Line 242: | ||
==Bluetooth== | ==Bluetooth== | ||
| − | {{ | + | {{:FAQ:Bluetooth}} |
Revision as of 12:39, 24 October 2019
Linn Setup Guide:
How to set up the Linn Series 3 loudspeaker
Contents
- 1 Product info
- 2 Initial Setup
- 3 Download App
- 4 Setup and changes
- 5 Space Optimisation
- 5.1 What are the differences between the Konfig Space Optimisation and Linn Account (Kloud Konfig) Space Optimisation?
- 5.2 What is the difference between Space Optimisation & Space Optimisation+?
- 5.3 Is the Linn Account Manage systems only available for the new Linn DSM's
- 5.4 Why don't you use a Microphone in Space Optimisation?
- 5.5 Can I use "Linn Account Space Optimisation" with my Exakt system?
- 6 Series3-301 Touch Interface
- 7 Series3 Touch Interface notifications
- 8 Control of the Linn DS/DSM using a PC/MAC/Tablets & Phones
- 9 Bluetooth
Product info
- Product Name: Series 3 Loudspeaker
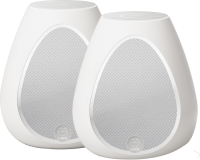
- 301 - All-In-One Wireless speaker & digital Music player
- 302 (partner) - Exakt speaker
- Date of Introduction: October 2019
- Type: Integrated digital music player, pre-amplifier and power amplifier
- Versions: None
- Features
- Digital streaming via Bluetooth, Wi-Fi & Airplay
- Connect TV via HDMI ARC
- Exakt Technology
- On-board Amplification
- Connect a partner speaker via Exakt Link to create a stereo system
Initial Setup
If you have just received this Linn product then you will be eager to listen to the Music. This section will show you how to unpack it, wire it up, position it and get Music playing...
The Series-3 301 speaker can be used alone for Mono playback or with the Series-3 302 speaker wired, using a CAT-5 Exakt-Link cable, for Stereo playback.
Unpacking
Remove the Series-3 (301) from the packing and check you have all of the accessories.
Now place the product you want it to be.
- REQUIRED CONNECTION
-
- 1. A mains power socket
Wiring
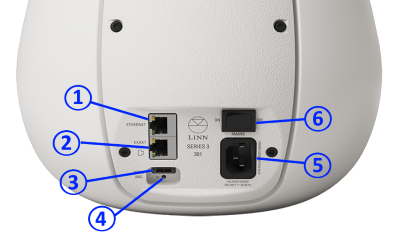
Series3-301 back panel
Information of what each connector is and a basic specification of these connectors
- ETHERNET - To connect to a network (100Base-T)- Not required if you are only using Bluetooth and/or Wifi connections
- EXAKT LINK - To connect to Exakt compatible devices (Exaktbox, Exakt Speakers, Urika II etc) - to Partner with a Series3-302
- HDMI ARC (HDMI) - To connect to a TV Audio Return Channel (ARC) connection
- FALLBACK - To put the device into Fallback mode (used when reprogramming)
- MAINS INPUT - To connect to the mains electricity supply.
- POWER SWITCH - Mains power switch
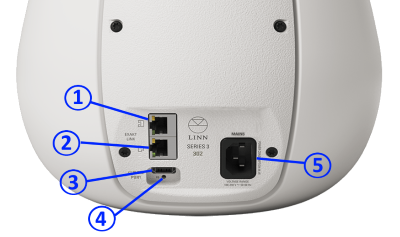
Series3-302 partner backpanel
Information of what each connector is and a basic specification of these connectors
- EXAKT-LINK - connection to Series3-301 speaker
- EXAKT LINK - To connect to Exakt compatible devices (Exaktbox, Exakt Speakers, Urika II etc) - connection to other Exakt-link applicable products
- SERVICE PORT For Linn service only
- FALLBACK - To put the device into Fallback mode (used when reprogramming)
- MAINS INPUT - To connect to the mains electricity supply.
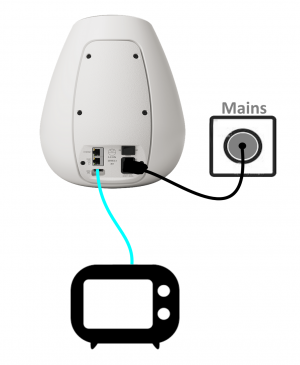
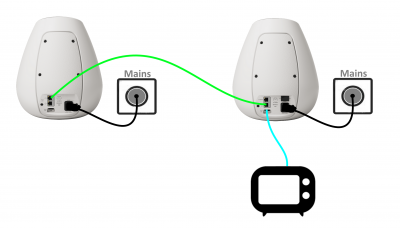
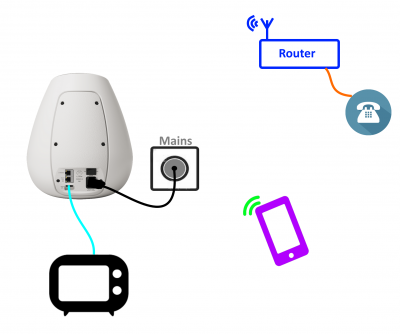
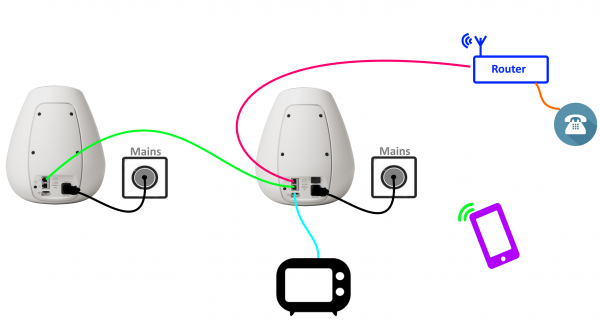
HDMI-ARC audio only setup
HDMI-ARC only (using the Series 3 as a TV Sound bar)
- This setup will allow:
- The Series3-301 to receive Mono audio and volume control from the HDMI-ARC connection from the TV. (The Series3 volume buttons will also control the volume)
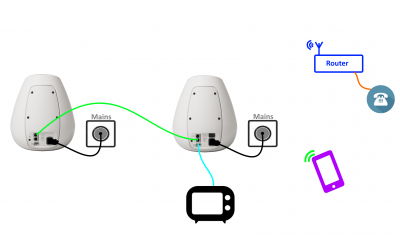
HDMI-ARC only (using the Series 3 as a Stereo TV Sound bar)
- This setup will allow:
- The Series3-301 to receive Stereo audio and volume control from the HDMI-ARC connection from the TV. (The Series3 volume buttons will also control the volume)
Configure for use with Series3-302 partner speaker

|
Add/Remove a Partner speaker setup procedure
(This will change the Series3-301 from MONO to STEREO and use the Series3-302 as the other STEREO channel) : | |
| 1. Connect or remove the Series3-302 speaker as required: | ||
| * Stereo mode:Connect the Series3-302 using an Exakt-link cable to the Series3-302 | ||
| * Single (mono) mode: Disconnect the Series3-302 Exakt-link from the Series3-302 | ||
2. Press and HOLD both buttons
| ||
| 3. This process is complete when the Series3-301 volume indicators are all illuminated for a few seconds and return back to volume level display. |
The On-line setup guide can be found https://www.linn.co.uk/setup
- Note
- if you disconnect the Exakt-link or do not have the Mains power going to the Series3-302 speaker and have the previously setup the Series3-301 for Stereo operation then you will only get one channel playback, (left channel only). The Series3-301 will assume that the other speaker still exists and has to be "'configured'" for Mono playback.
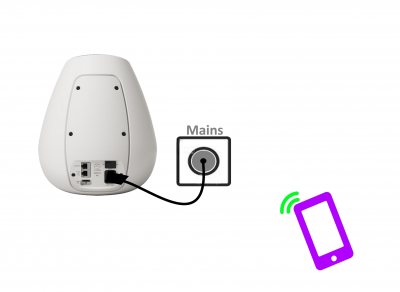
Bluetooth only setup
Bluetooth only
- This setup will allow:
- The Series3-301 as a Mono Bluetooth loudspeaker.

|
Bluetooth Setup procedure: | |
1. On the Series3-301, press and HOLD buttons
| ||
| 2. On your Bluetooth device, setup this up for pairing and look for Linn Series 3. | ||
| 3. This Bluetooth pairing process is complete when the Series3-301 volume indicators are all illuminated for a few seconds and return back to volume level display. |
The On-line setup guide can be found https://www.linn.co.uk/setup
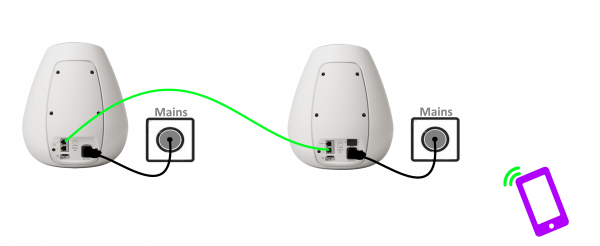
Bluetooth only with Stereo playback
- This setup will allow:
- The Series3-301 & Series3-302 as Stereo Bluetooth loudspeakers.
Configure for Bluetooth pairing

|
Bluetooth Setup procedure: | |
1. On the Series3-301, press and HOLD buttons
| ||
| 2. On your Bluetooth device, setup this up for pairing and look for Linn Series 3. | ||
| 3. This Bluetooth pairing process is complete when the Series3-301 volume indicators are all illuminated for a few seconds and return back to volume level display. |
The On-line setup guide can be found https://www.linn.co.uk/setup Configure for use with Series3-302 partner speaker

|
Add/Remove a Partner speaker setup procedure
(This will change the Series3-301 from MONO to STEREO and use the Series3-302 as the other STEREO channel) : | |
| 1. Connect or remove the Series3-302 speaker as required: | ||
| * Stereo mode:Connect the Series3-302 using an Exakt-link cable to the Series3-302 | ||
| * Single (mono) mode: Disconnect the Series3-302 Exakt-link from the Series3-302 | ||
2. Press and HOLD both buttons
| ||
| 3. This process is complete when the Series3-301 volume indicators are all illuminated for a few seconds and return back to volume level display. |
The On-line setup guide can be found https://www.linn.co.uk/setup
- Note
- if you disconnect the Exakt-link or do not have the Mains power going to the Series3-302 speaker and have the previously setup the Series3-301 for Stereo operation then you will only get one channel playback, (left channel only). The Series3-301 will assume that the other speaker still exists and has to be "'configured'" for Mono playback.
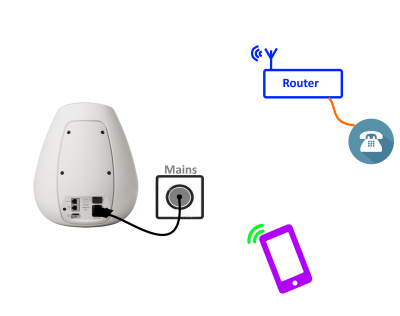
Wifi wiring & setup
Basic Wifi operation
This setup will allow:
- Stream Music, using Wifi, to the Series3 speaker(s).
- Optional Bluetooth loudspeaker operation is still available by initial setup of Bluetooth
- This is to setup the Wifi connection using the front panel buttons.

|
WPS WIFI Setup procedure: | |
| 1. On your ISP Router, press the WPS button to start the connection process. | ||
| * Check your Router manual on how start WPS pairing. | ||
2. On the Series3-301 , press and HOLD buttons
| ||
| 3. This process is complete when the Series3-301 volume indicators are all illuminated for a few seconds and return back to volume level display. |
- Or
| Alternative Wifi Setup Method via Web Browser: | |
| 1. With the Series3-301 DSM out of Sleep mode | |
| 2. Go to the Wireless settings on your device (e.g. iPad) | |
| 3. Find the Series-301 on the list of available networks. It will be called Series3- <serial number> | |
| 4. Select this as the wireless network on your device (e.g. iPad) | |
| 5. Now open a web browser on your device and type "https://setup.linn.co.uk" in the address bar | |
| 6. The Series3 Wifi Setup page should now be displayed (if you get a "..cannot find the server” error then you have not selected to Series3 Wifi channel in point 3&4) | |
| 7. Select the Wifi network you want to connect to | |
| 8. Enter the passkey for the Wifi network | |
| 9. Click on 'Set Network' | |
Note: If you cannot get any page from "https://setup.linn.co.uk", this may be due to added security on your phone/tablet. Check that the:
|
Note: To CLEAR/REMOVE any Wifi settings On the Series3-301 , press and HOLD buttons ![]() ,
, ![]() &
& ![]() for 2 seconds and this will forget your Wifi settings.
for 2 seconds and this will forget your Wifi settings.
Wifi operation with TV audio and streaming
This setup will allow:
- Mono TV audio from the TV HDMI-ARC socket
- Stream Music, using cable ethernet, to the Series3 speaker(s).
- Optional Bluetooth loudspeaker operation is still available by initial setup of Bluetooth
- This is to setup the Wifi connection using the front panel buttons.

|
WPS WIFI Setup procedure: | |
| 1. On your ISP Router, press the WPS button to start the connection process. | ||
| * Check your Router manual on how start WPS pairing. | ||
2. On the Series3-301 , press and HOLD buttons
| ||
| 3. This process is complete when the Series3-301 volume indicators are all illuminated for a few seconds and return back to volume level display. |
- Or
| Alternative Wifi Setup Method via Web Browser: | |
| 1. With the Series3-301 DSM out of Sleep mode | |
| 2. Go to the Wireless settings on your device (e.g. iPad) | |
| 3. Find the Series-301 on the list of available networks. It will be called Series3- <serial number> | |
| 4. Select this as the wireless network on your device (e.g. iPad) | |
| 5. Now open a web browser on your device and type "https://setup.linn.co.uk" in the address bar | |
| 6. The Series3 Wifi Setup page should now be displayed (if you get a "..cannot find the server” error then you have not selected to Series3 Wifi channel in point 3&4) | |
| 7. Select the Wifi network you want to connect to | |
| 8. Enter the passkey for the Wifi network | |
| 9. Click on 'Set Network' | |
Note: If you cannot get any page from "https://setup.linn.co.uk", this may be due to added security on your phone/tablet. Check that the:
|
Note: To CLEAR/REMOVE any Wifi settings On the Series3-301 , press and HOLD buttons ![]() ,
, ![]() &
& ![]() for 2 seconds and this will forget your Wifi settings.
for 2 seconds and this will forget your Wifi settings.
Wifi operation with Stereo TV audio and streaming
This setup will allow:
- Stereo TV audio from the TV HDMI-ARC socket
- Stereo streaming Music, using cable ethernet, to the Series3 speaker(s).
- Optional Stereo Bluetooth loudspeaker operation is still available by initial setup of Bluetooth
- This is to setup the Wifi connection using the front panel buttons.

|
WPS WIFI Setup procedure: | |
| 1. On your ISP Router, press the WPS button to start the connection process. | ||
| * Check your Router manual on how start WPS pairing. | ||
2. On the Series3-301 , press and HOLD buttons
| ||
| 3. This process is complete when the Series3-301 volume indicators are all illuminated for a few seconds and return back to volume level display. |
- Or
| Alternative Wifi Setup Method via Web Browser: | |
| 1. With the Series3-301 DSM out of Sleep mode | |
| 2. Go to the Wireless settings on your device (e.g. iPad) | |
| 3. Find the Series-301 on the list of available networks. It will be called Series3- <serial number> | |
| 4. Select this as the wireless network on your device (e.g. iPad) | |
| 5. Now open a web browser on your device and type "https://setup.linn.co.uk" in the address bar | |
| 6. The Series3 Wifi Setup page should now be displayed (if you get a "..cannot find the server” error then you have not selected to Series3 Wifi channel in point 3&4) | |
| 7. Select the Wifi network you want to connect to | |
| 8. Enter the passkey for the Wifi network | |
| 9. Click on 'Set Network' | |
Note: If you cannot get any page from "https://setup.linn.co.uk", this may be due to added security on your phone/tablet. Check that the:
|
Note: To CLEAR/REMOVE any Wifi settings On the Series3-301 , press and HOLD buttons ![]() ,
, ![]() &
& ![]() for 2 seconds and this will forget your Wifi settings.
for 2 seconds and this will forget your Wifi settings.
Configure for use with Series3-302 partner speaker

|
Add/Remove a Partner speaker setup procedure
(This will change the Series3-301 from MONO to STEREO and use the Series3-302 as the other STEREO channel) : | |
| 1. Connect or remove the Series3-302 speaker as required: | ||
| * Stereo mode:Connect the Series3-302 using an Exakt-link cable to the Series3-302 | ||
| * Single (mono) mode: Disconnect the Series3-302 Exakt-link from the Series3-302 | ||
2. Press and HOLD both buttons
| ||
| 3. This process is complete when the Series3-301 volume indicators are all illuminated for a few seconds and return back to volume level display. |
The On-line setup guide can be found https://www.linn.co.uk/setup
Cable network wiring & setup
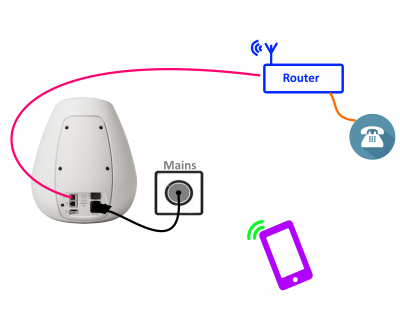
Wired network operation
This setup will allow:
- Stream Music, using cable ethernet, to the Series3 speaker(s).
- Optional Bluetooth loudspeaker operation is still available by initial setup of Bluetooth
- No top plate setup required
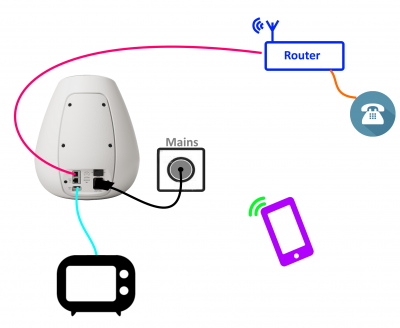
Wired network operation with TV audio and streaming
This setup will allow:
- Mono TV audio from the TV HDMI-ARC socket
- Stream Music, using cable ethernet, to the Series3 speaker(s).
- Optional Bluetooth loudspeaker operation is still available by initial setup of Bluetooth
- No top plate setup required
Wired network operation with Stereo TV audio and streaming
This setup will allow:
- Stereo TV audio from the TV HDMI-ARC socket
- Stereo streaming Music, using cable ethernet, to the Series3 speaker(s).
- Optional Stereo Bluetooth loudspeaker operation is still available by initial setup of Bluetooth
Configure for use with Series3-302 partner speaker

|
Add/Remove a Partner speaker setup procedure
(This will change the Series3-301 from MONO to STEREO and use the Series3-302 as the other STEREO channel) : | |
| 1. Connect or remove the Series3-302 speaker as required: | ||
| * Stereo mode:Connect the Series3-302 using an Exakt-link cable to the Series3-302 | ||
| * Single (mono) mode: Disconnect the Series3-302 Exakt-link from the Series3-302 | ||
2. Press and HOLD both buttons
| ||
| 3. This process is complete when the Series3-301 volume indicators are all illuminated for a few seconds and return back to volume level display. |
The On-line setup guide can be found https://www.linn.co.uk/setup
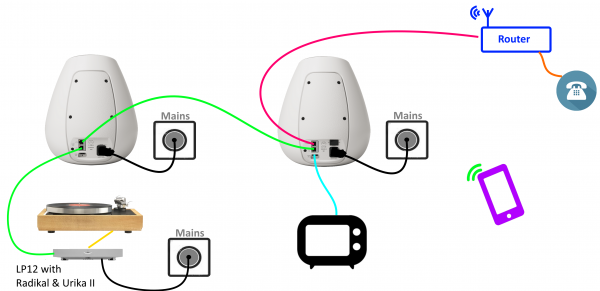
Wired network operation with LP12, TV audio and streaming, all in Stereo
This setup will allow:
- Stereo LP12 turntable playback. The Linn LP12 MUST be fitted with both URIKA-II and Radikal motor supply
- Optional:
- Stereo TV audio from the TV HDMI-ARC socket
- Stereo streaming Music, using cable ethernet or Wifi, to the Series3 speaker(s)
- Stereo Bluetooth loudspeaker operation is still available by initial setup of Bluetooth
Positioning
- Review the advised Positioning guide to ensure safe and cool operation of the Series3 speakers
Summary
Configure for use with a Series3-302

|
Add/Remove a Partner speaker setup procedure
(This will change the Series3-301 from MONO to STEREO and use the Series3-302 as the other STEREO channel) : | |
| 1. Connect or remove the Series3-302 speaker as required: | ||
| * Stereo mode:Connect the Series3-302 using an Exakt-link cable to the Series3-302 | ||
| * Single (mono) mode: Disconnect the Series3-302 Exakt-link from the Series3-302 | ||
2. Press and HOLD both buttons
| ||
| 3. This process is complete when the Series3-301 volume indicators are all illuminated for a few seconds and return back to volume level display. |
The On-line setup guide can be found https://www.linn.co.uk/setup
Configure for Wifi
- This is to setup the Wifi connection using the front panel buttons.

|
WPS WIFI Setup procedure: | |
| 1. On your ISP Router, press the WPS button to start the connection process. | ||
| * Check your Router manual on how start WPS pairing. | ||
2. On the Series3-301 , press and HOLD buttons
| ||
| 3. This process is complete when the Series3-301 volume indicators are all illuminated for a few seconds and return back to volume level display. |
- Or
| Alternative Wifi Setup Method via Web Browser: | |
| 1. With the Series3-301 DSM out of Sleep mode | |
| 2. Go to the Wireless settings on your device (e.g. iPad) | |
| 3. Find the Series-301 on the list of available networks. It will be called Series3- <serial number> | |
| 4. Select this as the wireless network on your device (e.g. iPad) | |
| 5. Now open a web browser on your device and type "https://setup.linn.co.uk" in the address bar | |
| 6. The Series3 Wifi Setup page should now be displayed (if you get a "..cannot find the server” error then you have not selected to Series3 Wifi channel in point 3&4) | |
| 7. Select the Wifi network you want to connect to | |
| 8. Enter the passkey for the Wifi network | |
| 9. Click on 'Set Network' | |
Note: If you cannot get any page from "https://setup.linn.co.uk", this may be due to added security on your phone/tablet. Check that the:
|
Note: To CLEAR/REMOVE any Wifi settings On the Series3-301 , press and HOLD buttons ![]() ,
, ![]() &
& ![]() for 2 seconds and this will forget your Wifi settings.
for 2 seconds and this will forget your Wifi settings.
Configure for Bluetooth speaker operation
Series 3 currently implements Bluetooth v4.2.

|
Bluetooth Setup procedure: | |
1. On the Series3-301, press and HOLD buttons
| ||
| 2. On your Bluetooth device, setup this up for pairing and look for Linn Series 3. | ||
| 3. This Bluetooth pairing process is complete when the Series3-301 volume indicators are all illuminated for a few seconds and return back to volume level display. |
The On-line setup guide can be found https://www.linn.co.uk/setup
Download App
- Kazoo (Aug 2023 - Ceased all development)
The Linn DS/DSM can be done from many control points at the same time.
Note: from April 2023 : Tidal have removed support for the Linn Kazoo application on ALL platforms. We recommend trying the new Linn app (available on iOS and Android)
- The name of this control App/software is KAZOO..
- Kazoo control App/software is available for
-
| Windows Kazoo download - from April 2023 : Tidal have removed support for the Linn Kazoo application on ALL platforms. We recommend trying the new Linn app (available on iOS and Android)
-
- Kazoo control App/software is available for
MAC OSX Kazoo download- from April 2023 : Tidal have removed support for the Linn Kazoo application on ALL platforms. We recommend trying the new Linn app (available on iOS and Android)
 Android Kazoo for Android Phone/Tablet download
- from April 2023 : Tidal have removed support for the Linn Kazoo application on ALL platforms. We recommend trying the new Linn app (available on iOS and Android)
Setup and changes
There are two ways to configure, (if required), your Linn DS/DSM player/Speakers etc:
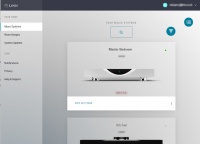
Before you do anything you will need to have a Linn Account. This is a simple process and can only be performed using the Kazoo App or Linn App.
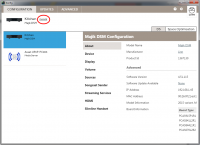
Details on how to create your Linn Account and how to use Manage systems can be found in the Manage Systems page.
This Konfig App can be downloaded from KONFIG App
This will allow changing the Room name, Linn DS/DSM name, input name and other settings. This can be changes by yourself and/or your Linn Retailer.
Details of most of the options are listed in the Konfig Manual, this covers many options
Konfig has been deprecated and replaced by Manage Systems.
- Note: Manage Systems has taken over from Konfig and we would prefer you to use Manage Systems to setup an configure your Linn products.
Space Optimisation
 for ALL Linn DS/DSM products |
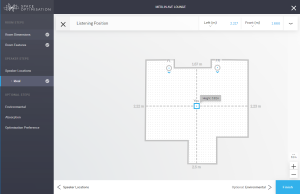 Linn Account Space Optimisation from Davaar64 ⇒ |
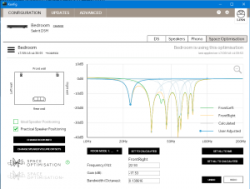 Linn Konfig Space Optimisation & Space Optimisation+ |
Linn Space Optimisation is currently configurable using either the Konfig app or the Linn Account Manage systems.
Click the above picture/icon for more information of that version of Space Optimisation.
More details of what Space Optimisation can be found can be found at www.Linn.co.uk
What are the differences between the Konfig Space Optimisation and Linn Account (Kloud Konfig) Space Optimisation?
- The new version of Space Optimisation uses highly sophisticated acoustic modelling to model the interactions between your speakers and the room; this acoustic modelling is based on the finite-difference time-domain method. A simple two-dimensional analogy to this method of acoustic modelling is of a fishing net laid over a pond; each knot in the net defines a discrete measurement location, so that when a stone is thrown into the pond, we can track the resulting ripple by measuring its height at each knot.
- The spatial discretisation employed by this method of acoustic modelling allows the new version of Space Optimisation to correctly consider the effects of:
- non-rectangular rooms;
- the placement of features like doors and windows;
- And the location and rotation of your speakers.
- Furthermore, the time-domain formulation of this method of acoustic modelling means that the new version of Space Optimisation can now reduce both the energy and decay time of any artificial distortions caused by the interactions between your speakers and the room, resulting in both a flat frequency response and a uniform decay time. :Finally, the new version of Space Optimisation has been designed to give a better balance of low- and mid-frequency energy.
What is the difference between Space Optimisation & Space Optimisation+?
- This is applicable to both Linn Konfig and Manage System/Kloud Konfig
- Space Optimisation is for NON-Exakt systems. This uses the direct analogue outputs of the Linn DS/DSM
Is the Linn Account Manage systems only available for the new Linn DSM's
- Both Applications can be used for ALL Linn Products.
- The only limitation is that the Linn DS/DSM must have Davaar64 to run Linn Account Manage systems]
Why don't you use a Microphone in Space Optimisation?
- The aim of Space Optimisation is to remove the effects of your room, to uncover the unique acoustic characteristics of your speakers; after all, this is what you fell in love with when buying your speakers. To achieve this, Space Optimisation needs to understand both the interactions between your speakers and the room and the unique acoustic characteristics of your speakers; the unique acoustic characteristics of your speakers are then subtracted from the interactions between your speakers and the room, leaving only the effects of your room.
- An acoustic measurement of the interactions between your speakers and room can have many sources of error which may affect the accuracy and repeat-ability of the measurement, including the choice of measurement stimulus, such as MLS or a log chirp; external noise, such as traffic noise and vibration; quality and calibration of the microphone, which can introduce distortion; and the microphone location, which can be sensitive to within a few centimetres. The use of acoustic modelling removes these sources of error: the model can apply an ideal impulse as stimulus; the modelling domain is free from noise; the model can use an ideal microphone; and the listening location is well-defined. It can thus be seen that acoustic modelling has a clear advantage over acoustic measurement in understanding the interactions between your speaker and the room.
- The unique acoustic characteristics of your speakers depend on many factors, including the shape and size of the drive units and ports; the constructive and destructive interference between the drive units, ports and any cabinet-edge diffraction sources; and the angle between the listening location and your speakers. Therefore, a simple on-axis anechoic measurement of your speakers is insufficient information; what is actually required is an anechoic measurement with your speakers in the same configuration as you have them in your home. While some manufacturers do publish anechoic measurements of their speakers, both on- and off-axis, it is extremely unlikely that they will have performed an anechoic measurement of your speakers in the same configuration as you have them in your home. The acoustic modelling of such a scenario is, however, straightforward; the model can simply turn your room into an anechoic chamber to obtain the unique acoustic characteristics of your speakers in the same configuration as you have them in your home. It can thus be seen that acoustic modelling once again has a clear advantage over acoustic measurement in understanding the unique acoustic characteristics of your speakers.
- From the above, it is clear that acoustic modelling is the best approach to Space Optimisation.
Can I use "Linn Account Space Optimisation" with my Exakt system?
- From November 2019 you can now use Linn Account Space Optimisation with Stereo and Surround Exakt systems.
Series3-301 Touch Interface
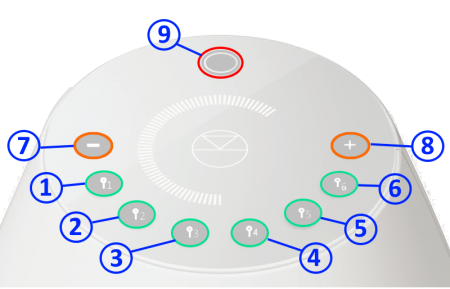
- Buttons keys
- Any Button - Wake Series3 301 from Standby/Sleep
 Select the Favourite media/PIN# 11 or setup Self configure with button6Self Configure
 Select the Favourite media/PIN# 21 or setup WiFi with button5WPS Wifi Setup
 Select the Favourite media/PIN# 31 or setup Bluetooth with button4Bluetooth Setup
 Select the Favourite media/PIN# 41 or setup Bluetooth with button3Bluetooth Setup
 Select the Favourite media/PIN# 51 or setup WiFi with button2WPS Wifi Setup
 Select the Favourite media/PIN# 61 or setup Self configure with button1Self Configure
- Volume DOWN2 - decrease volume
- Volume UP 2 - increase volume
- Multifunction button3: Pause/Play, Mute/Unmute, Standby
- Notes
- 1 A quick press of this button will select your PIN. For more information on PINS check the FAQ-What is a PIN
- Quick press/Tap action
- Increment or decrement the volume level by one step.
- Press and HOLD
- continuously Increment or decrement the volume level until button has the volume level has reached 0 or maximum level.
- Quick press/Tap action
- Quick press/Tap action
- Toggle between Pause/Play if you are playing a Music stream such as a Playlist, Tidal, Qobuz, Spotify
- Toggle between Mute/UnMute if you are playing a Radio station, HDMI ARC input or Bluetooth connection
- Press and HOLD
- Go into Standby/Sleep mode
- Quick press/Tap action

|
Add/Remove a Partner speaker setup procedure
(This will change the Series3-301 from MONO to STEREO and use the Series3-302 as the other STEREO channel) : | |
| 1. Connect or remove the Series3-302 speaker as required: | ||
| * Stereo mode:Connect the Series3-302 using an Exakt-link cable to the Series3-302 | ||
| * Single (mono) mode: Disconnect the Series3-302 Exakt-link from the Series3-302 | ||
2. Press and HOLD both buttons
| ||
| 3. This process is complete when the Series3-301 volume indicators are all illuminated for a few seconds and return back to volume level display. |
The On-line setup guide can be found https://www.linn.co.uk/setup
- This is to setup the Wifi connection using the front panel buttons.

|
WPS WIFI Setup procedure: | |
| 1. On your ISP Router, press the WPS button to start the connection process. | ||
| * Check your Router manual on how start WPS pairing. | ||
2. On the Series3-301 , press and HOLD buttons
| ||
| 3. This process is complete when the Series3-301 volume indicators are all illuminated for a few seconds and return back to volume level display. |
- Or
| Alternative Wifi Setup Method via Web Browser: | |
| 1. With the Series3-301 DSM out of Sleep mode | |
| 2. Go to the Wireless settings on your device (e.g. iPad) | |
| 3. Find the Series-301 on the list of available networks. It will be called Series3- <serial number> | |
| 4. Select this as the wireless network on your device (e.g. iPad) | |
| 5. Now open a web browser on your device and type "https://setup.linn.co.uk" in the address bar | |
| 6. The Series3 Wifi Setup page should now be displayed (if you get a "..cannot find the server” error then you have not selected to Series3 Wifi channel in point 3&4) | |
| 7. Select the Wifi network you want to connect to | |
| 8. Enter the passkey for the Wifi network | |
| 9. Click on 'Set Network' | |
Note: If you cannot get any page from "https://setup.linn.co.uk", this may be due to added security on your phone/tablet. Check that the:
|
Note: To CLEAR/REMOVE any Wifi settings On the Series3-301 , press and HOLD buttons ![]() ,
, ![]() &
& ![]() for 2 seconds and this will forget your Wifi settings.
for 2 seconds and this will forget your Wifi settings.

|
Bluetooth Setup procedure: | |
1. On the Series3-301, press and HOLD buttons
| ||
| 2. On your Bluetooth device, setup this up for pairing and look for Linn Series 3. | ||
| 3. This Bluetooth pairing process is complete when the Series3-301 volume indicators are all illuminated for a few seconds and return back to volume level display. |
The On-line setup guide can be found https://www.linn.co.uk/setup
Series3 Touch Interface notifications
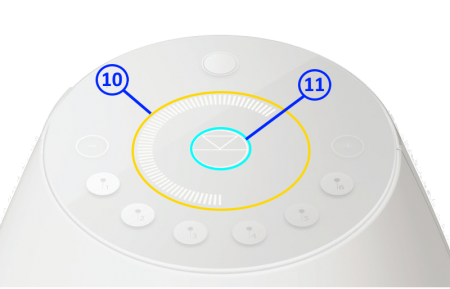
- . Primarily the outer ring is the volume level indicator.
- This also has other indications:

|
⊕ Press any of the Favourite/PIN buttons, the volume indicator will illuminate beside this button to show that it has been selected |

|
Bluetooth scan in progress |

|
WiFi scan in progress |
Normal operation with the Series 3 playing music
Linn symbol has a lower brightness level the Series3 speakers are MUTED
If you do not have a live Wifi/network/LAN connection to the Series 3 then the Linn symbol on the dial will go red.
If you select the HDMI-ARC input or Bluetooth to the Series 3 speaker this red light will go out
- If your network cable is plugged in and your network/LAN is alive then check that you have the network/LAN cable plugged into the LAN socket and NOT the Exakt socket.
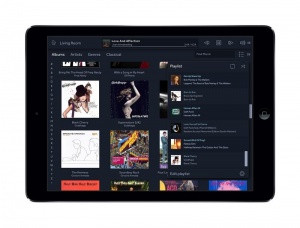
Control of the Linn DS/DSM using a PC/MAC/Tablets & Phones
Initial installation
- Linn App
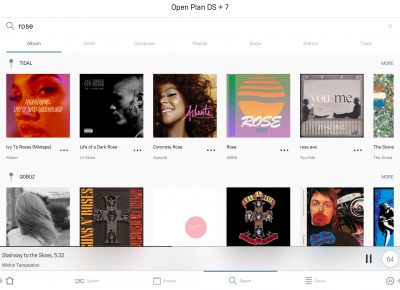
The Linn DS/DSM can be done from many control points at the same time.
- The name of this control App/software is Linn App
or
- Kazoo (Aug 2023 - Ceased all development)
The Linn DS/DSM can be done from many control points at the same time.
Note: from April 2023 : Tidal have removed support for the Linn Kazoo application on ALL platforms. We recommend trying the new Linn app (available on iOS and Android)
- The name of this control App/software is KAZOO..
- Kazoo control App/software is available for
-
| Windows Kazoo download - from April 2023 : Tidal have removed support for the Linn Kazoo application on ALL platforms. We recommend trying the new Linn app (available on iOS and Android)
-
- Kazoo control App/software is available for
MAC OSX Kazoo download- from April 2023 : Tidal have removed support for the Linn Kazoo application on ALL platforms. We recommend trying the new Linn app (available on iOS and Android)
 Android Kazoo for Android Phone/Tablet download
- from April 2023 : Tidal have removed support for the Linn Kazoo application on ALL platforms. We recommend trying the new Linn app (available on iOS and Android)
Using the Linn DS/DSM control software
As illustrated by the above section, there are multiple software/Apps for different control devices. Although Kazoo has the same style of control in each device, there are minor differences depending on what your control device is. This is why we have different Manuals.
These manuals should only be used as a basic guide for what the buttons can do. We would recommend just using the App/Software and only using the guide if you are having difficulty or want to see what more features are available.
These guides may show some features that are not available, or not have not been configured to work in your system. If you're required additional information, then please contact your Retailer or Linn Support Site
- iPad / iPhone / Android Linn App
- Windows Kazoo
- from April 2023 : Tidal have removed support for the Linn Kazoo application on ALL platforms. We recommend trying the new Linn app (available on iOS and Android)
- Windows7
- Windows 8 / 10 / 11
- MAC/MACBook Kazoo
- from April 2023 : Tidal have removed support for the Linn Kazoo application on ALL platforms. We recommend trying the new Linn app (available on iOS and Android)
- up to Yosemite (OSX 10.10)]
- El Capitan (10.11 >)
- Kazoo User Guide for iMac El Capitan (10.11 >) onwards.. (including OSX Catalina 10.15)
- iPad/iPhone Kazoo
- from April 2023 : Tidal have removed support for the Linn Kazoo application on ALL platforms. We recommend trying the new Linn app (available on iOS and Android)
- Android Kazoo
- from April 2023 : Tidal have removed support for the Linn Kazoo application on ALL platforms. We recommend trying the new Linn app (available on iOS and Android)
Bluetooth
 Bluetooth Specification
Reception of Bluetooth Audio:
Series 3, Selekt DSM, Majik DSM (2020 variant) & Klimax DSM (2020 & 2025 variant) implements Bluetooth v4.2
- Audio is transferred using SBC encoding
- This is not natively compatible with Googlecast.
This is a recent update and available on the Series3-301, Selekt DSM (running Davaar 75+ firmware) and Klimax DSM/3 (2020 Variant), Majik DSM (2020 variant) products
