Difference between revisions of "New Product template"
(Created page with "<!--Product picture--> right|350px <!-- == '''Getting Started''' == [http://www.linn.co.uk/go/akurate '''www.linn.co.uk/go/akurate''' ] --> =...") |
m |
||
| (85 intermediate revisions by the same user not shown) | |||
| Line 1: | Line 1: | ||
| − | <!-- | + | <!--[[Image:Back_Home.png | link=Main_Page:Kiko|100px]]--> |
| − | [[ | + | {{HIDE_PAGE_TITLE}}<div style="margin-left:10px;max-width:1000px;"> |
| + | <!--<div style="margin-left:10px;max-width:1000px;min-width:900px;"> to limit this page width--> __NOTOC__ | ||
| + | {{Title_Text | Linn Setup Guide:<br> How to set up the Linn KIKO}} | ||
| + | {{breadcrumb | ||
| + | | [[#Initial Setup|Initial Setup]] | ||
| + | | [[#Download_App|Download App]] | ||
| + | | [[#Setup_and_changes|Setup & changes]] | ||
| + | | [[#Using_your_system|Controlling your Kiko]] | ||
| + | | [[Main_Page:Kiko|Back to Kiko Home]] | ||
| + | }} </p> | ||
| − | <!-- | + | <!--Product picture |
| + | [[Image:SelektDsmLarge.jpg|centre|550px]]--> | ||
| + | <p style="padding-left:20%;">[[Image:KikoFront-1-0.jpg|550px]]</p> | ||
| − | |||
| − | |||
| − | |||
| − | |||
| + | <div style="LINE-HEIGHT:25px;> | ||
== '''Product info''' == | == '''Product info''' == | ||
| − | * ''Product Name:'' <font style="color:red"> | + | * ''Product Name:'' <Big>''KIKO''</big> <!--<font style="color:red">Kiko</font>--> |
| − | * ''Date of Introduction:'' | + | * ''Date of Introduction:'' July 2012 |
| − | * ''Type:'' | + | * ''Type:'' Integrated digital music player, pre-amplifier and power amplifier |
| − | * ''Versions:'' | + | * ''Versions:'' None |
| + | <!--* ''Features''--> | ||
| − | + | == Initial Setup == | |
| − | + | If you have just received this Linn product then you will be eager to listen to the Music. This section will show you how to unpack it, wire it up, position it and get Music playing... | |
| − | |||
| − | |||
| − | |||
| − | |||
| − | |||
| − | |||
| − | |||
| − | |||
| + | === '''Unpacking''' === | ||
| + | Remove the Kiko & speakers from the packing and check you have all of the [[product_unpacking|accessories]]. | ||
| + | Now place the product you want it to be. Make sure that you have: | ||
| + | :* A mains power socket | ||
| + | :* A ethernet/LAN connection to your broadband Router. (The Kiko does not have any inbuilt Wiki capabilty, you need to connect it to a wired network connection first. Then you can use thw Wifi capabilities of your network to control and stream music to the Kiko) | ||
| − | == ''' | + | === '''Wiring''' === |
| + | ====Connecting the speakers to the Linn Kiko==== | ||
| + | To insert connect up the speakers into the speaker: | ||
| + | # The cable plug and speaker socket are keyed to prevent plugging incorrectly. Please view the speaker plug and socket to find the correct orientation. <br> | ||
| + | #. Insert plug into socket and twist clockwise until they lock together.<br> | ||
| + | # Repeat the action for connecting the speaker cable to the Linn Kiko. Find the plug key and socket key and insert then twist until it locks.<br> | ||
| + | ::[[Image:Kiko_Speaker_cable_connect.jpg|600px]] | ||
| − | + | ====Disconnecting the speakers from the Linn Kiko==== | |
| + | To disconnect the speakers: | ||
| + | # On the plugs you will find a lock slide. | ||
| + | # Pull this slide back and twist the plug anti-lockwise whilst gently pulling the plug out of the socket. | ||
| − | [ | + | ::[[Image:Kiko_Speaker_cable_disconnect.jpg|600px]] |
| + | <br><br> | ||
| + | <big><u><b>Kiko back panel sockets</b></u></big> | ||
| + | [[Image:Kiko_DSM_rear_1-1.jpg|center|700px|link=Kiko_DSM#Back_Panel_Connections]] | ||
| − | + | ====Connecting to Ethernet==== | |
| + | :Plug your Ethernet cable from you Broadband router into Kiko socket number 3, shown above. | ||
| − | + | ====Connecting TV, Satellite receivers, DVD players etc ==== | |
| + | :Connect your TV to the HDMI OUT, Socket 4 above. | ||
| + | :Connect your Blu-Ray, Satellite reciever, camera etc to the remaining HDMI IN sockets, socket group 5 above. | ||
| − | + | :If you have any audio only sources such a MP3 player, CD players etc they can connect to the respectibe sockets 6,7 or 8 shown above. | |
| − | + | For more details on these rear panel sockets then check [[Kiko_DSM#Back_Panel_Connections|<u><font style="color:blue">this page</font></u>]] for more information | |
| − | |||
| − | |||
| − | |||
| − | |||
| − | |||
| − | |||
| − | |||
| − | |||
| − | |||
| − | |||
| − | |||
| − | |||
| − | |||
| − | |||
| − | |||
| − | |||
| − | |||
=== '''Positioning''' === | === '''Positioning''' === | ||
| + | :Review the advised <u> [[product_positioning|Positioning guide]]</u> to ensure safe and cool operation of the Kiko | ||
| + | :The speaker cables supplied 2M long, your Linn Retailer can make longer/shorter one on request. | ||
| − | == | + | == '''Download App''' == |
| + | {{Kazoo:Download App}} | ||
| − | + | == '''Setup and changes''' == | |
| − | + | <br> | |
| − | + | [[File:Configuration.png|left|200px|link=https://www.linn.co.uk/software#konfig]] | |
| − | + | <div style="margin-left:220px;> | |
| − | : | + | After you have wired up your Linn system this <i><b>may</b></i> require setup from the Windows 7/10 or MAC OSX app. <br> |
| − | + | This <b>Konfig</b> App can be downloaded from [https://www.linn.co.uk/software#konfig <u> KONFIG App</u>] | |
| − | |||
| − | |||
| − | |||
| − | : | ||
| − | |||
| − | |||
| − | < | ||
| − | |||
| − | |||
| − | |||
| − | |||
| − | |||
| − | |||
| − | |||
| − | |||
| − | |||
| − | |||
| − | |||
| − | |||
| − | |||
| − | |||
| − | |||
| − | |||
| − | |||
| − | |||
| − | |||
| − | |||
| − | |||
| − | : | ||
| − | |||
| − | |||
| − | + | This will allow to change the Room name, Kiko name, input name and other settings. This can be changes by yourself and/or your Linn Retailer. <br> | |
| + | Details of most of the options are listed in the <u>[[Konfig Manual]]</u>, this covers a lot of options | ||
| + | </div><br><br> | ||
| − | == ''' | + | == '''Using your system''' == |
| + | The Kiko has no front panel buttons, only a mains power switch on its side. | ||
| + | {{Frontpanel:Kiko}} | ||
| − | |||
| − | [[ | + | ===Controlling your Linn DS/DSM=== |
| + | To control you Kiko you can you the infra-red handset supplied with product as well as the Linn App, Kazoo that was previously <u> [[New_Product_template#Download_App|downloaded & installed]]</u> | ||
| + | <br><br> | ||
| + | ===Controling your Kiko using an infrared handset=== | ||
| + | {{General:IR control}} | ||
| − | == | + | ===Controling your Kiko using a PC/MAC or Tablet=== |
| − | + | {{General:Tablet-PC Control}} | |
| − | |||
| − | |||
| − | |||
| − | |||
| − | |||
| − | |||
| − | |||
| − | |||
| − | |||
| − | |||
| − | |||
| − | |||
| − | |||
| − | |||
| − | |||
| − | |||
| − | |||
| − | |||
| − | |||
| − | |||
| − | |||
| − | |||
| − | |||
| − | |||
| − | |||
| − | |||
| − | |||
| − | |||
| − | |||
| − | |||
| − | |||
| − | |||
| − | |||
| − | |||
| − | |||
| − | |||
| − | |||
| − | |||
| − | |||
| − | |||
| − | |||
| − | |||
| − | |||
| − | |||
| − | |||
| − | |||
| − | |||
| − | |||
| − | |||
| − | |||
| − | |||
| − | |||
| − | |||
| − | |||
| − | |||
| − | |||
| − | |||
| − | {{ | ||
| − | |||
| − | |||
| − | |||
| − | |||
| − | |||
| − | |||
| − | |||
| − | |||
| − | |||
| − | |||
| − | |||
| − | |||
| − | |||
| − | |||
| − | |||
| − | |||
| − | |||
| − | |||
| − | |||
| − | |||
| − | |||
| − | |||
| − | |||
| − | |||
| − | |||
| − | |||
| − | |||
| − | |||
| − | |||
| − | |||
| − | |||
| − | |||
| − | = | + | [[Image:Back_Home.png | link=Main_Page:Kiko|100px]] |
| − | < | + | </div></div> |
Latest revision as of 13:35, 31 July 2019
Linn Setup Guide:
How to set up the Linn KIKO

Product info
- Product Name: KIKO
- Date of Introduction: July 2012
- Type: Integrated digital music player, pre-amplifier and power amplifier
- Versions: None
Initial Setup
If you have just received this Linn product then you will be eager to listen to the Music. This section will show you how to unpack it, wire it up, position it and get Music playing...
Unpacking
Remove the Kiko & speakers from the packing and check you have all of the accessories. Now place the product you want it to be. Make sure that you have:
- A mains power socket
- A ethernet/LAN connection to your broadband Router. (The Kiko does not have any inbuilt Wiki capabilty, you need to connect it to a wired network connection first. Then you can use thw Wifi capabilities of your network to control and stream music to the Kiko)
Wiring
Connecting the speakers to the Linn Kiko
To insert connect up the speakers into the speaker:
- The cable plug and speaker socket are keyed to prevent plugging incorrectly. Please view the speaker plug and socket to find the correct orientation.
- . Insert plug into socket and twist clockwise until they lock together.
- Repeat the action for connecting the speaker cable to the Linn Kiko. Find the plug key and socket key and insert then twist until it locks.

Disconnecting the speakers from the Linn Kiko
To disconnect the speakers:
- On the plugs you will find a lock slide.
- Pull this slide back and twist the plug anti-lockwise whilst gently pulling the plug out of the socket.

Kiko back panel sockets
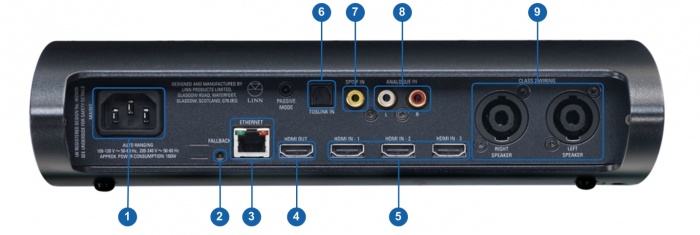
Connecting to Ethernet
- Plug your Ethernet cable from you Broadband router into Kiko socket number 3, shown above.
Connecting TV, Satellite receivers, DVD players etc
- Connect your TV to the HDMI OUT, Socket 4 above.
- Connect your Blu-Ray, Satellite reciever, camera etc to the remaining HDMI IN sockets, socket group 5 above.
- If you have any audio only sources such a MP3 player, CD players etc they can connect to the respectibe sockets 6,7 or 8 shown above.
For more details on these rear panel sockets then check this page for more information
Positioning
- Review the advised Positioning guide to ensure safe and cool operation of the Kiko
- The speaker cables supplied 2M long, your Linn Retailer can make longer/shorter one on request.
Download App
The Linn DS/DSM can be done from many control points at the same time.
Note: from April 2023 : Tidal have removed support for the Linn Kazoo application on ALL platforms. We recommend trying the new Linn app (available on iOS and Android)
- The name of this control App/software is KAZOO..
- Kazoo control App/software is available for

| Windows Kazoo download- from April 2023 : Tidal have removed support for the Linn Kazoo application on ALL platforms. We recommend trying the new Linn app (available on iOS and Android)
- Kazoo control App/software is available for

MAC OSX Kazoo download- from April 2023 : Tidal have removed support for the Linn Kazoo application on ALL platforms. We recommend trying the new Linn app (available on iOS and Android)
 Android Kazoo for Android Phone/Tablet download
- from April 2023 : Tidal have removed support for the Linn Kazoo application on ALL platforms. We recommend trying the new Linn app (available on iOS and Android)
Setup and changes
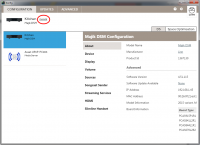
After you have wired up your Linn system this may require setup from the Windows 7/10 or MAC OSX app.
This Konfig App can be downloaded from KONFIG App
This will allow to change the Room name, Kiko name, input name and other settings. This can be changes by yourself and/or your Linn Retailer.
Details of most of the options are listed in the Konfig Manual, this covers a lot of options
Using your system
The Kiko has no front panel buttons, only a mains power switch on its side.

- HEADPHONE OUTPUT - To connect to stereo headphones with a 3.5mm input
- AUX SOURCE INPUT - To connect to a stereo audio source with a 3.5mm output
- IR SENSOR - Recieves IR commands
- STANDBY LED
- FRONT PANEL DISPLAY
- POWER SWITCH- Switches the power on/off
Controlling your Linn DS/DSM
To control you Kiko you can you the infra-red handset supplied with product as well as the Linn App, Kazoo that was previously downloaded & installed
Controling your Kiko using an infrared handset
The infra-red handset supplied has;-
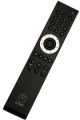
* Volume control, Mute
* Input control with PIN selection
* Radio station selection using the handset joystick,
* Playlist navigation using the handset joystick,
* Transport control (Play, Stop, Pause, Skip & Search) &
* Music information.
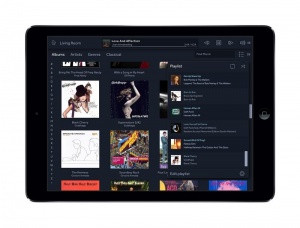
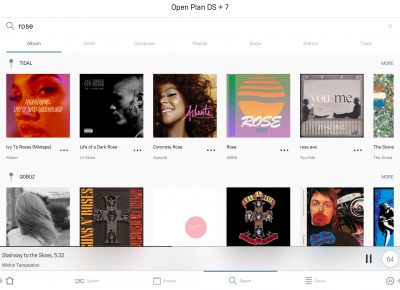
Controling your Kiko using a PC/MAC or Tablet
Control of the Linn DS/DSM using a PC/MAC/Tablets & Phones
Initial installation
- Linn App
The Linn DS/DSM can be done from many control points at the same time.
- The name of this control App/software is Linn App
or
- Kazoo (Aug 2023 - Ceased all development)
The Linn DS/DSM can be done from many control points at the same time.
Note: from April 2023 : Tidal have removed support for the Linn Kazoo application on ALL platforms. We recommend trying the new Linn app (available on iOS and Android)
- The name of this control App/software is KAZOO..
- Kazoo control App/software is available for
| Windows Kazoo download- from April 2023 : Tidal have removed support for the Linn Kazoo application on ALL platforms. We recommend trying the new Linn app (available on iOS and Android)
- Kazoo control App/software is available for
MAC OSX Kazoo download- from April 2023 : Tidal have removed support for the Linn Kazoo application on ALL platforms. We recommend trying the new Linn app (available on iOS and Android)
- Android Kazoo for Android Phone/Tablet download
- from April 2023 : Tidal have removed support for the Linn Kazoo application on ALL platforms. We recommend trying the new Linn app (available on iOS and Android)
Using the Linn DS/DSM control software
- For full operation of Kustom DSM you will need to use Linn App and/or Kazoo 4.13.64 >
As you can see from the above section there are multiple software/Apps for different control devices. Although Kazoo has the same style of control in each device, there are minor differences depending on what your control device is. This is why we have different Manuals.
These manuals should only be used as a basic guide for what the buttons can do. We would recommend just using the App/Software and only using the guide if you are having difficulty or want to see what more features are available.
These guides may show some features that are not available, or not have not be configured to work in your system. If you required more information then please contact your Retailer or Linn Support Site
- iPad / iPhone / Android Linn App
- Windows Kazoo
- from April 2023 : Tidal have removed support for the Linn Kazoo application on ALL platforms. We recommend trying the new Linn app (available on iOS and Android)
- Windows7
- Windows 8 / 10 / 11
- MAC/MACBook Kazoo
- from April 2023 : Tidal have removed support for the Linn Kazoo application on ALL platforms. We recommend trying the new Linn app (available on iOS and Android)
- up to Yosemite (OSX 10.10)]
- El Capitan (10.11 >)
- Kazoo User Guide for iMac El Capitan (10.11 >) onwards.. (including OSX Catalina 10.15)
- iPad/iPhone Kazoo
- from April 2023 : Tidal have removed support for the Linn Kazoo application on ALL platforms. We recommend trying the new Linn app (available on iOS and Android)
- Android Kazoo
- from April 2023 : Tidal have removed support for the Linn Kazoo application on ALL platforms. We recommend trying the new Linn app (available on iOS and Android)
![]()