Difference between revisions of "Sneaky DSM"
(→Back Panel Connections) |
m (→Back Panel Connections) |
||
| (44 intermediate revisions by 5 users not shown) | |||
| Line 1: | Line 1: | ||
| − | [[Image: | + | [[Image:SneakyDsmMain.png|right|550px]] |
== '''Product info''' == | == '''Product info''' == | ||
| − | * ''Product Name:'' Sneaky DSM | + | * ''Product Name:'' Sneaky DSM (2013 Variant) |
| − | * ''Date of Introduction:'' February | + | * ''Date of Introduction:'' February 2013 - September 2017 |
* ''Type:'' Integrated digital music player, pre-amplifier, and power amplifier | * ''Type:'' Integrated digital music player, pre-amplifier, and power amplifier | ||
| Line 20: | Line 20: | ||
== '''Latest software''' == | == '''Latest software''' == | ||
| − | + | {{General:Latest_Product_SW}} | |
| − | |||
| − | |||
== '''Manuals''' == | == '''Manuals''' == | ||
| − | + | {{General:Product_Manuals}} | |
| − | |||
| − | |||
| − | |||
| − | |||
| − | + | == '''Audio Latency''' == | |
| − | [ | + | [[DSM Audio Latencies Explained]] |
| − | |||
| − | |||
| − | |||
| − | [ | ||
== '''Network Setup''' == | == '''Network Setup''' == | ||
| − | + | {{General:DS_Network_system}} | |
| − | |||
| − | |||
| − | |||
| − | |||
== '''Back Panel Connections''' == | == '''Back Panel Connections''' == | ||
| − | [[Image:SneakyDsmRear.png|center|700px]] | + | [[Image:SneakyDsmRear.png|center|700px|link=]] |
| − | # | + | # {{link:MAINS INPUT}} |
| − | # | + | # {{link:FALLBACK}} |
| − | # | + | # {{link:ETHERNET}} |
# '''HDMI OUTPUT''' - To connect to a display device with HDMI inputs. | # '''HDMI OUTPUT''' - To connect to a display device with HDMI inputs. | ||
# '''HDMI INPUTS (3)''' - To connect sources with HDMI outputs. | # '''HDMI INPUTS (3)''' - To connect sources with HDMI outputs. | ||
| Line 67: | Line 53: | ||
[[Image:SneakyDsmFront.png|center|700px]] | [[Image:SneakyDsmFront.png|center|700px]] | ||
| − | # ''' | + | # '''Front Slot''' - contains the IR sensor and the Standby LED |
| − | |||
| − | |||
| − | |||
| − | |||
<br> | <br> | ||
| − | ''' | + | '''STANDBY LED FUNCTIONS''' |
{| border="1" cellspacing="0" cellpadding="0" width="100%" align="center" | {| border="1" cellspacing="0" cellpadding="0" width="100%" align="center" | ||
|- | |- | ||
| − | |||
| − | |||
| bgcolor="#cccccc" width="21%" align="center" | | | bgcolor="#cccccc" width="21%" align="center" | | ||
| − | ''''' | + | '''''DIM/OFF''''' |
'''''indicates''''' | '''''indicates''''' | ||
| bgcolor="#cccccc" width="21%" align="center" | | | bgcolor="#cccccc" width="21%" align="center" | | ||
| − | ''''' | + | '''''BRIGHT/ON''''' |
'''''indicates''''' | '''''indicates''''' | ||
| bgcolor="#cccccc" width="21%" align="center" | | | bgcolor="#cccccc" width="21%" align="center" | | ||
| − | '''''Slow''''' '''''Flash | + | '''''Slow''''' '''''Flash''''' |
| bgcolor="#cccccc" width="15%" align="center" | | | bgcolor="#cccccc" width="15%" align="center" | | ||
'''''Fast''''' '''''Flash''''' <br> | '''''Fast''''' '''''Flash''''' <br> | ||
|- | |- | ||
| − | |||
| − | |||
| − | |||
| − | |||
| − | |||
| − | |||
| − | |||
| − | |||
| − | |||
| − | |||
| − | |||
| − | |||
| − | |||
| − | |||
| − | |||
| − | |||
| − | |||
| − | |||
| − | |||
| − | |||
| − | |||
| − | |||
| − | |||
|- | |- | ||
| − | |||
| − | |||
| − | |||
| − | |||
| − | |||
| − | |||
| − | |||
| align="center" | Device in standby | | align="center" | Device in standby | ||
| − | | align="center" | Device active | + | | align="center" | Device active (will also pulse on IR command received) |
| align="center" | Searching for IP address (boot) | | align="center" | Searching for IP address (boot) | ||
| align="center" | Fallback (reprogramme) | | align="center" | Fallback (reprogramme) | ||
| Line 137: | Line 87: | ||
== '''Speaker Wiring''' == | == '''Speaker Wiring''' == | ||
| − | The | + | The Sneaky DSM has 4 DAC channels and 4 Power Amplifiers. These amplifiers can be configured in stereo mode or bi-amped mode (via Konfig). All speaker outputs (and Analogue Output) share the same common Volume control. |
Connections to the speakers are made via Neutrik Speakon connectors, NL4FX. | Connections to the speakers are made via Neutrik Speakon connectors, NL4FX. | ||
| − | [ | + | [https://www.neutrik.com/media/11062/download/bda-114---speakon-nl4fx--nl4frx.pdf?v=1 Neutrik Speakon Assembly Instructions] or check [https://www.neutrik.com Neutrik website for NL4FX information] |
| − | The | + | The '''stereo mode''' is best suited to connecting to passive one-way speakers. Power output is 33W/channel (2 x 33) into 4ohm |
| − | + | [[Image:NeutrikConnector.png|left|100px]] | |
| − | + | 1+ -> Speaker + | |
| − | + | 1- -> Speaker - | |
| − | [[Image: | + | 2+ -> Not Connected |
| + | 2- -> Not Connected | ||
<br> | <br> | ||
| − | + | The '''bi-amped mode''' is best suited to connecting to passive two-way speakers. Power output is 33W/channel (4 x 33) into 4ohm | |
| − | + | [[Image:NeutrikConnector.png|left|100px]] | |
| + | 1+ -> Speaker 1+ | ||
| + | 1- -> Speaker 1- | ||
| + | 2+ -> Speaker 2+ | ||
| + | 2- -> Speaker 2- | ||
<br> | <br> | ||
| Line 156: | Line 111: | ||
Please read the following carefully '''before''' installing the unit in your system – your unit may need to be reconfigured by your Linn retailer. | Please read the following carefully '''before''' installing the unit in your system – your unit may need to be reconfigured by your Linn retailer. | ||
| − | * [ | + | * [[product_unpacking |Unpacking Information]] |
| + | |||
| + | * [[product_positioning |Positioning Information]] | ||
| + | |||
| + | * [[amplifier_protection |Amplifier Protection]] | ||
| − | + | == Sneaky DSM FAQ's == | |
| + | {{FAQ:SekritDSM FAQ}} | ||
| − | |||
| + | For further assistance, try our [http://www.linn.co.uk/linn_customer_support customer support] pages | ||
| − | + | [[Category:Linn_DSM]] | |
| + | [[Category:CORE1]] | ||
Latest revision as of 13:14, 4 December 2023

Contents
Product info
- Product Name: Sneaky DSM (2013 Variant)
- Date of Introduction: February 2013 - September 2017
- Type: Integrated digital music player, pre-amplifier, and power amplifier
- Dimensions: 350 mm (width) x 54.5 mm (height) x 215 mm (depth)
- Features
Support
Latest software
Details of latest Product release software
Manuals
Controlling the product User Guide
Product setup:Manage Systems user manual
Third Party Software Copyright
Audio Latency
Network Setup
Back Panel Connections
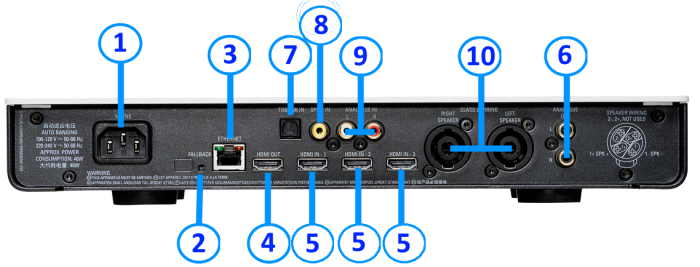
- MAINS INPUT - To connect to the mains electricity supply.
- FALLBACK - To put the device into Fallback mode (used when reprogramming)
- ETHERNET - To connect to a network (100Base-T)
- HDMI OUTPUT - To connect to a display device with HDMI inputs.
- HDMI INPUTS (3) - To connect sources with HDMI outputs.
- ANALOGUE OUTPUT (RCA, variable/fixed level) - To connect to subwoofer or external power amplifier (or pre amplifier when internal volume control is disabled, this will also disable the internal Power amplifier/speaker outputs) with unbalanced (RCA) analogue inputs.
- DIGITAL INPUT (Toslink) - To connect sources with Toslink (optical) digital outputs.
- DIGITAL INPUT (Spdif) - To connect sources with Spdif (RCA) digital outputs.
- ANALOGUE INPUT (line level) - To connect a turntable or line level source with unbalanced (RCA) outputs.
- SPEAKER OUTPUTS - To connect to loudspeakers, Neutrik 4 pole connector
Front Panel Connections

- Front Slot - contains the IR sensor and the Standby LED
STANDBY LED FUNCTIONS
|
DIM/OFF indicates |
BRIGHT/ON indicates |
Slow Flash |
Fast Flash |
| Device in standby | Device active (will also pulse on IR command received) | Searching for IP address (boot) | Fallback (reprogramme) |
Speaker Wiring
The Sneaky DSM has 4 DAC channels and 4 Power Amplifiers. These amplifiers can be configured in stereo mode or bi-amped mode (via Konfig). All speaker outputs (and Analogue Output) share the same common Volume control.
Connections to the speakers are made via Neutrik Speakon connectors, NL4FX. Neutrik Speakon Assembly Instructions or check Neutrik website for NL4FX information
The stereo mode is best suited to connecting to passive one-way speakers. Power output is 33W/channel (2 x 33) into 4ohm

1+ -> Speaker +
1- -> Speaker -
2+ -> Not Connected
2- -> Not Connected
The bi-amped mode is best suited to connecting to passive two-way speakers. Power output is 33W/channel (4 x 33) into 4ohm
1+ -> Speaker 1+
1- -> Speaker 1-
2+ -> Speaker 2+
2- -> Speaker 2-
Installation
Please read the following carefully before installing the unit in your system – your unit may need to be reconfigured by your Linn retailer.
Sneaky DSM FAQ's
HARDWARE
HDMI
- The Sekrit DSM/Sneaky DSM are only available with HDMI 1.4 connections.
- This product does NOT support ARC (Audio Return Channel)
Difference between Sneaky DSM & Sekrit DSM
Sekrit DSM has
- A chassis (case) that can be mounted in a 19” (RAKK-SNKMDS) with power switch & Fallback on the front of the case
- Indicator leds to give the operational/connection status of the Sekrit DSM
- Can be used with BASIK-3 or BASIK-3-IR RCU
- The option to screw an IR emitter over DSM IR receiver. This is intended for IR repeater control interface whilst the Sekrit DSM is hidden.
- Full range Power Amplifier with the (Configured in Konfig)
- a. Single ended option of 4x33W. For driving two pairs of in-wall/in-ceiling speakers with common volume control.
- b. Bridged mode of 2x50W. For driving one pair of speakers. (This requires wiring the Nuetrik plug for bridged mode)
Sneaky DSM has
- A chassis (case) for table top positioning with side power switch. Fallback button on rear connector panel
- Front panel power indicator that flashes when IR command is being received or in boot mode awaiting a DHCP address.
- Full range Power Amplifier with the (Configured in Konfig)
- a. Single ended option of 2x33W. For driving one pair of speakers in single amp mode.
- b. Single ended option of 4x33W. For driving one pair of speakers in Bi-AMP mode.
For further assistance, try our customer support pages