Difference between revisions of "Akubarik Exakt"
m |
|||
| (37 intermediate revisions by the same user not shown) | |||
| Line 1: | Line 1: | ||
| + | [[Image:Akubarik Wal 3Q.jpg|right|200x300px]] | ||
| + | |||
| + | |||
| + | |||
| + | == '''Product info''' == | ||
| + | |||
| + | * ''Product Name:'' EXAKT AKUBARIK | ||
| + | |||
| + | * ''Date of Introduction:'' | ||
| + | :::::: April 2014 | ||
| + | :::::: September 2017 - updated to Katalyst | ||
| + | * ''Type:'' Fully Integrated Active Isobarik Loudspeaker with Exakt Technology | ||
| + | |||
| + | * ''Features'' | ||
| + | ** [[Chakra_Power| Chakra Power]] | ||
| + | ** [http://docs.linn.co.uk/wiki/index.php/Dynamik Dynamik Power Supply] | ||
| + | ** [http://www.linn.co.uk/systems/technology/exakt/traditional-vs-exakt Exakt Technology] | ||
| + | ** [http://www.linn.co.uk/technology/katalyst Katalyst from Sept 2017] | ||
| + | |||
| + | <br><u><b>Hardware Upgrades</b></u><br> | ||
| + | :[[Organik_DAC|<u>Organik Upgrade</u>]]<br> | ||
| + | |||
| + | ''Note: It should be noted that this upgrade information may at times be out of date and should not be used as a current list of what upgrades are available.'' | ||
| + | |||
| + | <br> | ||
| + | |||
| + | ==<b>History of upgrade options</b>== | ||
| + | {{Info:Upgrade_HIstory_statement}} | ||
| + | :* [[File:Organik_Logo_Black.png |link=Organik_DAC|80px]]: <b>Organik DAC upgrade for Akubarik Exakt</b> (March 2024) | ||
| + | :::This requires the Akubarik modules to be returned to the Linn factory, via the Linn Retailer, for this upgrade. | ||
| + | |||
| + | == '''Manuals''' == | ||
| + | |||
| + | [http://docs.linn.co.uk/wiki/images/d/d5/PACK_1671_lo_res_18thApr2013.pdf Quickstart] | ||
| + | |||
| + | [http://docs.linn.co.uk/wiki/images/1/1b/Linn_Safety_Info.pdf Safety Information] | ||
| + | |||
| + | [http://www.linn.co.uk/warranty Warranty Terms & Conditions] | ||
| + | |||
| + | [http://www.linn.co.uk/support Linn Support Site] | ||
| + | |||
| + | [http://docs.linn.co.uk/wiki/images/9/99/Akubarik_Exakt_quick_tech_spec.pdf Tech Spec] | ||
| + | |||
| + | == '''Installation''' == | ||
| + | |||
| + | We recommend that your Akubarik loudspeakers are unpacked, installed and adjusted by | ||
| + | an authorised Linn retailer. | ||
| + | To get the best from your Akubarik loudspeakers, it is important that they are | ||
| + | positioned and levelled correctly. | ||
| + | |||
| + | Please note, in order to achieve the very best from your Akubarik, some | ||
| + | adjustment may be required after positioning, levelling and connecting. See the Fine | ||
| + | adjustment section. | ||
| + | <br> | ||
| + | '''As this is an Exakt speaker the initial setup must be performed with a Local Area Network that has Internet access. Otherwise [[Konfig_Manual|Konfig]] cannot set the speaker channel, Speaker profile and Space Optimisation of these products''' | ||
| + | <br> | ||
| + | |||
| + | == '''Unpacking''' == | ||
| + | |||
| + | [[Image:Akubarik_no_lie.jpg|right|365x300px|Image:Akubarik_no_lie.jpg]] | ||
| + | |||
| + | '''IMPORTANT:''' | ||
| + | The Akubariks are heavy; take great care when moving them. <br> | ||
| + | When unpacking, lifting or moving them, we recommend using two people to avoid personal injury. | ||
| + | |||
| + | |||
| + | * Do not lift your Akubarik using the amplifier module, this will cause damage to your loudspeaker. | ||
| + | |||
| + | * Do not lay the loudspeakers on their front face or the amplifier on the rear as this will damage the loudspeaker. | ||
| + | |||
| + | * We recommend that you retain the packaging in case you need to transport your loudspeaker(s) at a later date. | ||
| + | |||
| + | * Loudspeakers are packed individually with a separate package containing both speaker stands. | ||
| + | |||
| + | * Take care when unpacking to avoid damage to the cabinets. | ||
| + | |||
| + | |||
| + | |||
| + | Move the (boxed) loudspeaker to an uncluttered, flat area adjacent to its eventual position (this will avoid any excessive moving and carrying of unpacked loudspeakers). | ||
| + | |||
| + | Stand the loudspeaker box on its base. | ||
| + | |||
| + | Remove the plastic clips holding the box together (four from the base and one from the sleeve). | ||
| + | |||
| + | Remove the cardboard sleeve by lifting it straight up until it clears the top of the | ||
| + | cabinet | ||
| + | |||
| + | Leaving the top end cap on (to protect the loudspeaker) turn the Akubarik upside down. | ||
| + | |||
| + | Remove the bottom end caps to allow the stand to be fitted (see below). | ||
| + | |||
| + | Once the stand has been fitted, carefully rotate speaker onto the stand. Lift the loudspeaker out of the top end-cap and remove its protective bag. | ||
| + | |||
| + | Leave the packaging between the amplifier module and the cabinet and the 3-K Array cover in place until the loudspeakers have been moved to their final position. | ||
| + | |||
| + | Once you have positioned the loudspeakers, remove the two packaging pieces between the amplifier and the cabinet and VERY CAREFULLY snip the plastic tie holding the 3-K Array cover in place and remove it. | ||
| + | |||
| + | |||
| + | == '''Fitting the Stand''' == | ||
| + | |||
| + | <br> | ||
| + | |||
| + | [[Image:Akubarik_plinth_off_stand_on.jpg|centre|618x336px|Image:Stand fitting.jpg]] | ||
| + | |||
| + | |||
| + | On a clean, level surface that will not damage the loudspeaker; carefully stand the speaker upside-down without laying it on its front or rear face. | ||
| + | |||
| + | Remove the five bolts holding the transit plinth in place using a 13mm socket spanner. | ||
| + | |||
| + | Remove the transit plinth and retain with the packaging in case you need to transport your loudspeaker(s) in the future. | ||
| + | |||
| + | Position the speaker stand above the speaker as shown above and attach using the 5 bolts removed earlier. | ||
| + | |||
| + | '''IMPORTANT:''' | ||
| + | Take care not to over tighten the bolts. | ||
| + | |||
| + | |||
| + | |||
| + | == '''Positioning''' == | ||
| + | |||
| + | |||
| + | As with any stereo loudspeaker there are some fundamental principles which should be observed to get the best sound from your loudspeakers. | ||
| + | |||
| + | * The loudspeakers should be place at an equal distance from the wall behind the loudspeakers. | ||
| + | * The speakers should be a similar (not the same) distance from the walls to the outside of each loudspeaker. | ||
| + | * Any toe-in applied should be the same for each loudspeaker. | ||
| + | * The loudspeakers should be level with all four spikes in contact with the floor. Use Linn Skeets for hard floors. | ||
| + | |||
| + | As the Akubarik loudspeaker has a ported bass system the low frequency performance will be better if the loudspeakers are pulled out from the wall, 20-30cm is a good starting point, but adjustment will be required to get the best results. Additional benefit will be heard in the upper midrange and high frequencies by placing the loudspeakers away from the rear wall. | ||
| + | |||
| + | The Linn 3K Array used in the Akubarik loudspeaker offers exceptional dispersion characteristics. This means that there should be little or no need to toe-in your loudspeakers. | ||
| + | |||
| + | |||
| + | For further assistance, try our [http://www.linn.co.uk/linn_customer_support customer support] pages | ||
| + | |||
| + | == '''Levelling''' == | ||
| + | |||
| + | [[Image:Akubarik_insert_spike.jpg|right|300x180px|Image:Akubarik_insert_spike.jpg]] | ||
| + | |||
| + | <br> | ||
| + | Screw the spikes into the corners of the stand. | ||
| + | <br> | ||
| + | Fit the lock nuts but do not tighten at this stage. | ||
| + | |||
| + | <br><br><br><br><br><br> | ||
| + | |||
| + | [[Image:Akubarik_adjust_spikes.jpg|right|300x150px|Image:Akubarik_adjust_spikes.jpg]] | ||
| + | |||
| + | |||
| + | Very carefully (do not scratch the cabinet), use a spirit level to check if it is sitting | ||
| + | level. If it is, gently rock the loudspeaker from front to back, side to side and | ||
| + | diagonally to check for any movement. If none is present and the loudspeaker is | ||
| + | sitting level, no adjustment to the spikes is necessary. | ||
| + | |||
| + | |||
| + | |||
| + | If the loudspeaker is not level, or moves when you rock it, loosen the appropriate lock | ||
| + | nuts using the tool provided and use a screwdriver to turn the spikes to adjust | ||
| + | their height. | ||
| + | Adjust the spikes to level the speaker, using a spirit level placed on the stand. | ||
| + | |||
| + | Press down firmly on the top of the loudspeaker to ensure it is in close contact with | ||
| + | your flooring. | ||
| + | |||
| + | Use the spirit level as before and continue to adjust the spikes as required. | ||
| + | |||
| + | <br><br> | ||
| + | |||
| + | [[Image:Akubarik_adjust_stand.jpg|right|300x150px|Image:Akubarik_adjust.jpg]] | ||
| + | |||
| + | Once the speaker is level and does not rock, use the screwdriver to hold the spike in place and fit and tighten the lock nuts with the spanner provided. | ||
| + | |||
| + | <br> | ||
| + | |||
| + | '''Note:''' | ||
| + | To protect wooden or tiled floors, the spikes can be placed on Linn Skeets which are | ||
| + | available from your Linn retailer. | ||
| + | |||
| + | |||
| + | |||
| + | == '''Connections''' == | ||
| + | |||
| + | === Lower Back Panel === | ||
| + | [[Image:Marked_Bottom_conns.jpg|right|350x700px|Image:Akubarik Exakt]] <br> | ||
| + | # '''MAINS INPUT''' - To connect to the mains electricity supply. | ||
| + | # [[Exakt_link |'''EXAKT LINK''']] - From Exakt Master OR from a Exakt Slave connected to the Exakt master | ||
| + | # [[Exakt_link |'''EXAKT LINK''']] - To Exakt Slave product | ||
| + | |||
| + | [[Akurate_Exakt_System]] has more detail on connection and usage | ||
| + | |||
| + | ==== [[Exakt_link | '''EXAKT LINK connection''']]==== | ||
| + | Check [[Exakt_link | '''HERE''']] for information of Exakt link connection | ||
| + | |||
| + | <br> | ||
| + | |||
| + | <br><br><br><br><br><br><br> | ||
| + | |||
| + | === Upper Back Panel === | ||
| + | [[Image:AkurBarik Top plate1.jpg|right|350x700px|Image:Akubarik Exakt]] <br> | ||
| + | |||
| + | 5 '''FALLBACK''' - Primarily for Linn service use only, to put the device into Fallback mode (used when reprogramming the unit).<br> | ||
| + | 6 '''SPEAKER STATUS INDICATORS''' - Combined RED/Blue LEDs showing the speaker function. See below: <br> | ||
| + | <br><br><br><br><br><br><br> | ||
| + | |||
== '''Operation''' == | == '''Operation''' == | ||
| − | [[Image: | + | [[Image:AkubarikE_OFF_V2.jpg|right|200x110px|Image:Akubarik_Exakt_OFF_V2.jpg]] |
==='''General'''=== | ==='''General'''=== | ||
| Line 10: | Line 214: | ||
| − | [[Image: | + | |
| + | |||
| + | |||
| + | |||
| + | [[Image:AkubarikE_ON_V2.jpg|right|200x110px|Image:AkubarikE_ON_V2.jpg]] | ||
When the Exakt DSM is brought out of Standby it will send trigger voltage and wake the speaker up. The LED's beside the Mains socket/Exakt link sockets will tell you the status. | When the Exakt DSM is brought out of Standby it will send trigger voltage and wake the speaker up. The LED's beside the Mains socket/Exakt link sockets will tell you the status. | ||
After approx 6seconds the Blue LED on the top of the speaker will illuminate stating "its ready to party!" | After approx 6seconds the Blue LED on the top of the speaker will illuminate stating "its ready to party!" | ||
| − | |||
| − | |||
| − | |||
| − | |||
| − | |||
| + | [[Image:No_Power.jpg|right|200x110px|Image:No_Power.jpg]] | ||
| + | If you have brought the Exakt DSM out of standby and you only get this LED then the speaker has no Mains power. Check the Mains lead is fully inserted into the speaker and the wall socket mains switch is ON. | ||
| + | |||
| + | |||
| + | |||
| + | |||
| + | |||
| + | |||
| + | |||
| + | === '''EXAKT STATUS INDICATORS''' === | ||
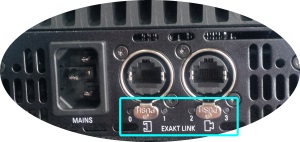
| + | [[Image:Exakt_LINK_LED.jpg |right|300x700px|Image:Akubarik Exakt]] <br> | ||
| + | === EXAKT LED Status === | ||
| + | {| border="1" cellspacing="0" cellpadding="0" width="55%" align="LEFT" | ||
| + | |- | ||
| + | | bgcolor="#cccccc" width="5%" align="center" | | ||
| + | '''''LED''''' | ||
| + | |||
| + | | bgcolor="#cccccc" width="17%" align="center" | | ||
| + | '''''OFF''''' | ||
| + | |||
| + | | bgcolor="#cccccc" width="17%" align="center" | | ||
| + | '''''ON''''' | ||
| + | |||
| + | | bgcolor="#cccccc" width="17%" align="center" | | ||
| + | '''''Flash / Blink''''' | ||
| + | |||
| + | |- | ||
| + | | align="center" | '''0 Master Port''' | ||
| + | | align="center" | No Link | ||
| + | | align="center" | Link Discovered | ||
| + | | align="center" | Link Activity | ||
| + | |||
| + | |- | ||
| + | | align="centre" | '''1 Audio Clock''' | ||
| + | | align="center" | No Clock | ||
| + | | align="center" | Clock locked | ||
| + | | align="center" | Clock not locked | ||
| + | |||
| + | |- | ||
| + | | align="center" | '''2 Slave Port''' | ||
| + | | align="center" | No Link | ||
| + | | align="center" | Link Enabled | ||
| + | | align="center" | Link Activity | ||
| + | |||
| + | |- | ||
| + | | align="center" | '''3 Software Status''' | ||
| + | | align="center" | Not Configured | ||
| + | | align="center" | Running | ||
| + | | align="center" | Hardware Fault | ||
| + | |||
| + | |} | ||
| + | |||
| + | <BR><BR><BR><BR><BR><BR><BR><BR><BR><BR> | ||
| + | <BR><BR><BR><BR> | ||
| + | |||
| + | === Upper Back Panel === | ||
| + | [[Image:AkuBarik Exakt Top-LED_V2.jpg|right|250x700px|Image:AkuBarik Exakt Top-LED_V2]] <br> | ||
| + | |||
| + | === Speaker status LED === | ||
| + | {| border="1" cellspacing="0" cellpadding="0" width="65%" align="LEFT" | ||
| + | |- | ||
| + | | bgcolor="#cccccc" width="30%" align="center" | | ||
| + | '''''RED LED''''' | ||
| + | |||
| + | | bgcolor="#cccccc" width="30%" align="center" | | ||
| + | '''''BLUE LED''''' | ||
| + | |||
| + | | bgcolor="#cccccc" width="40%" align="center" | | ||
| + | '''''STATUS''''' | ||
| − | |||
| + | |- | ||
| + | | align="center" | '''OFF''' | ||
| + | | align="center" | '''OFF''' | ||
| + | | align="center" | No Power '''(Speaker OFF)''' | ||
| − | ''' | + | |- |
| + | | align="center" | '''OFF''' | ||
| + | | align="center" | '''ON''' | ||
| + | | align="center" | Active '''(Speaker ON)''' | ||
| + | |- | ||
| − | + | | align="center" | '''ON''' | |
| − | + | | align="center" | '''OFF''' | |
| − | + | | align="center" | Standby (Not implemented) | |
| + | |- | ||
| − | + | | align="center" | '''ON''' | |
| + | | align="center" | '''ON''' | ||
| + | | align="center" | Invalid state | ||
| + | |- | ||
| + | | align="center" | '''OFF''' | ||
| + | | align="center" | '''Slow flash''' | ||
| + | | align="center" | Discovering | ||
| + | |- | ||
| + | | align="center" | '''OFF''' | ||
| + | | align="center" | '''Fast flash''' | ||
| + | | align="center" | Configuring | ||
| + | |- | ||
| + | | align="center" | '''Fast flash''' | ||
| + | | align="center" | '''OFF''' | ||
| + | | align="center" | Hardware fault | ||
| + | |- | ||
| + | | align="center" | '''Slow Alternating flash''' | ||
| + | | align="center" | '''Slow Alternating flash''' | ||
| + | | align="center" | Fallback mode | ||
| + | |- | ||
| + | | align="center" | '''Fast Alternating flash''' | ||
| + | | align="center" | '''Fast Alternating flash''' | ||
| + | | align="center" | Reflashing | ||
| − | + | |} | |
| − | + | <BR><BR><BR><BR><BR><BR><BR><BR><BR><BR><BR> | |
| − | + | <BR> | |
| − | + | <BR><BR><BR><BR> | |
| − | + | {{:Exakt_Loudspeaker_Category}} [[Category:Family: Akurate]] [[Category:CHAKRA Class Amplifier]] [[Category:Organik Exakt speaker upgrade]] | |
| − | |||
Latest revision as of 07:09, 2 October 2025
Contents
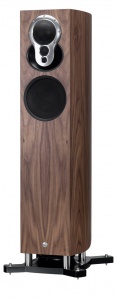
Product info
- Product Name: EXAKT AKUBARIK
- Date of Introduction:
- April 2014
- September 2017 - updated to Katalyst
- Type: Fully Integrated Active Isobarik Loudspeaker with Exakt Technology
Hardware Upgrades
Note: It should be noted that this upgrade information may at times be out of date and should not be used as a current list of what upgrades are available.
History of upgrade options
This list is only a summary of upgrades that are/were available for this product.
Please check with your Retailer to verify if these upgrades are still available.
-
- This requires the Akubarik modules to be returned to the Linn factory, via the Linn Retailer, for this upgrade.
Manuals
Installation
We recommend that your Akubarik loudspeakers are unpacked, installed and adjusted by an authorised Linn retailer. To get the best from your Akubarik loudspeakers, it is important that they are positioned and levelled correctly.
Please note, in order to achieve the very best from your Akubarik, some
adjustment may be required after positioning, levelling and connecting. See the Fine
adjustment section.
As this is an Exakt speaker the initial setup must be performed with a Local Area Network that has Internet access. Otherwise Konfig cannot set the speaker channel, Speaker profile and Space Optimisation of these products
Unpacking
IMPORTANT:
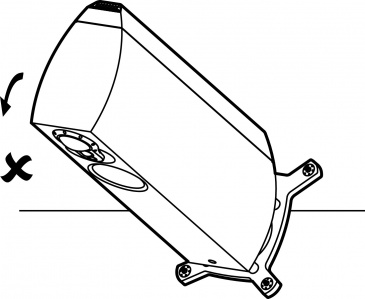
The Akubariks are heavy; take great care when moving them.
When unpacking, lifting or moving them, we recommend using two people to avoid personal injury.
- Do not lift your Akubarik using the amplifier module, this will cause damage to your loudspeaker.
- Do not lay the loudspeakers on their front face or the amplifier on the rear as this will damage the loudspeaker.
- We recommend that you retain the packaging in case you need to transport your loudspeaker(s) at a later date.
- Loudspeakers are packed individually with a separate package containing both speaker stands.
- Take care when unpacking to avoid damage to the cabinets.
Move the (boxed) loudspeaker to an uncluttered, flat area adjacent to its eventual position (this will avoid any excessive moving and carrying of unpacked loudspeakers).
Stand the loudspeaker box on its base.
Remove the plastic clips holding the box together (four from the base and one from the sleeve).
Remove the cardboard sleeve by lifting it straight up until it clears the top of the cabinet
Leaving the top end cap on (to protect the loudspeaker) turn the Akubarik upside down.
Remove the bottom end caps to allow the stand to be fitted (see below).
Once the stand has been fitted, carefully rotate speaker onto the stand. Lift the loudspeaker out of the top end-cap and remove its protective bag.
Leave the packaging between the amplifier module and the cabinet and the 3-K Array cover in place until the loudspeakers have been moved to their final position.
Once you have positioned the loudspeakers, remove the two packaging pieces between the amplifier and the cabinet and VERY CAREFULLY snip the plastic tie holding the 3-K Array cover in place and remove it.
Fitting the Stand
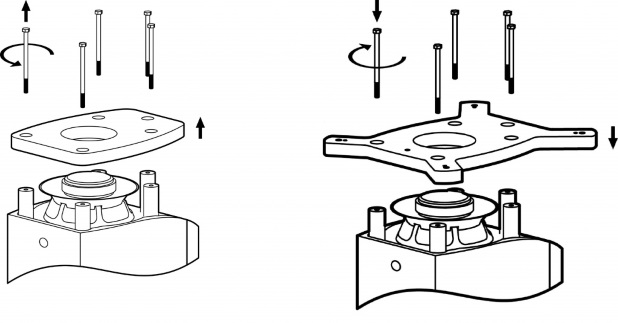
On a clean, level surface that will not damage the loudspeaker; carefully stand the speaker upside-down without laying it on its front or rear face.
Remove the five bolts holding the transit plinth in place using a 13mm socket spanner.
Remove the transit plinth and retain with the packaging in case you need to transport your loudspeaker(s) in the future.
Position the speaker stand above the speaker as shown above and attach using the 5 bolts removed earlier.
IMPORTANT: Take care not to over tighten the bolts.
Positioning
As with any stereo loudspeaker there are some fundamental principles which should be observed to get the best sound from your loudspeakers.
- The loudspeakers should be place at an equal distance from the wall behind the loudspeakers.
- The speakers should be a similar (not the same) distance from the walls to the outside of each loudspeaker.
- Any toe-in applied should be the same for each loudspeaker.
- The loudspeakers should be level with all four spikes in contact with the floor. Use Linn Skeets for hard floors.
As the Akubarik loudspeaker has a ported bass system the low frequency performance will be better if the loudspeakers are pulled out from the wall, 20-30cm is a good starting point, but adjustment will be required to get the best results. Additional benefit will be heard in the upper midrange and high frequencies by placing the loudspeakers away from the rear wall.
The Linn 3K Array used in the Akubarik loudspeaker offers exceptional dispersion characteristics. This means that there should be little or no need to toe-in your loudspeakers.
For further assistance, try our customer support pages
Levelling
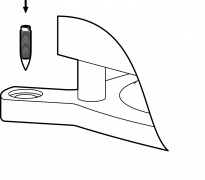
Screw the spikes into the corners of the stand.
Fit the lock nuts but do not tighten at this stage.
Very carefully (do not scratch the cabinet), use a spirit level to check if it is sitting
level. If it is, gently rock the loudspeaker from front to back, side to side and
diagonally to check for any movement. If none is present and the loudspeaker is
sitting level, no adjustment to the spikes is necessary.
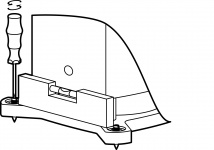
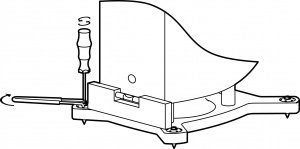
If the loudspeaker is not level, or moves when you rock it, loosen the appropriate lock nuts using the tool provided and use a screwdriver to turn the spikes to adjust their height. Adjust the spikes to level the speaker, using a spirit level placed on the stand.
Press down firmly on the top of the loudspeaker to ensure it is in close contact with your flooring.
Use the spirit level as before and continue to adjust the spikes as required.
Once the speaker is level and does not rock, use the screwdriver to hold the spike in place and fit and tighten the lock nuts with the spanner provided.
Note: To protect wooden or tiled floors, the spikes can be placed on Linn Skeets which are available from your Linn retailer.
Connections
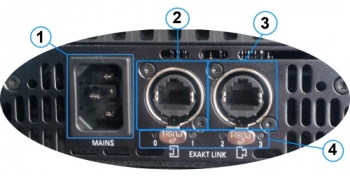
Lower Back Panel
- MAINS INPUT - To connect to the mains electricity supply.
- EXAKT LINK - From Exakt Master OR from a Exakt Slave connected to the Exakt master
- EXAKT LINK - To Exakt Slave product
Akurate_Exakt_System has more detail on connection and usage
EXAKT LINK connection
Check HERE for information of Exakt link connection
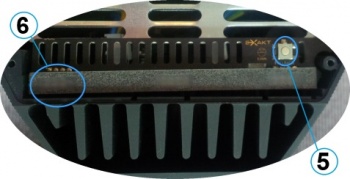
Upper Back Panel
5 FALLBACK - Primarily for Linn service use only, to put the device into Fallback mode (used when reprogramming the unit).
6 SPEAKER STATUS INDICATORS - Combined RED/Blue LEDs showing the speaker function. See below:
Operation
General
If the Exakt DSM is in Standby, the Akubarik speaker is totally shutdown. No LED's or indicators are shown
When the Exakt DSM is brought out of Standby it will send trigger voltage and wake the speaker up. The LED's beside the Mains socket/Exakt link sockets will tell you the status. After approx 6seconds the Blue LED on the top of the speaker will illuminate stating "its ready to party!"
If you have brought the Exakt DSM out of standby and you only get this LED then the speaker has no Mains power. Check the Mains lead is fully inserted into the speaker and the wall socket mains switch is ON.
EXAKT STATUS INDICATORS
EXAKT LED Status
|
LED |
OFF |
ON |
Flash / Blink |
| 0 Master Port | No Link | Link Discovered | Link Activity |
| 1 Audio Clock | No Clock | Clock locked | Clock not locked |
| 2 Slave Port | No Link | Link Enabled | Link Activity |
| 3 Software Status | Not Configured | Running | Hardware Fault |
Upper Back Panel
Speaker status LED
|
RED LED |
BLUE LED |
STATUS
|
| OFF | OFF | No Power (Speaker OFF) |
| OFF | ON | Active (Speaker ON) |
| ON | OFF | Standby (Not implemented) |
| ON | ON | Invalid state |
| OFF | Slow flash | Discovering |
| OFF | Fast flash | Configuring |
| Fast flash | OFF | Hardware fault |
| Slow Alternating flash | Slow Alternating flash | Fallback mode |
| Fast Alternating flash | Fast Alternating flash | Reflashing |
