Difference between revisions of "DS High End System"
m (→Step 1: Connect router to switch) |
m |
||
| (73 intermediate revisions by 4 users not shown) | |||
| Line 1: | Line 1: | ||
| + | ;<big>NOTE: This page is retired as this was created in the days when we still had modems, low speed internet and poor Wifi. Due to many updates in the Linn DS, Ethernet/Internet world and components this information is obsolete, but kept for reference.<br> | ||
| + | Plug the Linn DS/DSM/HUB into your LAN and it will work.</big> | ||
| + | ;(If you don't know what a modem is, then this proves how old this page is! [[File:Emoji-wink.png|30px]] ) | ||
==Introduction== | ==Introduction== | ||
| − | This is a recommended guide to setting up a high end DS system, requiring | + | This is a recommended guide to setting up a high end Linn DS system, requiring all of the specified network components to be purchased, ensuring that they meet the stated specifications. |
| − | It is advisable to follow the instructions step by step to ensure that each part of the system is working before moving on to the next. By doing this, it simplifies the setup process and allows for any problems encountered to be more easily identified and resolved. | + | |
| + | |||
| + | [[image:High6.png|centre]] | ||
| + | |||
| + | |||
| + | |||
| + | It is advisable to follow the instructions step by step to ensure that each part of the system is working before moving on to the next. By doing this, it simplifies the setup process and allows for any problems encountered to be more easily identified and resolved. | ||
| + | |||
| + | |||
| + | |||
| + | ==Required Components== | ||
The following components are required for the system detailed in this page: | The following components are required for the system detailed in this page: | ||
| − | *Router | + | *Internet Service Provider (ISP) router |
| + | *Router | ||
| + | *Computer | ||
| + | *Linn DS | ||
| + | *NAS | ||
*Network switch | *Network switch | ||
| − | *Wireless access point | + | *Wireless access point (WAP) |
| − | *NAS | + | *Wireless control point |
| − | + | ||
| − | + | Notes: | |
| − | + | # Ethernet cables are required to connect devices | |
| − | + | # Router is required to have a WAN port | |
| + | # NAS is required to have UPnP media server software preinstalled | ||
| + | # WAP should have 'N' band support | ||
| + | |||
| + | ==Step 1: Connect Router To ISP Router== | ||
| + | |||
| + | #Connect the ISP router to the WAN port on the router | ||
| + | #Power on the ISP router | ||
| + | #Power on the router | ||
| + | |||
| + | |||
| + | |||
| + | [[image:High1.1.png|centre]] | ||
| + | |||
| + | |||
| − | ==Step | + | ==Step 2: Connect Router To Network switch== |
| + | |||
| + | #Connect the router to the network switch | ||
| + | #Power on the network switch | ||
| − | |||
[[image:High1.png|centre]] | [[image:High1.png|centre]] | ||
| − | |||
| − | |||
| − | Connect the | + | |
| + | ==Step 3: Connect Computer To Network Switch== | ||
| + | |||
| + | #Connect the computer to the network switch. | ||
| + | #Power on the computer | ||
| + | #Configure the router to issue IP addresses in a suitable range | ||
| + | |||
| Line 32: | Line 69: | ||
| − | |||
| − | Connect the | + | The network adapter on the computer should already be configured to ‘'''obtain an IP address automatically'''’. |
| + | |||
| + | ==Test Step== | ||
| + | *Test that the computer has internet access | ||
| + | #Download Konfig [http://www.linn.co.uk/konfig here] | ||
| + | #Install Konfig onto the computer | ||
| + | |||
| + | |||
| + | |||
| + | ==Step 4: Connect Linn DS To Network Switch== | ||
| + | |||
| + | #Connect the Linn DS to the network switch | ||
| + | #Power on the Linn DS | ||
| + | |||
| + | |||
| + | |||
| + | [[Image:High4.1.2.png|centre]] | ||
| + | |||
| + | |||
| + | |||
| + | ==Test Step== | ||
| + | *Test that the Linn DS appears on the network | ||
| + | #Open Konfig | ||
| + | #Check that the Linn DS is discovered in Konfig | ||
| + | |||
| + | |||
| + | |||
| + | ==Step 5: Connect NAS to Network Switch== | ||
| + | |||
| + | #Connect the NAS to the network switch | ||
| + | #Power on the NAS | ||
| + | |||
| Line 40: | Line 107: | ||
| − | |||
| − | + | The network adapter on the NAS should already be configured to ''''obtain an IP address automatically''''. | |
| + | |||
| − | + | ==Step 6: Install Linn DS Control Software On Computer== | |
| + | #Download and install Kazoo from [http://www.linn.co.uk/Kazoo here] | ||
| + | #View the Kazoo manual [[Kazoo_Manual|here]] | ||
| − | ==Step | + | ==Test Step== |
| + | *Test that the Linn DS plays music | ||
| + | #Open Kazoo | ||
| + | #Select the Linn DS | ||
| + | #Select Radio from the list of available sources | ||
| + | #Highlight and play any radio station; the timer will start to count when the radio station is playing<br><br> | ||
| − | + | '''Note: To hear music, the Linn DS must be connected to a hi-fi system''' | |
| + | |||
| + | |||
| + | |||
| + | ==Step 7: Connect Wireless Access Point== | ||
| + | |||
| + | #Connect the WAP to the router | ||
| + | |||
| + | ==Test Step== | ||
| + | *Install Kazoo on the wireless control point and check that you can control the Linn DS | ||
[[Image:High5.png|centre]] | [[Image:High5.png|centre]] | ||
| + | |||
| + | |||
| + | |||
| + | ==Links to Other Systems== | ||
| + | |||
| + | [[DS_Budget_System | DS Budget System]] | ||
| + | |||
| + | [[DS_Entry_Level_System | DS Entry Level System]] | ||
| + | |||
| + | [[Networking_Glossary | Networking Glossary]] | ||
| + | |||
| + | [[Network_Components | Network Components]] | ||
| + | |||
| + | <!--[Multicast_Filtering#Tested_Devices | Multicast Filtering Tested Devices]]--> | ||
| + | |||
| + | [[Linn_DS/DSM_Network_requirements|Linn DS/DSM Network requirements]] | ||
Latest revision as of 15:59, 20 November 2020
- NOTE: This page is retired as this was created in the days when we still had modems, low speed internet and poor Wifi. Due to many updates in the Linn DS, Ethernet/Internet world and components this information is obsolete, but kept for reference.
Plug the Linn DS/DSM/HUB into your LAN and it will work.
Contents
- 1 Introduction
- 2 Required Components
- 3 Step 1: Connect Router To ISP Router
- 4 Step 2: Connect Router To Network switch
- 5 Step 3: Connect Computer To Network Switch
- 6 Test Step
- 7 Step 4: Connect Linn DS To Network Switch
- 8 Test Step
- 9 Step 5: Connect NAS to Network Switch
- 10 Step 6: Install Linn DS Control Software On Computer
- 11 Test Step
- 12 Step 7: Connect Wireless Access Point
- 13 Test Step
- 14 Links to Other Systems
Introduction
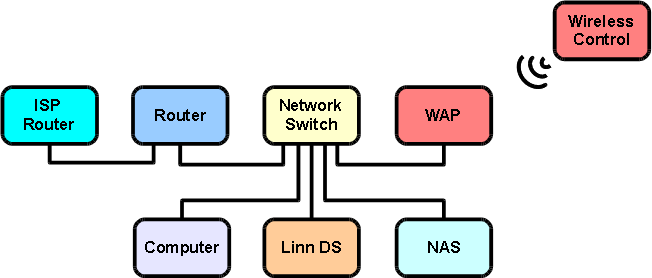
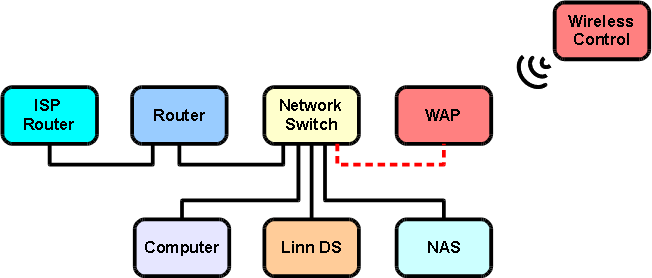
This is a recommended guide to setting up a high end Linn DS system, requiring all of the specified network components to be purchased, ensuring that they meet the stated specifications.
It is advisable to follow the instructions step by step to ensure that each part of the system is working before moving on to the next. By doing this, it simplifies the setup process and allows for any problems encountered to be more easily identified and resolved.
Required Components
The following components are required for the system detailed in this page:
- Internet Service Provider (ISP) router
- Router
- Computer
- Linn DS
- NAS
- Network switch
- Wireless access point (WAP)
- Wireless control point
Notes:
- Ethernet cables are required to connect devices
- Router is required to have a WAN port
- NAS is required to have UPnP media server software preinstalled
- WAP should have 'N' band support
Step 1: Connect Router To ISP Router
- Connect the ISP router to the WAN port on the router
- Power on the ISP router
- Power on the router
Step 2: Connect Router To Network switch
- Connect the router to the network switch
- Power on the network switch
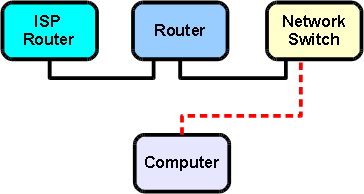
Step 3: Connect Computer To Network Switch
- Connect the computer to the network switch.
- Power on the computer
- Configure the router to issue IP addresses in a suitable range
The network adapter on the computer should already be configured to ‘obtain an IP address automatically’.
Test Step
- Test that the computer has internet access
- Download Konfig here
- Install Konfig onto the computer
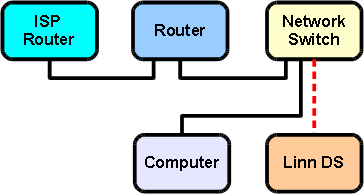
Step 4: Connect Linn DS To Network Switch
- Connect the Linn DS to the network switch
- Power on the Linn DS
Test Step
- Test that the Linn DS appears on the network
- Open Konfig
- Check that the Linn DS is discovered in Konfig
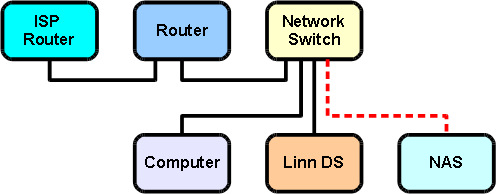
Step 5: Connect NAS to Network Switch
- Connect the NAS to the network switch
- Power on the NAS
The network adapter on the NAS should already be configured to 'obtain an IP address automatically'.
Step 6: Install Linn DS Control Software On Computer
Test Step
- Test that the Linn DS plays music
- Open Kazoo
- Select the Linn DS
- Select Radio from the list of available sources
- Highlight and play any radio station; the timer will start to count when the radio station is playing
Note: To hear music, the Linn DS must be connected to a hi-fi system
Step 7: Connect Wireless Access Point
- Connect the WAP to the router
Test Step
- Install Kazoo on the wireless control point and check that you can control the Linn DS
