Difference between revisions of "360 Exakt integrated/0 /Setup"
m (→Connections & operation) |
m (→Connections & operation) |
||
| (7 intermediate revisions by the same user not shown) | |||
| Line 1: | Line 1: | ||
{{HIDE_PAGE_TITLE}} | {{HIDE_PAGE_TITLE}} | ||
<noinclude> | <noinclude> | ||
| + | [[File:360 Clyde Built Silver 3Q WR.png|right| link= | 100px]] | ||
<span style="position:absolute;left:20px;"> << <u>[[360_Exakt_Integrated/0| BACK]]</u></div></span> | <span style="position:absolute;left:20px;"> << <u>[[360_Exakt_Integrated/0| BACK]]</u></div></span> | ||
{{Title_Text | Linn Setup Guide:<br> How to set up the Linn 360 Exakt Integrated loudspeaker}} | {{Title_Text | Linn Setup Guide:<br> How to set up the Linn 360 Exakt Integrated loudspeaker}} | ||
| Line 56: | Line 57: | ||
=== Back Panel === | === Back Panel === | ||
| − | [[Image:360_pwab_backpanel_Exakt.png|right|275x599px|]] <br> | + | <div class="zoom_img">[[Image:360_pwab_backpanel_Exakt.png|right|275x599px|link=|]] </div><br> |
# '''MAINS INPUT''' - To connect to the mains electricity supply. | # '''MAINS INPUT''' - To connect to the mains electricity supply. | ||
| − | # '''POWER SWITCH''' - To | + | # '''POWER SWITCH''' - To switch the mains power on/off. |
| − | # [[Exakt_link | '''EXAKT LINK''']] - From Exakt Master OR from | + | # [[Exakt_link | '''EXAKT LINK''']] - From Exakt Master OR from an Exakt Slave connected to the Exakt master |
# <b>SERVICE</b> - For use of Linn Technicians only | # <b>SERVICE</b> - For use of Linn Technicians only | ||
| − | # '''FALLBACK''' - Primarily for Linn service use only, to put the device into Fallback mode (used when reprogramming the unit). <BR> Note: The LED behind the Fallback indicates the Exakt Link is active but the product is not powered/switched off. | + | # '''FALLBACK''' - Primarily for Linn service use only, to put the device into Fallback mode (used when reprogramming the unit). <BR> Note: The LED behind the Fallback indicates the Exakt Link is active, but the product is not powered/switched off. |
# [[Exakt_link | '''EXAKT LINK''']] - To Exakt Slave product | # [[Exakt_link | '''EXAKT LINK''']] - To Exakt Slave product | ||
# '''STATUS INDICATORS''' - Function of the LED's are given below: | # '''STATUS INDICATORS''' - Function of the LED's are given below: | ||
<br><br> | <br><br> | ||
| − | :Example of | + | :Example of wiring using a Klimax DSM with Linn 360 Exakt Integrated loudspeakers. |
[[File:360 EI wiring.png| 600px | link=]] | [[File:360 EI wiring.png| 600px | link=]] | ||
<br><br> | <br><br> | ||
| Line 73: | Line 74: | ||
=== LED Status indicators=== | === LED Status indicators=== | ||
| + | [[File:360_Diffuser.png|300px|right|link=]] | ||
;Front panel | ;Front panel | ||
| Line 149: | Line 151: | ||
<br><br><br><br> | <br><br><br><br> | ||
<br><br><br><br> | <br><br><br><br> | ||
| + | |||
| + | ==Setup== | ||
| + | <!--To setup the 360 Exakt speakers---> | ||
| + | {{:Manage_Systems:Speaker_setup|1=a set of 360 Exakt speakers}} | ||
==Safety== | ==Safety== | ||
Latest revision as of 07:20, 28 November 2024

<< BACK
Linn Setup Guide:
How to set up the Linn 360 Exakt Integrated loudspeaker
Product information
| • Product Name: |
360 Exakt Integrated
|
| • Date of Introduction: | April 2023
|
|
| |
| • Type: | 4-way Floor-standing Fully integrated Aktiv loudspeaker with Exakt technology
|
- Features
- Bass System – Power DAC technology combines DAC and amp into a single step,
- 360 Array amplification features Adaptive Bias Control technology
- Aluminium-magnesium alloy bass drive units
- Exakt Technology
Manuals
Installation
We recommend that your 360 loudspeakers are unpacked, installed and adjusted by an authorised Linn retailer. To get the best from your 360 loudspeakers, it is important that they are positioned and levelled correctly.
Please note, in order to achieve the very best from your 360's, some adjustment may be required after positioning, levelling and connecting.
Unpacking
IMPORTANT:
The 360 speakers are heavy; take great care when moving them.
When unpacking, lifting or moving them, we recommend using two people to avoid personal injury.
- Do NOT lift your speaker using the amplifier module, this will cause damage to your loudspeaker.
- Do NOT lay the loudspeakers on their front face or the amplifier on the rear as this will damage the loudspeaker.
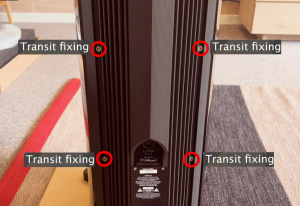
- Do NOT lay the loudspeakers, in any orientation, without the transit bolts in place. This would risk damage to both the cabinet and the module isolation mounts.
- We recommend that you retain the packaging in case you need to transport your loudspeaker(s) at a later date.
- Loudspeakers are packed individually, with a separate package containing both speaker stands.
- Take care when unpacking to avoid damage to the cabinets and drive units.
- Note the important Safety information on the Beryllium Dome Tweeter
- Double check that the transit screws have been removed
-
Positioning
As with any stereo loudspeaker, there are some fundamental principles which should be observed to get the best sound from your loudspeakers.
- The loudspeakers should be place at an equal distance from the wall behind the loudspeakers.
- The speakers should be a similar (not the same) distance from the walls to the outside of each loudspeaker.
- Any toe-in applied should be the same for each loudspeaker.
- The loudspeakers should be level with all four spikes in contact with the floor. Use Linn Skeets for hard floors.
For further assistance, try our customer support pages.
Levelling
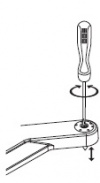
Screw the spikes into the corners of the stand.
Fit the lock nuts, but do not tighten at this stage.
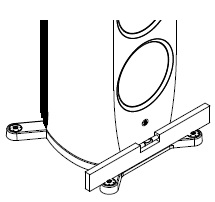
Very carefully (do not scratch the cabinet), use a spirit level to check if it is sitting
level. If it is, gently rock the loudspeaker from front to back, side to side and
diagonally to check for any movement. If none is present and the loudspeaker is
sitting level, no adjustment to the spikes is necessary.
If the loudspeaker is not level, or moves when you rock it, loosen the appropriate lock nuts using the tool provided and use a screwdriver to turn the spikes to adjust their height. Adjust the spikes to level the speaker, using a spirit level placed on the stand.
Press down firmly on the top of the loudspeaker to ensure it is in close contact with the flooring.

Use the spirit level as before and continue to adjust the spikes as required.
Once the speaker is level and does not rock, use the screwdriver to hold the spike in place and fit and tighten the lock nuts with the spanner provided.
Note: To protect wooden or tiled floors, the spikes can be placed on Linn Skeets, which are available from your Linn retailer.
Connections & operation
Back Panel
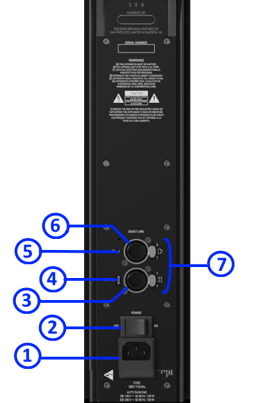
- MAINS INPUT - To connect to the mains electricity supply.
- POWER SWITCH - To switch the mains power on/off.
- EXAKT LINK - From Exakt Master OR from an Exakt Slave connected to the Exakt master
- SERVICE - For use of Linn Technicians only
- FALLBACK - Primarily for Linn service use only, to put the device into Fallback mode (used when reprogramming the unit).
Note: The LED behind the Fallback indicates the Exakt Link is active, but the product is not powered/switched off. - EXAKT LINK - To Exakt Slave product
- STATUS INDICATORS - Function of the LED's are given below:
- Example of wiring using a Klimax DSM with Linn 360 Exakt Integrated loudspeakers.
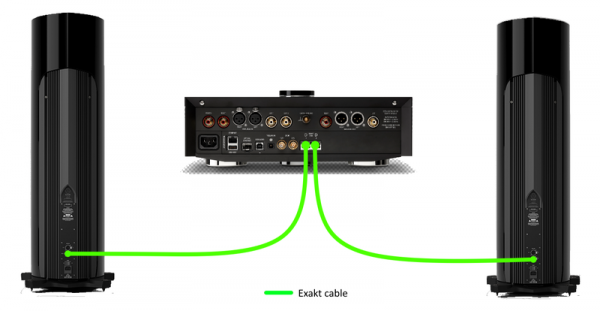
EXAKT LINK connection
Check HERE for information of Exakt link connection
LED Status indicators
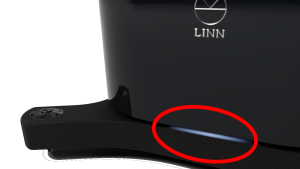
- Front panel
|
LED |
OFF |
ON |
Flash / Blink |
'RED' |
| Diffuser light (between cabinet and stand) | No power | Ready to Rock n Roll | Starting up or Fallback mode | Amplifier fault |
- Back panel
|
LED |
OFF |
ON |
Flash / Blink |
| 0 Master Port | No Link | Link Discovered | Link Activity |
| 1 Audio Clock | No Clock | Clock locked | Clock not locked |
| 2 Slave Port | No Link | Link Enabled | Link Activity |
| 3 Software Status | Not Configured | Running | Hardware Fault |
Setup
|
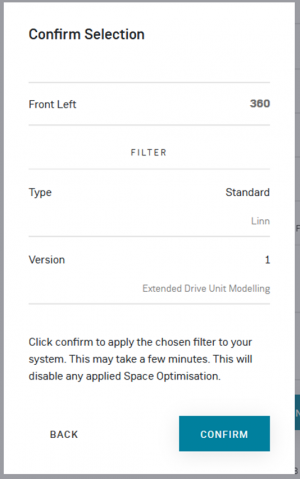
To set up a set of 360 Exakt speakers : 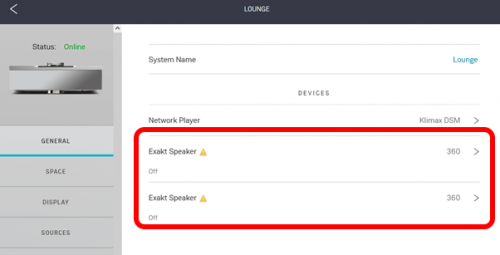

|
Safety
360 speakers built before Sept 2024 (serial no. 1615037) use the Beryllium Dome Tweeter
- Important Safety Information on the Beryllium Dome Tweeter
The outstanding high-frequency reproduction from this loudspeaker is made possible through the deployment of a beryllium dome tweeter.
The diaphragm contains 99% pure beryllium. Beryllium dust is a hazardous material, not to enter the human body, and waste material must be controlled.
Handling solid beryllium poses no significant health risks and if left undisturbed, the beryllium tweeter is safe.
- It is important that you comply with the following safety precautions.
- • Do NOT remove the protective grille.
- • Do NOT open or disassemble the tweeter.
- • If the beryllium dome has been in a fire zone, follow the safety recommendations in the material safety data sheet - Click to view/download
If the tweeter dome is handled aggressively, it will likely dent, however should the tweeter dome break small particles of beryllium may be released and, if airborne, these would pose a health risk.
If your tweeter dome is broken, use double plastic bags, collect loose particles with adhesive tape and put it in the plastic bag. Immediately contact your retailer.
All tweeters requiring repair or service must be returned to the manufacturer to allow safe recycling of the beryllium material – your retailer will handle this for you.
At the end of the speaker’s life, the beryllium material must be disposed of safely. Take the drive unit to an appropriate recycling or hazardous waste disposal site.
For handling beryllium, always follow the safety recommendations in the material safety data sheet - Click to view/download
FAQ
Linn 360 common FAQ's to both PWAB and Exakt variants
The 360 has two 8” bass drive units just like the Klimax 350. How does it produce more bass?
- The bass drivers in the 360 loudspeaker have the same surface area but are capable of greater than twice the excursion of the units deployed in the Klimax 350. This means they can move more than twice the amount of air.
- This is equivalent to the Klimax 350 with four bass drivers.
What is the Linn Power DAC?
- Linn Power DAC is a new amplifier technology specifically designed for bass systems that require high performance, high power, and high efficiency. The Linn Power DAC is a true digital amplifier combining DAC and amplifier into a single process.
- At high playback levels the Power DAC reduces distortion by over 10 dB compared to conventional designs.
Is the 360 bass system servo controlled?
- No. In 360 we have taken a feed-forward approach.
- The response of each bass drive unit is measured, and individual compensation filters are calculated. These filters are then applied in a feed-forward fashion to achieve the same result as the feed-back servo system.
- The 360 bass drive units are also far more linear than those previously used, so distortion correction is no longer required.
Linn 360 Exakt FAQ's
Why use different types of amplifier in 360 Integrated Exakt?
- The design of each amplifier in 360 is tailored to the requirements of its associated drive unit.
- The 360 Array is driven by all-new Linn designed Class-AB amplifiers with Adaptive Bias Control. This gives the best performance over the frequency range of these drive units. Even within the 360 array, the amplifiers are tailored to each drive unit. The upper-bass is a bridged design, whereas the midrange and tweeter are single-ended, and the tweeter amplifier is further ‘tuned’ to ensure very low distortion up to the very highest audio frequencies, improving the signal-to-noise level by around 15 dB compared to the prior art.
- The bass system uses the new Linn Power DAC architecture to achieve low distortion at high power whilst also being very efficient. This allows the bass system to play deeper and louder for longer.
What is Adaptive Bias Control
- Adaptive Bias Control technology is the control of the ideal bias current for all the amplifier output transistors. This is established dynamically and in real-time by measuring, sampling and digitising the current measurement, then using a closed loop to set the output bias voltage through a DAC and novel analogue floating bias circuit.
- A digital control loop then implements and persistently adjusts this optimum bias current for the transistors; negating crossover distortion at any temperature – regardless of volume or demanding dynamic changes in music – for the entirety of the amp’s life.
What are the integrated amplifier ratings?
- Each Linn Power DAC is easily capable of delivering 500 Watts into a four ohm load.
- The Adaptive Bias Control amplifiers for the midrange and tweeter can deliver 150 Watts into a four ohm load.
- The bridged Adaptive Bias Control amplifier for the upper bass can deliver 300 Watts into a four ohm load.
