|
|
| (29 intermediate revisions by 2 users not shown) |
| Line 1: |
Line 1: |
| − | =SPACE optimisation and SPACE optimisation +=
| + | #REDIRECT [[Space Optimisation and Space Optimisation+]] |
| − | SPACE optimisation is a set of tools available to all Linn DS, DSM and Exakt system owners that allow optimisation of the interaction between the customers’ loudspeakers and room. SPACE optimisation is accessed and controlled through Konfig. Before commencing optimisation please ensure that both your DS/DSM and Konfig are updated to the [http://www.linn.co.uk/ds_software latest software versions]
| + | <!--{| width="100%" cellspacing="20" cellpadding="0" border="0" align="center" class="FCK__ShowTableBorders" |
| − | <br><br>
| + | | width="5%" align="center" | |
| − | This document details the basic method for applying SPACE optimisation on a Linn DS or DSM, or SPACE optimisation '''+''' on a Linn Exakt system. More advanced set-up information is presented in [[Advanced SPACE optimisation and SPACE optimisation+| Advanced SPACE optimisation.]]
| + | | width="4<!--[http://docs.linn.co.uk/wiki/images/8/84/SpaceOptimisation.pdf Space Optimisation]--> |
| − | <br><br>
| + | {| width="100%" cellspacing="20" cellpadding="0" border="0" align="center" class="FCK__ShowTableBorders" |
| − | Konfig allows SPACE optimisation set-ups to be saved on a local hard drive and subsequently exported to alternate locations. Irrespective of saved or exported set-ups it is strongly recommended that a written note is taken of all relevant dimensions, along with detail of the final optimisation filters. This ‘hard copy’ should then be stored in the customers file.
| + | | width="25%" align="center" | |
| − | <br><br> | + | | width="50%" align="center" | [[image:SPACEOPTIMISATION_Logo.jpg|150px]] |
| − | Space optimisation work on external inputs of Linn DSM products.
| + | | width="25%" align="center" | |
| − | <br><br>
| + | |} |
| − | The SPDIF/TOSLINK, HDMI & headphone Outputs will NOT have the Space Optimisated audio, these outputs pass the unprocessed audio feed.
| + | {| width="100%" cellspacing="20" cellpadding="0" border="0" align="center" class="FCK__ShowTableBorders" |
| − | <br><br>
| + | | width="5%" align="center" | |
| | + | | width="40%" align="center" | [[image:Konfig_Space.png|250px|link=http://docs.linn.co.uk/wiki/images/8/84/SpaceOptimisation.pdf]]<br>[http://docs.linn.co.uk/wiki/images/8/84/SpaceOptimisation.pdf Linn Konfig Space Optimisation] |
| | | | |
| − | =Install the loudspeakers using the tune-dem.= | + | | width="5%" align="center" | |
| − | Decide along which axis of the room the loudspeakers should be installed. <br>
| + | |} |
| − | Use the Tune-dem method to find the ‘ideal’ location for the loudspeakers which gives the best sonic performance in your '''existing''' listening position.<br>
| |
| − | The correct identification of the ideal loudspeaker position is essential if the full potential of both your hi-fi system and SPACE optimisation is to be achieved. <br><br>
| |
| − | If you are unsure of how find the ideal location for your loudspeakers then contact your expert Linn retailer.
| |
| − | <br>
| |
| − |
| |
| | | | |
| − | =Selecting your system activating SPACE Optimisation in Konfig=
| + | <!-- |
| − | :Open Konfig and select the DS/DSM or Exakt system to be optimised. You will notice three tabs to the top right of the screen.
| + | {| width="100%" cellspacing="20" cellpadding="0" border="0" align="center" class="FCK__ShowTableBorders" |
| − | [[File:Basic 01 -419 Konfig select DS.jpg|700px|centre]]
| + | | width="5%" align="center" | |
| − |
| + | | width="40%" align="center" | [[image:Konfig_Space.png|300px|link=http://docs.linn.co.uk/wiki/images/8/84/SpaceOptimisation.pdf]]<br>[http://docs.linn.co.uk/wiki/images/8/84/SpaceOptimisation.pdf Linn Konfig Space Optimisation] <br> For EXAKT systems |
| − | | + | | width="15%" align="center" | |
| − | :Click on the ‘'''Space Optimisation'''’ tab.
| + | | width="40%" align="center" | [[image:Linn_Account_-_Space.png |300px]]<br>[http://docs.linn.co.uk/wiki/images/8/84/SpaceOptimisation.pdf Linn Konfig Space Optimisation] <br> For non-Exakt systems |
| − | | + | | width="5%" align="center" | |
| − |
| + | |}--> |
| − | | |
| − | ===Turn on SPACE optimisation=== | |
| − | :Select the '''‘Space Optimisation’''' tab in Konfig and click the '''‘TURN ON’''' button.
| |
| − | [[File:Basic_02_-419_Konfig_turn_on_space.jpg|700px|centre]]
| |
| − | <br>
| |
| − | | |
| − | ==Entering your room and speaker set-up in Konfig== | |
| − | :The screen will change to show an image of the room layout, a frequency response graph, several buttons and some data entry boxes. <br>Click on the ‘'''<<CHANGE SETTINGS…'''’ button.
| |
| − | [[File:Basic 03 -419 Konfig change settings.jpg |700px|centre]]
| |
| − | | |
| − | | |
| − | | |
| − | | |
| − | :The frequency response graph and the associated filter selection and control buttons will be replaced by a scrolling data entry page as shown below. <br>
| |
| − | | |
| − | [[File:Basic 04 -419 Konfig enter room settings.jpg |700px|centre]]
| |
| − | <br><br>
| |
| − | | |
| − | | |
| − | ==Enter room dimensions== | |
| − | :Carefully measure your room and enter the dimensions into Konfig. All measurements should be given in metres. As you enter the dimensions Konfig will adjust the room image on the left of the screen to reflect changes. <br><br>
| |
| − | :The room mode algorithm assumes a rectilinear room shape, if your room is not a simple rectangular shape you will need to make some approximations. For advice on how to simplify complex room geometries, see the [[Advanced Space optimisation| Advanced Space optimisation]] set-up page.
| |
| − |
| |
| − | [[File:Basic 05 -419 Konfig enter room dimensions.jpg|700px|centre]] | |
| − | <br><br><br><br>
| |
| − | | |
| − | ==Specify room construction and features==
| |
| − | | |
| − | :Once the room dimensions are entered you will need to specify the construction type for each surface in the room along with any features such as windows and doors.<br> | |
| − | :Starting with front wall, click the drop down list adjacent to ‘'''Construction Type'''’. Select the most appropriate description of the construction of the wall.<br><br>
| |
| − | :'''‘CONCRETE’''' describes any solid or very heavy wall construction including brick, blockwork or stone.<br><br>
| |
| − | :'''‘PARTITION’''' describes any flexible or lightweight construction such as wooden studwork and plasterboard walls.<br><br> | |
| − | :'''‘UNKNOWN’''' provides a coefficient to the room mode algorithm halfway between the '''‘CONCRETE''' and '''‘PARTITION’''' settings. This could be selected for drywall construction (plasterboard cement mounted to a solid wall), or where the construction is actually unknown.
| |
| − | | |
| − | [[File:Basic_06_-419_Konfig_enter_room_construction.jpg|700px|centre]]<br><br>
| |
| − | | |
| − | : If the wall has any features, such as windows or doors, click the ‘'''ADD FEATURE'''’ button.
| |
| − |
| |
| − | [[File:Basic 07 -419 Konfig enter room features.jpg|700px|centre]]<br><br>
| |
| − | | |
| − | :Select the feature type and enter the width and height of the feature. If you need to add more features, click on the ‘'''ADD FEATURE'''’ button. To delete a feature click the ‘'''DELETE'''’ text adjacent to the feature heading.<br><br>
| |
| − | :Repeat the above steps for each of the six surfaces in the room.<br><br>
| |
| − | | |
| − | ==Enter listening position==
| |
| − | :Enter the distance of your listening position from the front and left walls. Remember that the distances must be entered in metres.
| |
| − | | |
| − | [[File:Basic 08 -419Konfig enter listening position.jpg|700px|centre]]<br>
| |
| − |
| |
| − | | |
| − | ==Select your loudspeakers== | |
| − | :Making this selection informs Konfig of the physical and acoustical attributes of your loudspeakers. This information is used by SPACE optimisation for calculation of room modes and placement optimisation. In SPACE optimisation + the information is also used to set the individual drive unit delays to ensure coincident arrival of the music signal from each drive unit. No other use is made of the data regarding the speaker type.<br>
| |
| − | :Click on ‘'''CHANGE'''’ to select your loudspeaker.<br>
| |
| − | | |
| − | [[File:Basic 09 -419 Select left speaker.jpg|700px|centre]]<br><br>
| |
| − | | |
| − | | |
| − | | |
| − | :Select the manufacturer of your loudspeakers, then click ‘NEXT’.
| |
| − | | |
| − | [[File:Basic 10 -419 Select left speaker brand.jpg |700px|centre]]<br><br> | |
| − | | |
| − | | |
| − | | |
| − | :If the manufacturer of your loudspeakers does not appear in the selection you should select ‘other’ from the end of the list.
| |
| − | :Select your loudspeaker model and click the ‘SELECT’ button.
| |
| − | | |
| − | [[File:Basic 11 -419 Select left speaker model.jpg |700px|centre]]<br><br>
| |
| − | | |
| − | | |
| − | | |
| − | :Loudspeakers which have been measured for SPACE optimisation by Linn are indicated. Any model which has yet to be measured will raise the message below:
| |
| − | | |
| − | [[File:Basic 12 -419 Select left speaker model unmeasured.jpg|700px|centre]]<br><br>
| |
| − | | |
| − | | |
| − | | |
| − | :If your loudspeaker model is not selectable you should select ‘other’ from the end of the list.
| |
| − | | |
| − | [[File:Basic 13 -419 Select left speaker model unknown.jpg|700px|centre]]
| |
| − | | |
| − | ===Add Subwoofers===
| |
| − | :If you have any Subwoofers to add click on the "Add Subwoofers" button
| |
| − | :Note:
| |
| − | ::With non-Exakt front left/right speaker you connect the sub to the Linn DS/DSM front left or righ tsockets.<br>
| |
| − | ::With Exaktbox or Exakt speaker you need to use an Exaktbox-sub or Exaktbox for the sub-woofer connection.
| |
| − | | |
| − | | |
| − | [[File:Basic_20-4-22.jpg|700px|centre]]
| |
| − | | |
| − | <br><br><br><br>
| |
| − | | |
| − | ==Enter loudspeaker positions==
| |
| − | :Measure the distance from your loudspeaker to the front and side walls and enter the dimensions into Konfig.
| |
| − | :Konfig will provide the position on your loudspeaker from which the distances must be taken.
| |
| − | | |
| − | [[File:Basic_14_-419_Konfig_enter_ideal_speaker_position.jpg|700px|centre]]<br><br>
| |
| − | | |
| − | ===Point source modelling===
| |
| − | ::If your loudspeaker has not been measured by Linn for SPACE optimisation you will be prompted to enter the location of the lowest frequency drive unit relative to the front and side walls. If your loudspeaker has multiple low frequency drive units you should take an approximate average position for the drive units.
| |
| − | | |
| − | ==Practical position==
| |
| − | :If the ‘'''Ideal’''' position, where the loudspeakers offer their best sonic performance in your listening position, is not suitable due to other domestic constraints then move the loudspeakers to their ‘'''Practical’''' locations and re-measure to the front and side walls. Check the ‘'''Practical Position'''’ tick-box and enter new distances into Konfig.
| |
| − | | |
| − | | |
| − | [[File:Basic_15_-419_Konfig_enter_practical_speaker_position.jpg|700px|centre]]
| |
| − | | |
| − | | |
| − | :Repeat for the right loudspeaker.
| |
| − | <br><br><br><br> | |
| − | | |
| − | ==Optimise the system==
| |
| − | :Once all dimensions for the room, loudspeaker position and listener position have been entered, along with any construction and feature data Konfig is ready to apply SPACE optimisation to your system.
| |
| − | :Click on the ‘'''OPTIMISE'''’ button.
| |
| − | | |
| − | [[File:Basic_16_-419_Konfig_click_optimise.jpg|700px|centre]]
| |
| − | | |
| − | | |
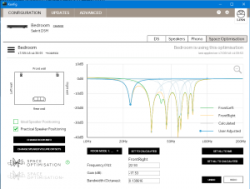
| − | :Konfig will now calculate the optimisation filters for room modes and loudspeaker placement (if practical placement has been entered for the loudspeakers). Once calculated the original SPACE optimisation screen will be displayed showing the result of the room mode optimisation algorithm.
| |
| − | :The DS/DSM or Exakt system is now also programmed with the SPACE optimisation filters and is ready to play music.
| |
| − | | |
| − | | |
| − | [[File:Basic_17_-419_Konfig_optimisation_result.jpg|700px|centre]]
| |
| − | | |
| − | | |
| − | :For information about further adjustment of the filters produced by SPACE optimisation or SPACE optimisation +, including setting bass and treble shelves and custom filters see the [[Advanced SPACE optimisation and SPACE optimisation+| advanced set-up pages for SPACE optimisation]].
| |
| − | <br><br><br><br>
| |
| − | | |
| − | ==Loading and Saving the setup== | |
| − | :At this point you should save your setup, should you chose to make changes to the calculated setup having saved settings will facilitate fast comparisons between any changes you make.<br>
| |
| − | :Click on the ‘'''SAVE'''’ button.<br>
| |
| − | ::NOTE: You can '''ONLY SAVE''' your setting '''AFTER''' pressing '''OPTOMISE'''<br>
| |
| − | :If you make changes to the setup you should use the ‘'''SAVE AS'''’ button to avoid overwriting the existing saved room optimisation.<br>
| |
| − | | |
| − | | |
| − | [[File:Basic_18_-419_Konfig_save_setup.jpg |700px|centre]]
| |
| − | <br><br>
| |
| − | | |
| − | :You will be presented with a dialogue box where you can enter a description of the optimisation setup. This should normally include the room name and any extra detail about the settings you are storing.
| |
| − | [[File:Basic_19_-419_Konfig_save_setup_give_name.jpg|700px|centre]]
| |
| − | | |
| − | | |
| − | :Click on the tick symbol to save the setup.<br><br>
| |
| − | | |
| − | :The optimisation is now named and the name will be displayed on the main SPACE optimisation page.<br><br>
| |
| − | [[File:Basic_20_-419_Konfig_saved_setup_name_displayed.jpg |700px|centre]]
| |
| − | | |
| − | | |
| − | :The settings can be re-loaded at any time by clicking the ‘LOAD’ button and selecting the stored file.
| |
| − | | |
| − | | |
| − | [[File:Basic_21_-419_Konfig_select_setup_to_load.jpg |700px|centre]]
| |
| − | | |
| − | | |
| − | Be aware that clicking the cross box on any saved optimisation will permanently delete that optimisation file.
| |
| − | <br><br><br>
| |
| − | | |
| − | = [[Advanced SPACE optimisation and SPACE optimisation+| '''Advanced''' Space optimisation]]=
| |
| − | [[Advanced SPACE optimisation and SPACE optimisation+| Advanced SPACE optimisation.]]
| |