Systems
Information, hints and tips on operating a DS player in typical Linn systems.
Contents
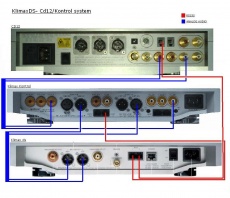
- 1 Klimax DS & Klimax Kontrol (& CD12)
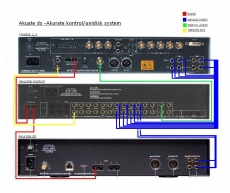
- 2 Akurate DS & Akurate Kontrol (& Akurate CD/Unidisk)
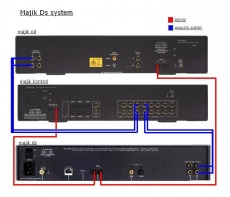
- 3 Majik DS & Majik Kontrol/Majik-I (& Majik CD)
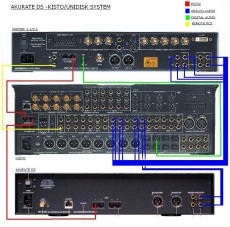
- 4 Akurate DS, Unidisk & Kisto system
- 5 Klimax DS or Majik DS, Unidisk & Kisto system
- 6 Akurate DS, Unidisk & Kinos system
- 7 Klimax DS or Majik DS, Unidisk & Kinos system
- 8 Any DS and Unidisk SC system
- 9 Any DS and Classik Music/Movie system
- 10 Any DS and Classik Movie
- 11 Integrating a DS and Akurate Music Server
- 12 Warning
- 13 Handset Control with a DS and a Linn Disc Player
Klimax DS & Klimax Kontrol (& CD12)
- Prior to the Bute release, the Klimax DS would pass handset IR commands to the Klimax Kontrol. As this functionality is not available in Bute, Product IR must be enabled on the Klimax Kontrol and the unit must be visible to handset commands.
- With Bute release version 1.2-0.6 of the Klimax DS, the RS232 Ports on the back of the Klimax DS are now matched correctly to the setup in the Linn Config App. If you have upgraded to this version or later but already had your system wired, you will need to swap the RS232 connections.
- Requires Klimax Kontrol software version S01020117 and CD12 software version S0450206
Klimax Kontrol Setup
- Enter setup by holding the standby button on the front panel for 2s (device must be in standby mode originally)
- Insure RS232 Connection is set to Enabled
CD12 Setup
- Only responds to CD handset commands
- Klimax DS should be set to respond to DVD commands only from the Linn Config App (Advanced Configure tab)
Connection Setup
- From the Linn Config App, set Linn Preamp Connected to Klimax Kontrol, and set Linn Preamp Connected on Com Port to the Port number on the DS you have connected to the Rs232 IN port of the Klimax Kontrol
- From the Linn Config App, set Linn Disc Player Connected toCD12, and set Linn Disc Player Connected on Com Port to the Port number on the DS you have connected to the Rs232 IN port of the CD12
- Reboot the Klimax DS once you have completed the connection setup
Source Setup
- Select the Klimax Kontrol from the Linn Config App and select Source Setup.
- Select the Source (Input) you have connected the Klimax DS on and select the Klimax DS from the drop down box for Source Name.
- Do the same for the CD12
- At this point, full system control will be available from the Linn GUI
Akurate DS & Akurate Kontrol (& Akurate CD/Unidisk)
Requires Akurate Kontrol software version S03110103 and Akurate CD Software version S01150222. The setup below allows for simultaneous full system control from Linn GUI and automatic stream selection from Akurate CD. The Unidisk 1.1/2.1 can be use in place of the Akurate CD and requires software version S01150218
Akurate Kontrol Setup
- Enter setup by holding the select button on the front panel for 2s (device must be out of standby mode originally)
- Select General Setup from the main options
- Insure Product IR is set to Enabled
- Select Rs232 Setup
- Insure the following RS232 settings are in place
- Baud Rate = 9600
- Parity = Even
- Data Bits = 7
- Stop Bits = 1
- RS232 Events = Enabled
- Select Source Setup from the main options
- Select the digital source used for the Akurate CD (ie Spdif 1) and set the Type to None
- Select Linn Disc Setup from the main options
- Set Analog Source to Analog Group
- Set Digital Source to the digital source used for the Akurate CD (ie Spdif 1)
- Make sure you save all of the changes you have made in setup mode
Akurate CD Setup
- Enter setup by holding the eject button on the front panel for 2s (device must be in standby mode originally)
- Set Front Panel IR Commands to Ignored and set DVD Commands to Ignored
- Insure RS232 Baudrate is set to 9600 and RS232 Events is set to Enabled
- Akurate DS should be set to respond to DVD commands only from the Linn Config App (Advanced Configure tab)
- Note: If using a Unidisk in place of an Akurate CD, set CD Commands to Ignored on the Unidisk and set the Akurate DS to respond to CD Commands Only
Connection Setup
- Connect Akurate DS RS232 port to Akurate Kontrol RS232 IN Port
- Connect Akurate Kontrol RS232 OUT Port to Akurate CD RS232 IN Port
- Connect a Phono cable from Akurate Kontrol Remote Out to Akurate CD Remote In
- Connect Akurate CD 5.1 Analog out to Akurate Kontrol Analog Group
- Connect Akurate DS Analog out to Akurate Kontrol Analog 4
- From the Linn Config App, set Linn Preamp Connected to Akurate Kontrol, and set Linn Preamp Connected on Com Port to the Port number on the DS you have connected to the Rs232 IN port of the Akurate Kontrol
- From the Linn Config App, set Linn Disc Player Connected to Akurate CD, and set Linn Disc Player Connected on Com Port to the same port number
- Reboot the Akurate DS once you have completed the connection setup
Source Setup
- Select the Akurate Kontrol from the Linn Config App and select Source Setup.
- Select the Source (ie Analog 4) you have connected the Akurate DS on and select the Akurate DS from the drop down box for Source Name.
- Select the Linn Disc source and select the Akurate CD from the drop down box for Source Name.
- Select the Analogue source used for the Akurate CD (ie Analogue group + Analog 1 + Analog 2 + Analog 3) and set Source Visible to No for each source
- Select the Digital source used for the Akurate CD (ie Spdif 1) and set Source Visible to No
- At this point, full system control will be available from the Linn GUI, as well as automatic stream selection from the Akurate CD
Majik DS & Majik Kontrol/Majik-I (& Majik CD)
Requires Majik Kontrol software version S04080109 and Majik CD Software version S02320102. The Majik-I can be used in place of the Majik Kontrol and requires software version S03130104.
Majik Kontrol Setup
- Enter setup by holding the mute button on the front panel for 2s (device must be out of standby mode originally)
- Select Unit Configuration
- Insure Handset Commands is set to Enabled
- Select Rs232 Configuration
- Insure the following RS232 settings are in place
- Baud Rate = 9600
- Parity = Even
- Data Bits = 7
- Stop Bits = 1
- RS232 Events = Enabled
Majik CD Setup
- Enter setup by holding the eject button on the front panel for 2s (device must be out of standby mode originally)
- Select Unit Configuration
- Set Handset Commands Accepted to Yes
- Set Accept DVD Commands to No
- Insure Baudrate is set to 9600 and RS232 Events is set to Yes
- Majik DS should be set to respond to DVD commands only from the Linn Config App (Advanced Configure tab)
Connection Setup
- From the Linn Config App, set Linn Preamp Connected to Majik Kontrol, and set Linn Preamp Connected on Com Port to the Port number on the DS you have connected to the Rs232 IN port of the Majik Kontrol
- From the Linn Config App, set Linn Disc Player Connected toMajik CD, and set Linn Disc Player Connected on Com Port to the Port number on the DS you have connected to the Rs232 IN port of the Majik CD
- Reboot the Majik DS once you have completed the connection setup
Source Setup
- Select the Majik Kontrol from the Linn Config App and select Source Setup.
- Select the Source (Input) you have connected the Majik DS on and select the Majik DS from the drop down box for Source Name.
- Do the same for the Majik CD
- At this point, full system control will be available from the Linn GUI
Akurate DS, Unidisk & Kisto system
The DS-Unidisk-Kisto system delivers the best of surround sound playback, AV disk players, and high-definition network sources in a single system. The Akurate DS provides access to high-definition networked audio, and brings IP-network control to the high-performance surround sound AV preamp, and Unidisk universal disk player.
The latest software releases (Linn Config 1.3-0.5 or later, Akurate DS 1.1-0.8 or later, Kisto SP034V7, and Unidisk 1.1/2.1 S01150218) allow both the automatic stream-type selection feature of the Unidisk-Kisto system and the additional full system control from the Linn GUI. The automatic stream-type functionality automatically switches the selected source on the preamp based on the type of disk inserted in the disk player. i.e. Inserting a CD the system automatically selects the stereo inputs on the preamp, and inserting an SACD automatically selects the surround inputs on the preamp.
Physical Connections
- Linn RS232 cable from DS RS232 Port (ie 1) to the RS232 IN socket on the Kisto
- Linn RS232 cable from RS232 OUT socket on the Kisto to the RS232 IN socket on the Unidisk
- Phono cable from Kisto Remote Out to Unidisk Remote In
- Unidisk digital output to Kisto Digital Input (ie Tos 1)
- Unidisk analogue output to Kisto Analogue Input (ie Analog Group 1)
- DS Analogue out to Kisto Analog In (ie Analog 5)
Unidisk Setup
- Put Unidisk into Standby (hold down Play on front panel for ~2s)
- Hold down Eject on the front panel for ~2s to enter User Options mode
- Use Up/Down to select Front Panel IR Commands and use Rght/Left to change to Ignored
- Use Up/Down to select CD Commands and use Rght/Left to change to Ignored
- Also insure RS232 Events are Enabled, correct handeset is selected (All Silver or Silver and Grey), and RS232 Buadrate is set to 9600
- Press Play on the front panel to exit the setup mode
- Note: If you have changed the RS232 ID, it must be set back to the default 'UNIDISK'. Send $ID UNIDISK$\r\n from a PC terminal program.
Kisto Setup
- Press and hold Setup on front panel for ~7s to enter the Installer Menu
- Select +Edit Profile 1, 2, 3, or 4 using the navigation keys on the front panel
- Note: this step is not required, but recommended if you have 12 or more sources already setup, as the Linn GUI can only handle 14 sources or less(and we are adding 2 new sources; DS and Unidisk)
- Select Source Setup/+Remove All Sources/+Remove All Sources (should display 'No sources available) followed by Save
- Select Source Setup/+Remove All Sources/+Remove All Sources (should display 'No sources available) followed by Save
- Adding the DS source: Select Add Source, name it, set the type to AUX, and set the Audio Input (ie analog 5), and Save
- Adding the Unidisk source: Select +Add Unidisk, select +Inputs and set the Analogue (ie analogGroup1), Digital (ie tos1), and Video Inputs and select Save (saves the inputs). Select Save again to save the source.
- Select Back to come out of Source Setup and select General Setup
- Select +Product IR and change to Enable
- Select Handset and choose the correct handset (All Silver or Silver and Grey)
- Select +RS232 IN Settings and select Function=None, Baud Rate=9600, Parity=Even, Data Bits=7, Stop Bits=1. Select Save once this is complete.
- Select +RS232 OUT Settings and select Function=Unidisk. Select Save once this is complete.
- Select Save and Save again to return to the Profile setup page
- Select +Copy Profile and select the profile number you have just saved (ie 1, 2, 3, or 4) under the +CopyProfile setting. For +To Profile select User, then select +Overwrite Target Profile
- Select +Exit to come out of the installer setup menu
- Power cycle your Kisto device to insure the new RS232 settings are used
- Note: If you have changed the RS232 ID, it must be set back to the default 'KISTO'. Send $ID KISTO$\r\n from a PC terminal program.
Linn Config Setup
- Install the Linn Configuration Application. See main docs page for instructions and download locations
- Select your DS device and the Advanced Configure tab
- Set Handset Commands Accepted to CD Commands Only
- Set Linn Preamp Connected to Kisto
- Set Linn Preamp Connected to Com Port... to the RS232 port used on the DS (ie 1)
- Set Linn Disc Player Connected to your Unidisk variant
- Set Linn Disc Player Connected to Com Port... to the RS232 port used on the DS (same as the Preamp port)
- Click on the Reboot button to restart your system
- Select the Kisto device once it has re-appeared and the Advanced Configure tab
- Expand Source Setup by clicking the plus sign
- Expand Source 01 by clicking the plus sign and select 'Akurate DS' from the Source Name drop down list
- Note: This assumes you added the DS source first starting with an empty source list. If this is not the case, open the Linn GUI first and determine which Source number selects the DS source and change its name instead
- Expand Source 02 by clicking the plus sign and select your Unidisk variant from the Source Name drop down list
- Note: This assumes you added the Unidisk source second starting with an empty source list. If this is not the case, open the Linn GUI first and determine which Source number selects the Unidisk source and change its name instead
- Note: This assumes you added the Unidisk source second starting with an empty source list. If this is not the case, open the Linn GUI first and determine which Source number selects the Unidisk source and change its name instead
- Open the Linn GUI for full system control, along with automatic stream selection on the Unidisk. From the handset, you must be in CD mode to control the DS (DS Source must be selected) and DVD mode to control the Unidisk.
Klimax DS or Majik DS, Unidisk & Kisto system
The Akurate DS setup instructions also apply to a system with a Klimax DS (1.2-0.8 or later) or Majik DS (1.0-0.8 or later), but the photos and explanations are based on the use of the Akurate DS.
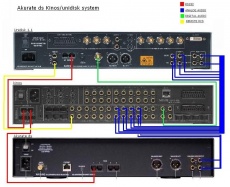
Akurate DS, Unidisk & Kinos system
The Kisto setup instructions apply to a system with a Kinos. The only differences are explained below:
- Hold down the Select button on the front panel for ~7s to enter the installer menu (no Setup button available on the front panel)
- Latest Kinos software version is SP040PV6
Klimax DS or Majik DS, Unidisk & Kinos system
The Akurate DS setup instructions also apply to a system with a Klimax DS (1.2-0.8 or later) or Majik DS (1.0-0.8 or later), but the photos and explanations are based on the use of the Akurate DS.
Any DS and Unidisk SC system
Unidisk SC should be running software version S01150221.
Unidisk SC Setup
- Enter setup by holding the eject button on the front panel for 2s (device must be in standby mode originally)
- Set Front Panel IR Commands to Accepted and set CD Commands to Ignored
- Insure RS232 Baudrate is set to 9600 and RS232 Events is set to Enabled
- DS should be set to respond to CD commands only from the Linn Config App (Advanced Configure tab)
Connection Setup
- Connect DS RS232 port to Unidisk SC RS232 IN Port
- Connect DS Analog out to any anolog input on the Unidisk SC
- From the Linn Config App, set Linn Preamp Connected on Com Port to the Port number on the DS you have connected to the Rs232 IN port of the Unidisk SC, and set Linn Preamp Connected to Unidisk SC
- The config app will fill in the remaining information automatically
- Reboot the DS once you have completed the connection setup
Source Setup
- Select the Unidisk SC (Preamp) from the Linn Config App and select Source Setup.
- Select the Source (input) you have connected the DS on and select the DS from the drop down box for Source Name.
- At this point, full system control will be available from the Linn GUI
Any DS and Classik Music/Movie system
Classik Music should be running software version S03530102.
Classik Movie should be running software version S02220111.
Classik Device Setup
- Enter setup by holding the standby button on the front panel for 2s (device must be in standby mode originally)
- Use the navigation keys on your supplied handset
- Set Enable IR Sensor to On and set CD Commands Accepted to No
- Insure RS232 Baudrate is set to 9600 and RS232 Events is set to On
- DS should be set to respond to CD commands only from the Linn Config App (Advanced Configure tab)
Connection Setup
- Connect DS RS232 port to Classik RS232 IN Port
- Connect DS Analog out to any anolog input on the Classik
- From the Linn Config App, set Linn Preamp Connected on Com Port to the Port number on the DS you have connected to the Rs232 IN port of the Classik, and set Linn Preamp Connected to Classik Music or Classik Movie
- The config app will fill in the remaining information automatically
- Reboot the DS once you have completed the connection setup
Source Setup
- Select the Classik (Preamp) from the Linn Config App and select Source Setup.
- Select the Source (input) you have connected the DS on and select the DS from the drop down box for Source Name.
- At this point, full system control will be available from the Linn GUI
Any DS and Classik Movie
Integrating a DS and Akurate Music Server
In some larger systems it may be necessary to integrate a DS in an installation with an Akurate Music Server.
Network Infrastructure
You will need to select a NAS that supports both products,filing systems. (i.e. NFS and Twonky Media Server). (For example, QNAP TS409 Pro, or see other posibilities on the Recommended NASes page).
Installation is best approached in steps.
- Set up the DS player from a clean network, exactly as described in the DS installation manual
- Set up the Akurate Music Server (AMS) network settings
- Attach the AMS to the network
- Verify that the Linn equipment works
- Attach any additional network devices such as routers and broadband modems
After completing step 1, take a note of the network sub-net address. In step 2 allocate a static IP address for the AMS. This address must be unique, and on the same sub-net as that used in step 1. Your network administrator will be able to allocate a unique address from the range dedicated to static IP addresses on your network. Before connecting the AMS, tell the AMS the chosen IP addresses of your NAS and the AMS itself; the AMS manual tells you how to do this. Move on to steps 3 and 4. Refer to the respective vendor's manuals to complete step 5.
Ripping
As of version 4.10-5 the AMS supports import of media from external (additional) rippers.
The AMS (Akurate Music Server) supports automatic import of FLAC media into the AMS media library. FLAC files with valid meta-data can be copied into the Media Import directory on the NAS. The AMS will import these files and they will be available for playback via the AMS control interface.
- Ensure Media Import Enabled box is checked
Importing media from an external ripper, (eg, EAC or RipStationMicroDS) can be used with this feature.
- Configure your ripping software to copy ripped files to the Media Import directory on the NAS. Your ripping program should be configured to rip to the FLAC media format and contain valid track meta-data.
By default the Media Import directory is "/Media/import" on the AMS NAS.
Ripping options are configurable from the AMS web interface.
Warning
- You can edit the Tags and ANY file on the AMS NAS. The only restriction is that you CANNOT change the FILENAME or DIRECTORY of the Music. (The AMS database is built on the filename and locations. It does NOT use the Tags, thus these can be edited to whatever you want.)
- If you want to change the AMS media name, this can only be done via the LINNTEK software. When you edit the media name using the LINNTEK software, this changes the database information for that file in that directory. It does nothing with that Media file.
- When you rip a CD in to the AMS, if you have this configured (via the web-interface) to Rip as FLAC, it will rip the CD in FLAC with the metadata AGS added. This simplifies the process of adding Music to the AMS and DS.
As of version 4.10-5 the Akurate Music Server rips to the FLAC media file format by default. FLAC is the optimal media format to share your media library for playback on both your DS and AMS systems.
To allow playback of the AMS media library on your DS system you should configure Twonky UPnP Media Server to point to the AMS Media Library directory. By default this directory is "/Media/audio". Add this directory to the list of directories scanned by Twonky Media Server.
Once the library has been scanned by Twonky, you will be able to select and play the content of the AMS media library from the DS control point software, (eg KinskyPDA).
AMS Media Library options are configurable from the AMS web interface. Twonky Media server options are configurable from the Twonky configuration page.
Handset Control with a DS and a Linn Disc Player
The latest Bute software allows the user to configure which commands are passed to the DS. All, None, CD Only, or DVD only can be selected. If you are using the DS with a Linn CD player, the DS should be set to DVD only and the Linn CD Player should be set to ignore DVD commands. If you are using the DS with a Linn DVD/CD player, the DS should be set to CD only and the Linn DVD/CD Player should be set to ignore CD commands. Also note, if you have a Linn Preamp in your system, the DS will only respond to handset commands if it is the active source
- Linn Config 1.3-0.5 or later
- Akurate DS 1.1-0.8 or later
- Klimax DS 1.2-0.8 or later
- Majik DS 1.0-0.8 or later
- Sneaky Music DS 1.1-0.6 or later
