DS Budget System
Contents
Introduction
This is a recommended guide to setting up the most basic Linn DS system, using any networking components that are already available. It requires the minimum expenditure in order to get a Linn DS product up and running in an existing network environment.
It is advisable to follow the instructions step by step to ensure that each part of the system is working before moving on to the next. By doing this, it simplifies the setup process and allows for any problems encountered to be more easily identified and resolved.
Required Components
- Router
- Computer
- Linn DS
Notes:
- Ethernet cables are required to connect devices
- Router may have been provided by your internet service provider
- An additional network switch may be required (see Step 2)
Step 1: Connect Computer To Router
If the computer already has a working internet connection then continue to step 2.
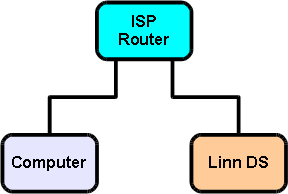
- Connect the computer to the router
- Power on the router
- Power on the computer
The computer’s network adapter should already be configured to ‘obtain an IP address automatically’.
Step 2: Connect Linn DS To Router
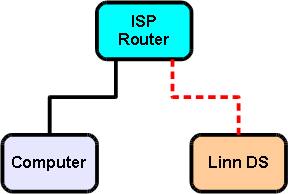
- Connect the Linn DS to the router
- Power on the Linn DS
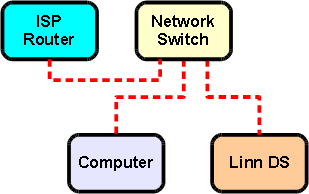
If the router does not have enough ethernet ports to connect the Linn DS then a network switch will be required and the devices should be connected as follows.
- Connect the router to the network switch
- Connect the computer to the network switch
- Connect the Linn DS to the network switch
- Power on the network switch
- Power on the Linn DS


