Difference between revisions of "Sekrit DSM"
(→Back Panel Connections) |
(→Speaker Wiring) |
||
| Line 47: | Line 47: | ||
== '''Speaker Wiring''' == | == '''Speaker Wiring''' == | ||
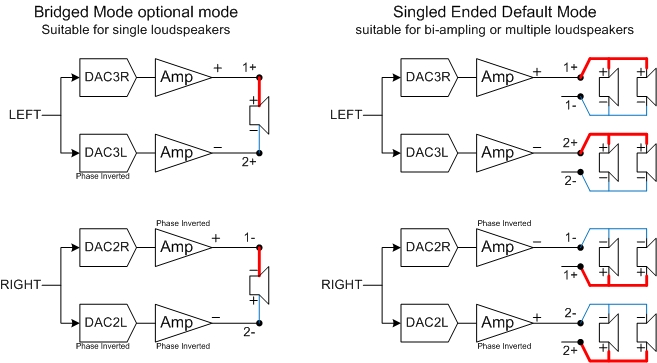
| + | The Sekrit DSM has 4 DAC channels and 4 Power Amplifiers. These amplifoers can be configuraed in seingle ended mode or Bridged mode. The Single Ended mode is best suited to bi-amping a pair of passive speakers or for driving multiple pairs of loadspeakers. Bridged mode is best suited to driving a single pair of loudspeakers. | ||
| + | |||
| + | [[Image:SekritDsmConfiguration.jpg|center|700px]] | ||
| + | |||
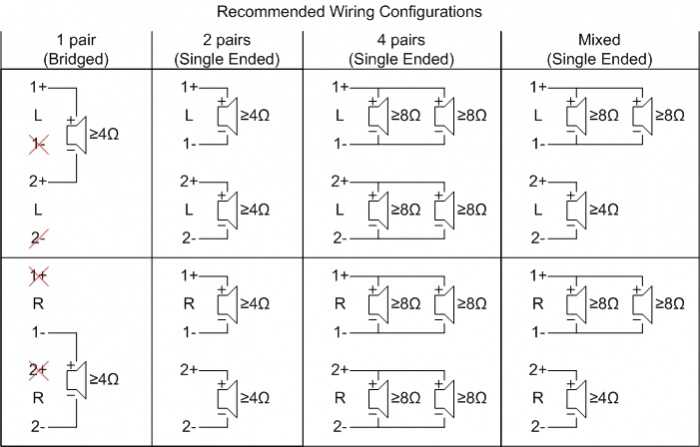
| + | The riring details are shown below: | ||
[[Image:SekritDsmWiring.jpg|center|700px]] | [[Image:SekritDsmWiring.jpg|center|700px]] | ||
<br> | <br> | ||
* 30W/channel in single-ended mode | * 30W/channel in single-ended mode | ||
| − | * 50W/channel in | + | * 50W/channel in bridged mode |
== '''Back Panel Connections''' == | == '''Back Panel Connections''' == | ||
Revision as of 10:52, 10 December 2012
Contents
Product info
- Product Name: Sekrit DSM
- Date of Introduction: December 2012
- Type: Integrated digital music player, pre-amplifier, and power amplifier
- Features
Support
Latest software
Manuals
HDMI Setup
Network Setup
Speaker Wiring
The Sekrit DSM has 4 DAC channels and 4 Power Amplifiers. These amplifoers can be configuraed in seingle ended mode or Bridged mode. The Single Ended mode is best suited to bi-amping a pair of passive speakers or for driving multiple pairs of loadspeakers. Bridged mode is best suited to driving a single pair of loudspeakers.
The riring details are shown below:
- 30W/channel in single-ended mode
- 50W/channel in bridged mode
Back Panel Connections
- MAINS INPUT - To connect to the mains electricity supply.
- FALLBACK- To put the device into Fallback mode (used when reprogramming).
- ETHERNET - To connect to a network.
- HDMI OUTPUT - To connect to a display device with HDMI inputs.
- HDMI INPUTS - To connect sources with HDMI outputs.
- ANALOGUE OUTPUT (RCA, variable/fixed level) - To connect to subwoofer or external power amplifier.
- IR OUTPUTS - To connect to infrared flasher devices allowing control of other products that accept infra-red signals.
- DIGITAL INPUT (Toslink) - To connect sources with Toslink (optical) digital outputs.
- DIGITAL INPUT (Spdif) - To connect sources with Spdif (RCA) digital outputs.
- ANALOGUE INPUT (line level) - To connect a turntable or line level source with unbalanced (RCA) outputs.
- SPEAKER OUTPUTS - To connect to loudspeakers
- ANALOGUE OUTPUT (RCA, variable/fixed level) - To connect to a preamplifier (or power amplifier when internal volume control is enabled) with unbalanced (RCA) analogue inputs.
- RC5 ACCESSORY - To connect BASIK-3 & BASIK-3IR Room Control units.
Front Panel Connections
- IR SENSOR - Recieves IR commands
- DIAGNOSTIC LEDS - See table below for functionality
- FALLBACK (F-BACK) - To put the device into Fallback mode (used when reprogramming).
- POWER SWITCH- Switches the power on/off
DIAGNOSTIC LED FUNCTIONS
|
Text |
ON indicates |
OFF indicates |
Slow Flash / Blink |
Fast Flash |
| IR | Pulse on IR command received | Reserved for future use | Reserved for future use | n/a |
| P-AMP | Internal amplifier enabled | Internal amplifier disabled | Internal amplifier fault | n/a |
| AUDIO | Valid audio (digital inputs only) | n/a | Invalid audio (digital inputs only) | n/a |
| DHCP | DHCP IP address obtained | Default IP address obtained | n/a | n/a |
| LINK | Ethernet link established | no link established | n/a | n/a |
| STBY | Device in standby | Device active | Searching for IP address (boot) | Fallback (reprogramme) |
*NOTE: All LED's will flash if 'Locate Device' request is invoked from Konfig
Installation
Please read the following carefully before installing the unit in your system – your unit may need to be reconfigured by your Linn retailer.
For further assistance, try our customer support pages or the Linn Forum.


