Difference between revisions of "LinnApp:Manage systems"
m |
m |
||
| Line 10: | Line 10: | ||
4. Complete | 4. Complete | ||
| − | [[file:LA.Add.Remove.products.png|800px|centre]] | + | [[file:LA.Add.Remove.products.png|800px|centre | link=]] |
:;Note | :;Note | ||
::<span style="color:RED"><b>Registering a product does NOT add it to your Linn Account.</b></span> | ::<span style="color:RED"><b>Registering a product does NOT add it to your Linn Account.</b></span> | ||
Revision as of 10:13, 18 November 2024
1. Make sure that you are on the same ethernet network as your Linn products. (In other words, make sure that you can see your Linn Products in the Linn App)
2. Check that you are logged into your Linn Account by pressing the Linn App settings button. The top of the settings menu will tell you the Linn Account used or show a Linn Account message to log in.
3. After you check, you are logged in
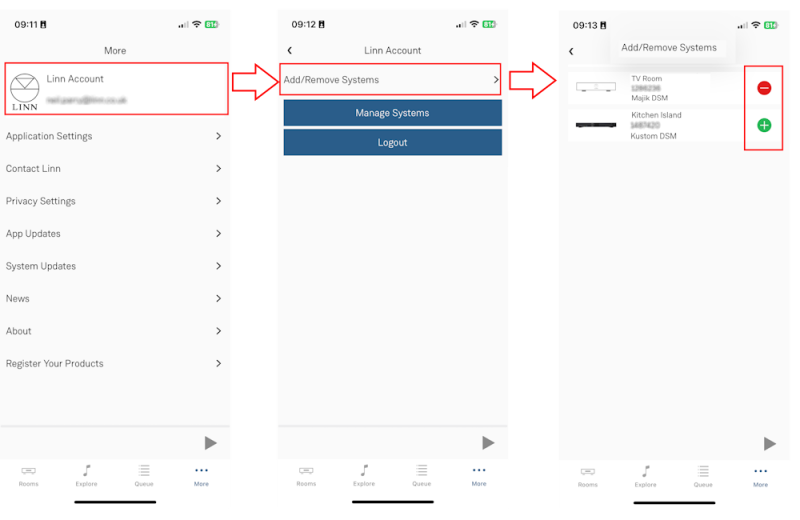
- 3.1 Click on the Settings > Linn Account Linn icon and "Add/Remove Systems"
- 3.2 This will show ALL the products on your network, even ones NOT of your Linn account, as well as the products already linked to your Linn Account.
- 3.3 Hit the + to add the product to your Linn Account
- 3.4 Hit the - to remove it from the Linn Account. If you are on the same local network as the Linn DS/DSM, this will allow you to remove ANY Linn DS/DSM on this local network from ANY Linn Account
4. Complete

- Note
- Registering a product does NOT add it to your Linn Account.