Difference between revisions of "Template:Build Series 3 Stand"
(Created page with "== '''Fitting the additional Stand''' == 80px center|200px <br> Brief install instuctions, please use...") |
m |
||
| Line 1: | Line 1: | ||
== '''Fitting the additional Stand''' == | == '''Fitting the additional Stand''' == | ||
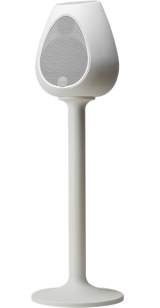
| − | [[image:Series3-stand.png| | + | [[image:Series3-stand.png|left|160px]] |
| − | < | + | <b><u>Install instuctions: </u></b> |
| − | |||
1. Have all parts ready to assemble, and a clean, soft surface to work on. | 1. Have all parts ready to assemble, and a clean, soft surface to work on. | ||
| − | 2. Turn the stand upside-down and feed the cables you require through the stand. Pull the cables out through the hole provided at the rear of the stand. | + | :2. Turn the stand upside-down and feed the cables you require through the stand. Pull the cables out through the hole provided at the rear of the stand. |
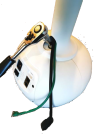
| − | 3. Gently and carefully place the Series 3 speaker on its head. Line up the hole in the top of the stand with the insert in the cabinet. Take the bolt and washer and start fitting the bolt by hand to ensure you are not cross threading. Tighten the bolt to secure, <B>but take care not to overtighten it</b>, as this could crack the speaker cabinet. | + | [[image:Series3-Stand-bolt.png|right |100px]] |
| + | :3. Gently and carefully place the Series 3 speaker on its head. Line up the hole in the top of the stand with the insert in the cabinet. | ||
| + | {{TAB4}} a) Take the bolt and washer and start fitting the bolt by hand to ensure you are not cross threading. <br> | ||
| + | {{TAB4}} b) Tighten the bolt to secure, <B>but take care not to overtighten it</b>, as this could crack the speaker cabinet.<br> | ||
| + | |||
| + | :4. Turn the stand the right way up and plug the cables into the connectors. The product is now ready to connect and install | ||
| + | |||
| + | :5. Optional rubber bump on feet can be fitted to the base if the stand is going to be used on a wooden floor, to avoid scratching. Arrange the feet equally spaced around the perimeter. | ||
Revision as of 16:13, 19 January 2021
Fitting the additional Stand
Install instuctions:
1. Have all parts ready to assemble, and a clean, soft surface to work on.
- 2. Turn the stand upside-down and feed the cables you require through the stand. Pull the cables out through the hole provided at the rear of the stand.
- 3. Gently and carefully place the Series 3 speaker on its head. Line up the hole in the top of the stand with the insert in the cabinet.
a) Take the bolt and washer and start fitting the bolt by hand to ensure you are not cross threading.
b) Tighten the bolt to secure, but take care not to overtighten it, as this could crack the speaker cabinet.
- 4. Turn the stand the right way up and plug the cables into the connectors. The product is now ready to connect and install
- 5. Optional rubber bump on feet can be fitted to the base if the stand is going to be used on a wooden floor, to avoid scratching. Arrange the feet equally spaced around the perimeter.

