Difference between revisions of "SO2:Ceiling Heights"
m |
m |
||
| Line 4: | Line 4: | ||
:::This will allow you to define points of different heights of the ceiling. This allows you to define, and add additional points to create a fresh ceiling state. | :::This will allow you to define points of different heights of the ceiling. This allows you to define, and add additional points to create a fresh ceiling state. | ||
:::[[File:SO2 Ceiling type.png|link=]] | :::[[File:SO2 Ceiling type.png|link=]] | ||
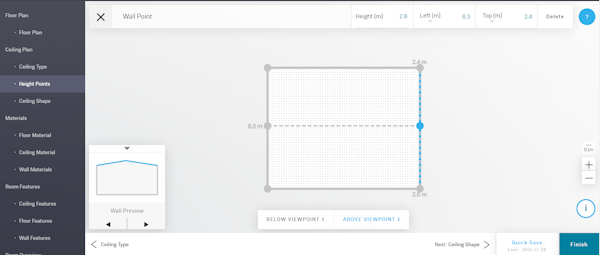
| − | :::In the above example, each corner has a height of 2.4M. The additional height points in the middle of the side walls with a height of 2.8M. This would create a peaked roof, as can be seen in the wall preview picture - bottom left of above image.) | + | :::In the above example, each corner has a height of 2.4M. The additional height points in the middle of the side walls, with a height of 2.8M. This would create a peaked roof, as can be seen in the wall preview picture - bottom left of above image.) |
| − | + | ||
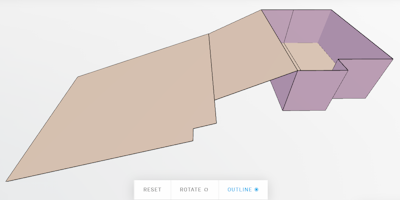
| − | + | :::With a room with a more complex shape, you will have to get the correct heights for each corner within the room. But when you look at the ceiling shape, it is nothing like the actual ceiling. | |
| − | :::<b>Fix</b> button, on the Ceiling shape page. The issue with multiple ceiling heights is that it can link to other height points. The <b>FIX< | + | :::e.g.[[File:SO2_Ceiling_Complex_room.png|link=|centre|800px]] |
| + | |||
| + | :::This can be fixed by either: | ||
| + | ::::*<b><u>Fix</u></b> button, on the Ceiling shape page. The issue with multiple ceiling heights is that it can link to other height points. The <b>FIX</b> button will allow you to join the height points together and fix the ceiling lines | ||
| + | ::::* The other is adding a <b>Ceiling feature</b> and adding a <b>Feature</b> of <b>Material</b> - <b><i>Suspended Ceiling</i></b>, or more depending on the room corners: | ||
| + | :::: With a positive height, this moves the suspended ceiling ABOVE the current. That is out of the room. | ||
| + | :::: With a negative height, this will bring the suspended ceiling INTO the room. | ||
| + | :::::e.g. Suspended ceiling negative height | ||
| + | [[File:SO2_Suspended_Ceiling.png|link=|centre]] | ||
Revision as of 14:11, 5 September 2024
- You get some ceilings that are not flat, you may have slopes, how do you deal with this?
- This is by defining the Ceiling Type as Variable Height Ceiling
- Ceiling heights points
- This will allow you to define points of different heights of the ceiling. This allows you to define, and add additional points to create a fresh ceiling state.

- In the above example, each corner has a height of 2.4M. The additional height points in the middle of the side walls, with a height of 2.8M. This would create a peaked roof, as can be seen in the wall preview picture - bottom left of above image.)
- With a room with a more complex shape, you will have to get the correct heights for each corner within the room. But when you look at the ceiling shape, it is nothing like the actual ceiling.
- e.g.

- This can be fixed by either:
- Fix button, on the Ceiling shape page. The issue with multiple ceiling heights is that it can link to other height points. The FIX button will allow you to join the height points together and fix the ceiling lines
- The other is adding a Ceiling feature and adding a Feature of Material - Suspended Ceiling, or more depending on the room corners:
- With a positive height, this moves the suspended ceiling ABOVE the current. That is out of the room.
- With a negative height, this will bring the suspended ceiling INTO the room.
- e.g. Suspended ceiling negative height
- This can be fixed by either:
