Difference between revisions of "Space Optimisation"
(Created page with "= Introduction = Space Optimisation provides a listener focused view of room optimisation.This means that Linn DS/DSM products give the listener an opportunity to greatly improv…") |
(Redirected page to Space Optimisation and Space Optimisation+) |
||
| (31 intermediate revisions by 2 users not shown) | |||
| Line 1: | Line 1: | ||
| + | #REDIRECT [[Space_Optimisation_and_Space_Optimisation%2B]] | ||
= Introduction = | = Introduction = | ||
| − | Space Optimisation provides a listener focused view of room optimisation.This means that Linn DS/DSM products give the listener an opportunity to greatly improve the listening experience by providing these products with information about the listening environment. The software inside the these products can then account for the listening environment and compensate accordingly. | + | '''Space Optimisation''' provides a listener focused view of room optimisation for analogue. This means that Linn DS/DSM products give the listener an opportunity to greatly improve the listening experience by providing these products with information about the listening environment. The software inside the these products can then account for the listening environment and compensate accordingly. |
| − | + | '''Space Optimisation+''' has the added functionality of '''Exakt''' products incorporating the measured response of every individual drive unit as well as Space Optimisation. It enables even more advanced speaker modelling that’s specific, not just to the model of speaker, but to the unique pair of speakers in your home. This will further enhance your Music experience. | |
| + | <br><br> | ||
| + | |||
| + | |||
| + | Space Optimisation/Space Optimisation+ works on '''ALL''' music playback sources '''except''' external source(s) with '''DIRECT '''Delay Mode. (This can be the default Delay mode on some external inputs so check this setting first in Konfig)<br><br> | ||
| + | |||
| + | The SPDIF/TOSLINK & HDMI Outputs will NOT have the Space Optimisated audio, these outputs pass the unprocessed audio feed. <br> | ||
| + | |||
| + | |||
| + | [http://www.linn.co.uk/systems/technology/space-optimisation#compatible-speakers Compatible Space Optimisation speakers] are listed in www.Linn.co.uk plus how to request new speaker support | ||
= Overview = | = Overview = | ||
| Line 22: | Line 32: | ||
= Optimisation Process = | = Optimisation Process = | ||
== Stage 1: TuneDem == | == Stage 1: TuneDem == | ||
| + | This is assuming if you have an Exakt speaker/ExaktBox system this has been configured using the Konfig manual | ||
: 1. Using the [http://www.linn.co.uk/tunedem TuneDem] method, determine the ideal speaker location for your room | : 1. Using the [http://www.linn.co.uk/tunedem TuneDem] method, determine the ideal speaker location for your room | ||
: 2. Select your Linn DS/DSM device in Konfig | : 2. Select your Linn DS/DSM device in Konfig | ||
| − | : 3. Click on | + | : 3. For non Exakt systems, select the "Speakers" tab, select your speakers and press the Apply button |
| + | :: NOTE: With '''Space Optimisation''' turned '''OFF''' this speaker selected in this tab is ignored and has no effect in Music playback. | ||
| + | : 4. This will show '''Space Optimisation+''' or '''Space Optimisation''' Click on this tab | ||
| + | :: '''Space Optimisation+''' is for '''Exakt''' Speakers/ExaktBoxes | ||
| + | :: '''Space Optimisation''' is for '''Non-Exakt''' system | ||
| + | : 5. TURN ON Space Optimisation if turned off | ||
| + | [[File:KonfigSpaceTabs.jpg|740px|Space Tabs]] | ||
| + | |||
| + | == Stage 2: Optimise for Room Modes == | ||
| − | + | '''TURNING OFF THE Space Optimisation WILL IGNORE ANY SPEAKER SELECTION AND WILL NOT PERFORM ANY Space Optimisation''' | |
| − | |||
=== Room dimensions === | === Room dimensions === | ||
<br> | <br> | ||
| + | Click in the '''CHANGE ROOM SETTINGS...''' | ||
| + | |||
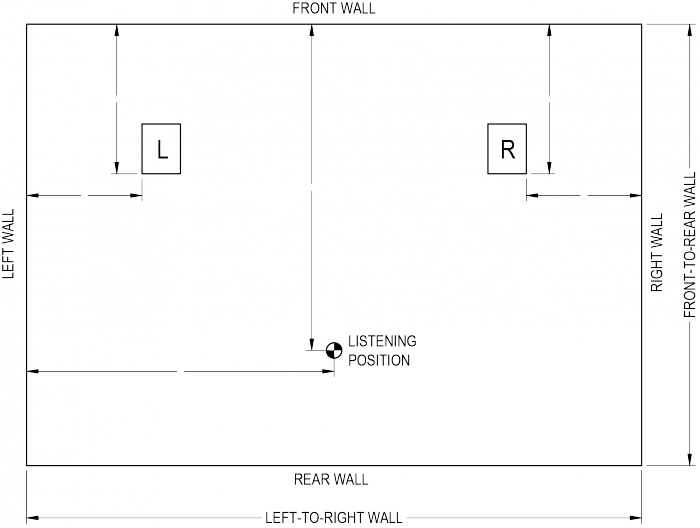
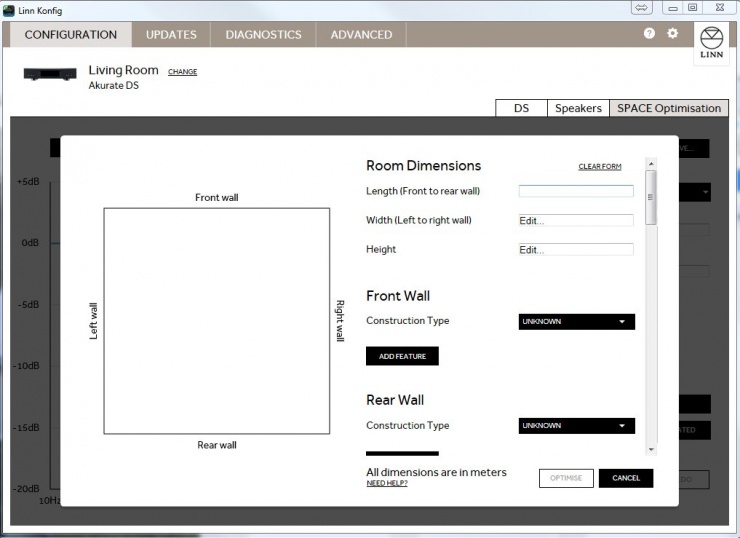
Measure the length, width and height of the listening room and note them down. All measurement must be taken in meters.<br><br> | Measure the length, width and height of the listening room and note them down. All measurement must be taken in meters.<br><br> | ||
| − | [[File: | + | [[File:KonfigSpaceOptimisationRoomModesDimensions.jpg|740px]] |
[[File:ExaktRoomMeasurement.png|700px]] | [[File:ExaktRoomMeasurement.png|700px]] | ||
| Line 47: | Line 67: | ||
To enter the Room Dimensions:-<br> | To enter the Room Dimensions:-<br> | ||
| − | : 1. Click on the ''' | + | : 1. Click on the '''SPACE Optimiation''' optimisation tab. |
| − | : 2. Click on '''Change | + | : 2. Click on '''Change Room Settings...'''. |
: 3. Enter values for '''Room Dimensions''' (in Metres) | : 3. Enter values for '''Room Dimensions''' (in Metres) | ||
| Line 59: | Line 79: | ||
: 5. Enter values for '''Ideal TuneDem Speaker Position''' | : 5. Enter values for '''Ideal TuneDem Speaker Position''' | ||
| − | :: a. The bottom area of the plinth to floor does not include the spikes height on floor standing speakers. | + | :: a. The bottom area of the plinth to floor does not include the '''spikes''', '''Skeets''' height on floor standing speakers. With desktop speakers this is from the base of the speakers. |
:: b. Speaker measurements should be made from the outside front corner. | :: b. Speaker measurements should be made from the outside front corner. | ||
| − | + | [[File:KonfigSpaceWallConstruction.jpg|740px]] | |
: 6. Click '''Optimise'''. | : 6. Click '''Optimise'''. | ||
| Line 70: | Line 90: | ||
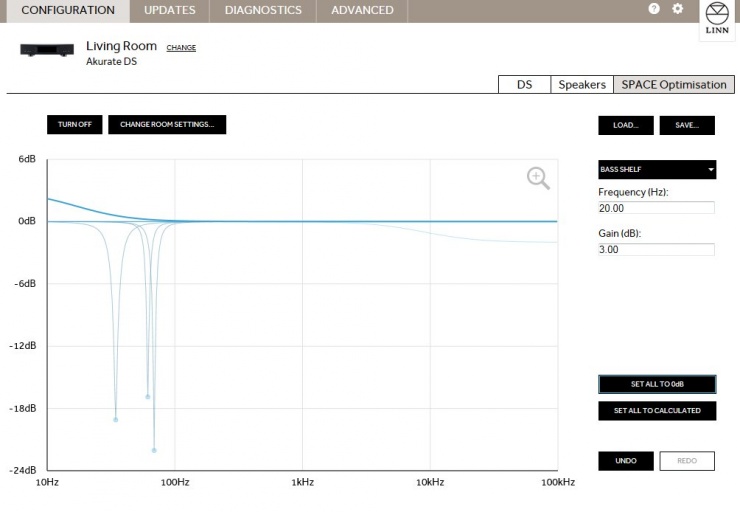
The '''Room Modes''' graph now displayed shows the audio notch filters/Room Modes that are applied to the audio stream before being played back from the speakers.<br> | The '''Room Modes''' graph now displayed shows the audio notch filters/Room Modes that are applied to the audio stream before being played back from the speakers.<br> | ||
All of these filters are applied in unison, they are not individual filters that you select to be operation one at a time.<br> | All of these filters are applied in unison, they are not individual filters that you select to be operation one at a time.<br> | ||
| + | |||
| + | The fresh graph shows '''BLUE''' lines, these are the user adjusted, (the '''Black''' calulated lines are hidden behind the blue lines) | ||
These Space Optimisation "Room Modes"/Notch filters are used to correct room audio reflections from the wall, ceiling, floor and furnishings. These reflections can cause highs and lows in the frequency response, these '''Room Modes''' filters correct these distortions.<br> | These Space Optimisation "Room Modes"/Notch filters are used to correct room audio reflections from the wall, ceiling, floor and furnishings. These reflections can cause highs and lows in the frequency response, these '''Room Modes''' filters correct these distortions.<br> | ||
| Line 75: | Line 97: | ||
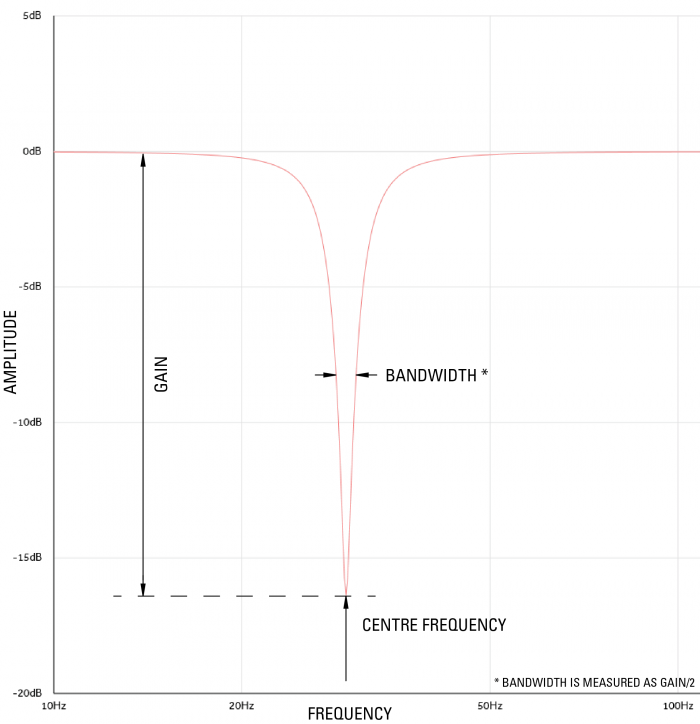
A large room will have more optimisation filters than a small room. Selecting an individual optimisation filter allows you to modify the centre frequency of the filter, its bandwidth and its gain. | A large room will have more optimisation filters than a small room. Selecting an individual optimisation filter allows you to modify the centre frequency of the filter, its bandwidth and its gain. | ||
| − | For regular shaped rectangular rooms | + | For regular shaped rectangular rooms it is likely that the room mode optimisation is quite accurate and will require little further improvement. |
=== Custom Filter === | === Custom Filter === | ||
| Line 84: | Line 106: | ||
As a first step it is recommended that the installer check the validity of each room mode filter. Filter redundancy may occur if a room surface is particularly irregular, for example a pitched roof. In this instance no strong standing waves will occur between the floor and ceiling and unnecessary optimisation filters may be produced. | As a first step it is recommended that the installer check the validity of each room mode filter. Filter redundancy may occur if a room surface is particularly irregular, for example a pitched roof. In this instance no strong standing waves will occur between the floor and ceiling and unnecessary optimisation filters may be produced. | ||
| − | + | Press the '''SET ALL TO 0dB''' then using the tune-dem re-instate each filter by pressing '''SET TO CALCULATED''', starting with the lowest frequency, and ensure that each optimisation filter improves the musicality of the system. If re-instating a filter has no audible effect then return the filter’s gain to zero and move to the next filter. | |
| − | |||
| − | |||
| − | |||
==== Adjusting Room mode for best sonic performance ==== | ==== Adjusting Room mode for best sonic performance ==== | ||
| Line 102: | Line 121: | ||
Always start with the lowest frequency room mode filter. Low frequencies mask higher frequencies so it will be easier to judge the accuracy of the higher frequency mode filters if the lower frequency filters are correct. | Always start with the lowest frequency room mode filter. Low frequencies mask higher frequencies so it will be easier to judge the accuracy of the higher frequency mode filters if the lower frequency filters are correct. | ||
| − | + | Pressing the '''SET TO CALCULATED''' will ONLY change the current node back to the calcuated value. | |
| + | |||
| + | Pressing the '''SET ALL TO CALCULATED''' will return ALL nodes to their calculated value. | ||
E.g. Take the difference between the Gain value and zero then half it. Listen to at centre gain plus half value and then minus half value to find the best Gain setting for the tune. Half the value between the two best sound gains and vary this by half again.<br> | E.g. Take the difference between the Gain value and zero then half it. Listen to at centre gain plus half value and then minus half value to find the best Gain setting for the tune. Half the value between the two best sound gains and vary this by half again.<br> | ||
| Line 113: | Line 134: | ||
:::::etc.... | :::::etc.... | ||
<br><br> | <br><br> | ||
| − | + | [[File:KonfigSpaceNodeAdj.jpg|700px]] | |
| − | |||
== Stage 3: Optimise for Speaker Placement == | == Stage 3: Optimise for Speaker Placement == | ||
| Line 120: | Line 140: | ||
You may not be happy with the speakers setup in the Tune-Dem locations setup above. If for reasons of practicality, interior design or aesthetics requirements, the loudspeakers to be placed elsewhere then move the loudspeakers as required and measure the new ‘practical’ loudspeaker positions.<br> | You may not be happy with the speakers setup in the Tune-Dem locations setup above. If for reasons of practicality, interior design or aesthetics requirements, the loudspeakers to be placed elsewhere then move the loudspeakers as required and measure the new ‘practical’ loudspeaker positions.<br> | ||
| + | Note: Any manual changes that you have made in the Ideal position are NOT carried forward to the Practical position, it is only new speaker position that is used to calculate the Space Optimisation, the manual adjustements are ignored. | ||
| − | |||
| − | : | + | [[File:KonfigSpaceOptPracSprPOS.jpg|740px|Speaker Placement Dimensions]] |
| − | : | + | : 1. Click on the '''CHANGE ROOM SETTINGS''' button. |
| − | : | + | : 2. Enter values for '''Practical Speaker Position''' for each speaker. (Do '''NOT''' change the 'ideal' loudspeaker positions.) |
:: a. All dimensions must be measured in meters. | :: a. All dimensions must be measured in meters. | ||
:: b. Speaker measurements should be made from the outside front corner. | :: b. Speaker measurements should be made from the outside front corner. | ||
| − | |||
| − | : | + | : 3. Click '''Optimise'''. |
: N.B. To remove any Speaker Placement optimisation from your setup click '''Disable'''. | : N.B. To remove any Speaker Placement optimisation from your setup click '''Disable'''. | ||
| Line 142: | Line 161: | ||
Remember and record the settings on the [[Media:Konfig Exakt Room Mode Adjustment.pdf]] sheet | Remember and record the settings on the [[Media:Konfig Exakt Room Mode Adjustment.pdf]] sheet | ||
| − | [[File:ExaktSpeakerPlacement.png|700px|RoomMeasurement]] | + | <!-- [[File:ExaktSpeakerPlacement.png|700px|RoomMeasurement]] --> |
== Stage 4: Optimise for High Frequency Response == | == Stage 4: Optimise for High Frequency Response == | ||
| − | [[File: | + | [[File:KonfigSpaceOptimisationHighFrequencyResponse.jpg|740px|High Frequency Response]] |
: 1. Click on the Room Mode selection and select Treble shelf | : 1. Click on the Room Mode selection and select Treble shelf | ||
: 2. Enter frequency and gain values as required. (gain limits -2dB to + 2dB) | : 2. Enter frequency and gain values as required. (gain limits -2dB to + 2dB) | ||
: N.B. To disable any high frequency response set the gain to 0. | : N.B. To disable any high frequency response set the gain to 0. | ||
| + | : You will have to click on the magnifying glass in the top left of the graph to see the result. | ||
== Stage 5: Optimise for bass response == | == Stage 5: Optimise for bass response == | ||
| − | [[File: | + | [[File:Konfig_Space_Bass_shelf.jpg|740px|Bass Response]] |
: 1. Click on the Room Mode selection and select Bass shelf | : 1. Click on the Room Mode selection and select Bass shelf | ||
: 2. Enter frequency and gain values as required. | : 2. Enter frequency and gain values as required. | ||
| − | :: Typical value range: 20Hz-200Hz corner, -6dB > +3dB gain (Keltik - | + | :: Typical value range: 20Hz-200Hz corner, -6dB > +3dB gain (Keltik -6dB > +9dB) |
: N.B. To disable any bass response set the gain to 0. | : N.B. To disable any bass response set the gain to 0. | ||
| − | |||
== Stage 6: Fine Tune Filter Parameters to Improve Audio Performance == | == Stage 6: Fine Tune Filter Parameters to Improve Audio Performance == | ||
| Line 175: | Line 194: | ||
::* Changing the '''Gain''' value will change the height of the notch filter. | ::* Changing the '''Gain''' value will change the height of the notch filter. | ||
::* Changing the '''Bandwidth''' value with change the width of the notch filter. | ::* Changing the '''Bandwidth''' value with change the width of the notch filter. | ||
| + | |||
| + | |||
| + | == Stage 7: Saving and Loading Space Optimisation setting == | ||
| + | |||
| + | You can now save and reload previous Space Optimisation settings using the '''"LOAD.."''' & '''"SAVE.."''' button on the '''Space Optimisation''' tab | ||
| + | |||
| + | These buttons will save and load the settings on you local PC/MAC and recalled at a later date. | ||
| + | :'''SAVE..''' will ask for a description of the changes and add the Room name with date & time of the save. | ||
| + | |||
| + | |||
| + | :'''LOAD..''' Shows the date, Room and description of previous SAVE.. and allow you to reload these settings.<br> | ||
| + | :: You can '''EXPORT''' these files that you can save, then copy/back to a different PC/MAC | ||
| + | :: You can '''IMPORT''' these exported files from a different machine | ||
| + | |||
| + | Note: | ||
| + | These same settings can be used with BOTH Exakt and Non-Exakt systems. | ||
= Known Restrictions = | = Known Restrictions = | ||
| Line 181: | Line 216: | ||
Internet access of required for KONFIG AND the Linn Exakt products to allow any loudspeaker measurements, crossover settings and software updates to be downloaded to the system. | Internet access of required for KONFIG AND the Linn Exakt products to allow any loudspeaker measurements, crossover settings and software updates to be downloaded to the system. | ||
| − | = '''Advanced''' | + | = '''Advanced''' Space optimisation= |
| − | [[Advanced | + | [[Advanced Space optimisation| Advanced Space optimisation]] |
Latest revision as of 10:36, 29 May 2017
Redirect to:
Contents
- 1 Introduction
- 2 Overview
- 3 Optimisation Process
- 3.1 Stage 1: TuneDem
- 3.2 Stage 2: Optimise for Room Modes
- 3.3 Stage 3: Optimise for Speaker Placement
- 3.4 Stage 4: Optimise for High Frequency Response
- 3.5 Stage 5: Optimise for bass response
- 3.6 Stage 6: Fine Tune Filter Parameters to Improve Audio Performance
- 3.7 Stage 7: Saving and Loading Space Optimisation setting
- 4 Known Restrictions
- 5 Advanced Space optimisation
Introduction
Space Optimisation provides a listener focused view of room optimisation for analogue. This means that Linn DS/DSM products give the listener an opportunity to greatly improve the listening experience by providing these products with information about the listening environment. The software inside the these products can then account for the listening environment and compensate accordingly.
Space Optimisation+ has the added functionality of Exakt products incorporating the measured response of every individual drive unit as well as Space Optimisation. It enables even more advanced speaker modelling that’s specific, not just to the model of speaker, but to the unique pair of speakers in your home. This will further enhance your Music experience.
Space Optimisation/Space Optimisation+ works on ALL music playback sources except external source(s) with DIRECT Delay Mode. (This can be the default Delay mode on some external inputs so check this setting first in Konfig)
The SPDIF/TOSLINK & HDMI Outputs will NOT have the Space Optimisated audio, these outputs pass the unprocessed audio feed.
Compatible Space Optimisation speakers are listed in www.Linn.co.uk plus how to request new speaker support
Overview
Internet connection is required for Konfig and Linn Exakt Products when using Exakt Systems
Konfig can optimise for the following acoustic phenomena:
Room Modes
Every room is different, and can therefore be optimised to sound as good as possible. You will need to use the TuneDem method to find the ideal location for your speakers.
Speaker Placement
In practice, the ideal TuneDem location for your speakers is rarely the practical location as well. Not to worry, optimisation will allow the ideal Tune Dem sound to be applied wherever your speakers are located.
High Frequency Response
Each room responds to high frequency (a.k.a. treble) differently. An empty room with marble walls will respond much differently to a room with plasterboard walls and lots of soft furnishings. This stage allows you to optimise according to the high frequency response of your room.
Optimisation Process
Stage 1: TuneDem
This is assuming if you have an Exakt speaker/ExaktBox system this has been configured using the Konfig manual
- 1. Using the TuneDem method, determine the ideal speaker location for your room
- 2. Select your Linn DS/DSM device in Konfig
- 3. For non Exakt systems, select the "Speakers" tab, select your speakers and press the Apply button
- NOTE: With Space Optimisation turned OFF this speaker selected in this tab is ignored and has no effect in Music playback.
- 4. This will show Space Optimisation+ or Space Optimisation Click on this tab
- Space Optimisation+ is for Exakt Speakers/ExaktBoxes
- Space Optimisation is for Non-Exakt system
- 5. TURN ON Space Optimisation if turned off
Stage 2: Optimise for Room Modes
TURNING OFF THE Space Optimisation WILL IGNORE ANY SPEAKER SELECTION AND WILL NOT PERFORM ANY Space Optimisation
Room dimensions
Click in the CHANGE ROOM SETTINGS...
Measure the length, width and height of the listening room and note them down. All measurement must be taken in meters.
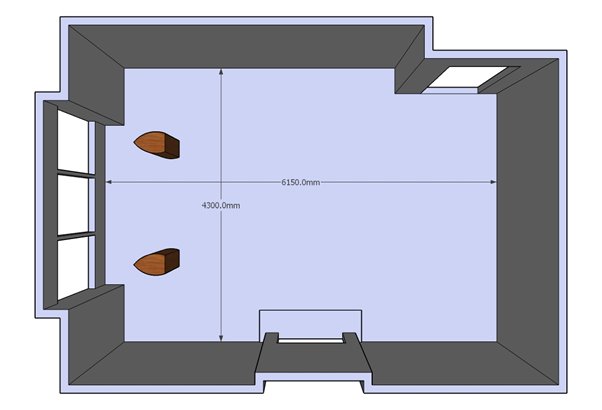
The Space optimisation algorithms are based on the assumption of a largely rectangular room. If the room is slightly non-rectangular (e.g. it has a chimney breast or a bay window) you must decide upon the pertinent dimensions. In general the room dimension should be taken as the distance corresponding to the largest surface area on any given wall. Taking the examples cited above; in the case of the bay window, if the window covers more than half of the wall then measure into the bay window. For the case of the chimney breast, if the chimney covers less than half of the wall surface then measure to the wall either side of the chimney.
If a room is rectangular but has one corner taken up by a partitioned corridor or small anteroom then the larger dimensions should be used.
In the example below, the length will be entered as 6.15m, the width as 4.3m. The inset door and chimney breast (fireplace) account for less than 50% of the side walls so they are ignored and the measurement taken is to the most distant surfaces. The bay window covers more than 50% of the end wall so the length of the room is measured into the window.
Further discussion of room dimensions, including more complicated room layouts, can be found on the Advanced Information page
To enter the Room Dimensions:-
- 1. Click on the SPACE Optimiation optimisation tab.
- 2. Click on Change Room Settings....
- 3. Enter values for Room Dimensions (in Metres)
- a. Each wall/floor/Ceiling construction type, (Unknown, Concrete or Partition)
- b. Add any other features in that particulat wall such as Windows and Doors. (with Dimensions in Metres)
- 4. Enter values for Listening Position (in Metres ),
- 5. Enter values for Ideal TuneDem Speaker Position
- a. The bottom area of the plinth to floor does not include the spikes, Skeets height on floor standing speakers. With desktop speakers this is from the base of the speakers.
- b. Speaker measurements should be made from the outside front corner.
- 6. Click Optimise.
- N.B. To remove any Room Mode optimisation from your setup click Disable .
Room Modes
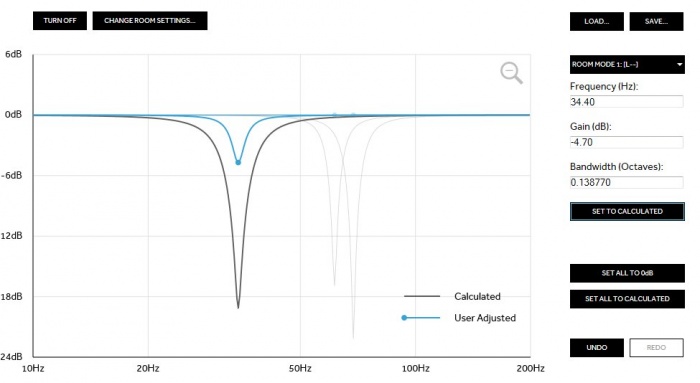
The Room Modes graph now displayed shows the audio notch filters/Room Modes that are applied to the audio stream before being played back from the speakers.
All of these filters are applied in unison, they are not individual filters that you select to be operation one at a time.
The fresh graph shows BLUE lines, these are the user adjusted, (the Black calulated lines are hidden behind the blue lines)
These Space Optimisation "Room Modes"/Notch filters are used to correct room audio reflections from the wall, ceiling, floor and furnishings. These reflections can cause highs and lows in the frequency response, these Room Modes filters correct these distortions.
A large room will have more optimisation filters than a small room. Selecting an individual optimisation filter allows you to modify the centre frequency of the filter, its bandwidth and its gain.
For regular shaped rectangular rooms it is likely that the room mode optimisation is quite accurate and will require little further improvement.
Custom Filter
This will allow you to add your own filters, but should be resticted to very advanced users.
Room mode validity
As a first step it is recommended that the installer check the validity of each room mode filter. Filter redundancy may occur if a room surface is particularly irregular, for example a pitched roof. In this instance no strong standing waves will occur between the floor and ceiling and unnecessary optimisation filters may be produced.
Press the SET ALL TO 0dB then using the tune-dem re-instate each filter by pressing SET TO CALCULATED, starting with the lowest frequency, and ensure that each optimisation filter improves the musicality of the system. If re-instating a filter has no audible effect then return the filter’s gain to zero and move to the next filter.
Adjusting Room mode for best sonic performance
Once all required room mode optimisation filters have been established some further optimisation may be achieved by altering the gain of the room mode filters (frequency and bandwidth adjustment are covered in Advanced Information)
Use a piece of music with an even, melodic bass line. Starting with the lowest frequency room mode filter, increase the gain by 6dB and listen again. Using tune-dem decide if the result is an improvement. If the base line sounds more even, try increasing the gain again. If the bass line sounds less even, then reduce the gain. Increase and decrease the gain in progressively smaller steps until the best result is achieved.
Move on to the next room mode and repeat.
Always start with the lowest frequency room mode filter. Low frequencies mask higher frequencies so it will be easier to judge the accuracy of the higher frequency mode filters if the lower frequency filters are correct.
Pressing the SET TO CALCULATED will ONLY change the current node back to the calcuated value.
Pressing the SET ALL TO CALCULATED will return ALL nodes to their calculated value.
E.g. Take the difference between the Gain value and zero then half it. Listen to at centre gain plus half value and then minus half value to find the best Gain setting for the tune. Half the value between the two best sound gains and vary this by half again.
- Original value -20dB
- Try Gain -14dB
- If -14dB sounds better try Gain -8db ... If better try Gain -2dB, if worse try Gain -5dB etc
- If -14dB sounds worse try Gain -17dB...if better try Gain -18.5dB, if worse try Gain -15.5dB etc
- Also try Gain -26dB....
- etc....
Stage 3: Optimise for Speaker Placement
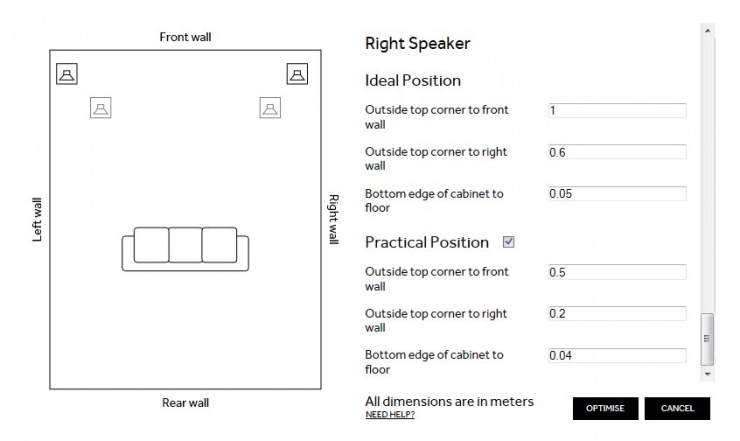
You may not be happy with the speakers setup in the Tune-Dem locations setup above. If for reasons of practicality, interior design or aesthetics requirements, the loudspeakers to be placed elsewhere then move the loudspeakers as required and measure the new ‘practical’ loudspeaker positions.
Note: Any manual changes that you have made in the Ideal position are NOT carried forward to the Practical position, it is only new speaker position that is used to calculate the Space Optimisation, the manual adjustements are ignored.
- 1. Click on the CHANGE ROOM SETTINGS button.
- 2. Enter values for Practical Speaker Position for each speaker. (Do NOT change the 'ideal' loudspeaker positions.)
- a. All dimensions must be measured in meters.
- b. Speaker measurements should be made from the outside front corner.
- 3. Click Optimise.
- N.B. To remove any Speaker Placement optimisation from your setup click Disable.
When Konfig calculates the placement optimisation filters it will disregard any changes you have made to the room mode optimisation and re-calculate the room modes for the new loudspeaker positions. You will need to go back to room mode optimisation and re-apply any previous changes. Use the gain offset values you have written in the room mode adjustment table to re-adjust the room modes.
Remember and record the settings on the Media:Konfig Exakt Room Mode Adjustment.pdf sheet
Stage 4: Optimise for High Frequency Response
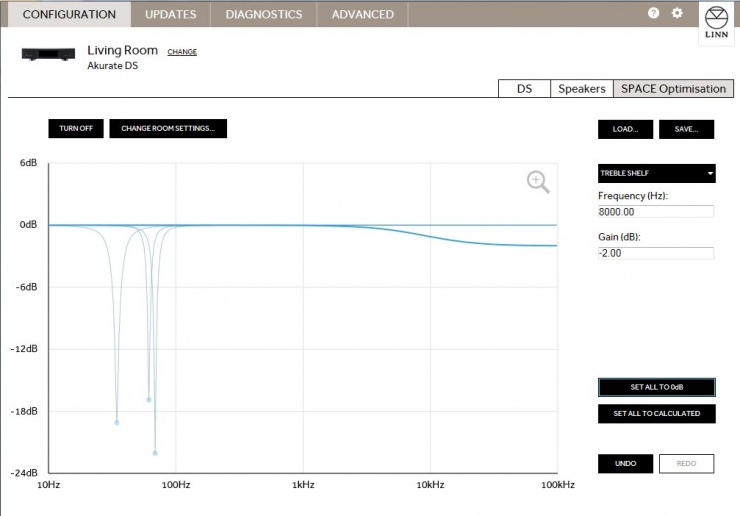
- 1. Click on the Room Mode selection and select Treble shelf
- 2. Enter frequency and gain values as required. (gain limits -2dB to + 2dB)
- N.B. To disable any high frequency response set the gain to 0.
- You will have to click on the magnifying glass in the top left of the graph to see the result.
Stage 5: Optimise for bass response
- 1. Click on the Room Mode selection and select Bass shelf
- 2. Enter frequency and gain values as required.
- Typical value range: 20Hz-200Hz corner, -6dB > +3dB gain (Keltik -6dB > +9dB)
- N.B. To disable any bass response set the gain to 0.
Stage 6: Fine Tune Filter Parameters to Improve Audio Performance
- 1. Select the Room Modes optimisation tab
- 2. Each notch filter in the room optimisation graph is represented by a Room Mode (i.e. Room Mode 1, Room Mode 2, etc).
- 3. You can modify a notch filter by selecting it from the drop down box and entering new values.
- 4. Room mode optimisation is based on an idealised rectangular room, so some modifications to these values may be required
- 5. Speaker Placement optimisation is less prone to error, so modifying these values is not recommended
- Changing the Frequency value will shift the notch filter left or right along the x-axis.
- Changing the Gain value will change the height of the notch filter.
- Changing the Bandwidth value with change the width of the notch filter.
Stage 7: Saving and Loading Space Optimisation setting
You can now save and reload previous Space Optimisation settings using the "LOAD.." & "SAVE.." button on the Space Optimisation tab
These buttons will save and load the settings on you local PC/MAC and recalled at a later date.
- SAVE.. will ask for a description of the changes and add the Room name with date & time of the save.
- LOAD.. Shows the date, Room and description of previous SAVE.. and allow you to reload these settings.
- You can EXPORT these files that you can save, then copy/back to a different PC/MAC
- You can IMPORT these exported files from a different machine
Note: These same settings can be used with BOTH Exakt and Non-Exakt systems.
Known Restrictions
Room optimisation graphs will not be visible if you are running Konfig on Windows XP. This is because Konfig requires IE9 or higher and Windows XP is not compatible with IE9 or higher.
Internet access of required for KONFIG AND the Linn Exakt products to allow any loudspeaker measurements, crossover settings and software updates to be downloaded to the system.

