Difference between revisions of "Template:FAQ:Space Optimisation (Linn Account) FAQ V3.2"
m (→How do I add floor and ceiling features?) |
m (→The Linn Account and Space Optimisation) |
||
| (2 intermediate revisions by the same user not shown) | |||
| Line 11: | Line 11: | ||
:<u>Note</u> that this issue may sometimes be related to an old Space Optimisation on your music system; turning off Space Optimisation in Linn Konfig and then refreshing the browser page in your Linn account may, in some cases, solve this issue. | :<u>Note</u> that this issue may sometimes be related to an old Space Optimisation on your music system; turning off Space Optimisation in Linn Konfig and then refreshing the browser page in your Linn account may, in some cases, solve this issue. | ||
| + | |||
| + | |||
| + | =====Can I turn off or select another Space Optimisation===== | ||
| + | : You will find in the Manage Systems SPACE tab you will see a list of Space optimisations for this room. You click the selection box and this will load. There is the option for "No Space Optimisation" if required | ||
| + | :<span style="color: red; font-weight:bold;">When changing or applying a new Space Optimisation, please make sure the system is muted or not playing any audio during the loading.</span> | ||
| Line 192: | Line 197: | ||
{{3/4_Horizontal-Line}} | {{3/4_Horizontal-Line}} | ||
| + | |||
| + | =====Ceiling heights===== | ||
| + | {{:SO2:Ceiling Heights}} | ||
====<u><big>Speaker Steps</big></u>==== | ====<u><big>Speaker Steps</big></u>==== | ||
Latest revision as of 07:29, 30 October 2024
Contents
[hide]- 1 The Linn Account and Space Optimisation
- 1.1 What should I do if I see an error message saying “Sorry, something went wrong”?
- 1.2 Can I turn off or select another Space Optimisation
- 1.3 How do I add my speakers to my music system?
- 1.4 How do I add my subwoofer to my music system?
- 1.5 How is the new version of Space Optimisation different?
- 1.6 Why does Space Optimisation not use a microphone measurement?
- 1.7 How long should an optimisation take to calculate?
- 1.8 How do I apply an optimisation to my music system?
- 1.9 How do I see what filters the optimisation is applying?
- 1.10 Incompatible Optimisation
- 2 Room steps
- 2.1 Why should I ignore small geometrical features with dimensions less than 10 cm?
- 2.2 Why should I ignore hard furnishings?
- 2.3 How do I add a free-standing wall?
- 2.4 What are there YELLOW wall(s) in my floor plan?
- 2.5 How do I enter my open plan room?
- 2.6 How do I enter the length of a wall?
- 2.7 Why is the minimum grid size on the Floor Plan step 1 cm?
- 2.8 How do I find out the construction materials of my room?
- 2.9 What do the "Custom Room Materials" do?
- 2.10 How do I measure my room features?
- 2.11 Why should I ignore soft furnishings and decorations?
- 2.12 Why do features disappear when I change my room dimensions?
- 2.13 How do I add floor and ceiling features?
- 2.14 How do I add wall windows depth, alcoves etc?
- 2.15 Ceiling heights
- 3 Speaker Steps
- 3.1 Where should I put my speakers?
- 3.2 Where do I measure to on my speaker?
- 3.3 How do enter the speaker orientation?
- 3.4 Speaker Placement with Room Depth/Height Features
- 3.5 How do I place the speakers in Alcoves etc
- 3.6 In-Wall Speakers
- 3.7 How do I measure my listening location?
- 3.8 How do I define Viewing Speaker Drive Unit Locations
- 4 Optional Steps
- 5 Optimisations
- 6 Change/Improvements Log
- 6.1 9th April 2019 (Wall step, Floor plan step & Speaker location step)
- 6.2 15th April 2019 (Floor plan step)
- 6.3 19th April 2019 (Floor plan step)
- 6.4 2nd July 2019 (Subwoofer addition)
- 6.5 23rd November 2019 (Exakt System support.)
- 6.6 27th November 2019 (Klimax 350)
- 6.7 19th December 2019 (Multi-Channel support)
- 6.8 9th December 2021 (new deployment of code)
- 6.9 10th July 2022 (User Interface improvements)
- 6.10 22nd July 2022 (User Interface change)
- 6.11 29th March 2023 (Room detail features)
- 6.12 15th June 2023 (Room detail features)
- 6.13 12th July 2023 (Filtering Optimisations)
- 6.14 25th Sept 2023 (2D/3D option, Ceiling features/heights...)
The Linn Account and Space Optimisation
What should I do if I see an error message saying “Sorry, something went wrong”?
- If you see this error message, please refresh the browser page. Once the browser page has refreshed:
- click on your Linn account logo in the top right-hand corner,
- click on Account Settings, and then
- click on Start next to Send Activity.
- This will record any further activity, until the browser page is next refreshed, for debugging purposes. Now attempt to recreate the issue that caused the error; if you are able to recreate the issue, please contact the Linn Service team, and our engineers will then be able to look into the issue with your recorded activity as reference.
- Note that this issue may sometimes be related to an old Space Optimisation on your music system; turning off Space Optimisation in Linn Konfig and then refreshing the browser page in your Linn account may, in some cases, solve this issue.
Can I turn off or select another Space Optimisation
- You will find in the Manage Systems SPACE tab you will see a list of Space optimisations for this room. You click the selection box and this will load. There is the option for "No Space Optimisation" if required
- When changing or applying a new Space Optimisation, please make sure the system is muted or not playing any audio during the loading.
How do I add my speakers to my music system?
- Click on the Add Speakers button below the graphic of your music system; a dialog prompting you to provide the manufacturer and model of your speakers will appear.
- Select the manufacturer and model of your speakers using the drop-down menus, then click on the Add button; if your speakers’ manufacturer or model does not appear in the drop-down menu, select Other. See §2.2 of the user guide for further information.
How do I add my subwoofer to my music system?
- Click on the Add Additional Subwoofer button below the graphic of your music system; a dialog prompting you to provide the channel, manufacturer and model of your subwoofer will appear.
- Select the channel, manufacturer and model of your subwoofer using the drop-down menus,
- Click on the Add button; if your subwoofer’s manufacturer or model does not appear in the drop-down menu, select Other.
- See §2.1 and §2.2 of the user guide for further information. (Subwoofers to the Linn Account Space Optimisation in added in July 2019)
How is the new version of Space Optimisation different?
- The new version of Space Optimisation uses highly sophisticated acoustic modelling to model the interactions between your speakers and the room; this acoustic modelling is based on the finite-difference time-domain method. A simple two-dimensional analogy to this method of acoustic modelling is of a fishing net laid over a pond; each knot in the net defines a discrete measurement location, so that when a stone is thrown into the pond, we can track the resulting ripple by measuring its height at each knot.
- The spatial discretisation employed by this method of acoustic modelling allows the new version of Space Optimisation to correctly consider the effects of:
- non-rectangular rooms;
- the placement of features like doors and windows;
- And the location and rotation of your speakers.
- Furthermore, the time-domain formulation of this method of acoustic modelling means that the new version of Space Optimisation can now reduce both the energy and decay time of any artificial distortions caused by the interactions between your speakers and the room, resulting in both a flat frequency response and a uniform decay time. :Finally, the new version of Space Optimisation has been designed to give a better balance of low- and mid-frequency energy.
Why does Space Optimisation not use a microphone measurement?
- The aim of Space Optimisation is to remove the effects of your room, to uncover the unique acoustic characteristics of your speakers; after all, this is what you fell in love with when buying your speakers. To achieve this, Space Optimisation needs to understand both the interactions between your speakers and the room and the unique acoustic characteristics of your speakers; the unique acoustic characteristics of your speakers are then subtracted from the interactions between your speakers and the room, leaving only the effects of your room.
- An acoustic measurement of the interactions between your speakers and room can have many sources of error which may affect the accuracy and repeat-ability of the measurement, including the choice of measurement stimulus, such as MLS or a log chirp; external noise, such as traffic noise and vibration; quality and calibration of the microphone, which can introduce distortion; and the microphone location, which can be sensitive to within a few centimetres. The use of acoustic modelling removes these sources of error: the model can apply an ideal impulse as stimulus; the modelling domain is free from noise; the model can use an ideal microphone; and the listening location is well-defined. It can thus be seen that acoustic modelling has a clear advantage over acoustic measurement in understanding the interactions between your speaker and the room.
- The unique acoustic characteristics of your speakers depend on many factors, including the shape and size of the drive units and ports; the constructive and destructive interference between the drive units, ports and any cabinet-edge diffraction sources; and the angle between the listening location and your speakers. Therefore, a simple on-axis anechoic measurement of your speakers is insufficient information; what is actually required is an anechoic measurement with your speakers in the same configuration as you have them in your home. While some manufacturers do publish anechoic measurements of their speakers, both on- and off-axis, it is extremely unlikely that they will have performed an anechoic measurement of your speakers in the same configuration as you have them in your home. The acoustic modelling of such a scenario is, however, straightforward; the model can simply turn your room into an anechoic chamber to obtain the unique acoustic characteristics of your speakers in the same configuration as you have them in your home. It can thus be seen that acoustic modelling once again has a clear advantage over acoustic measurement in understanding the unique acoustic characteristics of your speakers.
- From the above, it is clear that acoustic modelling is the best approach to Space Optimisation.
How long should an optimisation take to calculate?
- The calculation time of an optimisation will depend on your room and speakers, with large rooms containing multiple speakers taking longer to calculate than small rooms containing few speakers; optimisation calculations may take anywhere between four and twenty minutes, with a typical optimisation calculation taking around five minutes. See §1.2.3 of the user guide for further information.
- The processing time is governed by the processing speed available on the Web services. The expected calculation times are:
- Small room (up to 25m²) with small speaker (up to 3 drive units): Typically 4-5minutes
- Medium room (25m² - 100m²) with medium speaker (up to 4 drive units): Typically 5-8minutes
- Large room (More than 100m²) with a large speaker (4 or more drive units): Typically 8-20minute
- Note: If your optimisation calculation takes longer than expected:
- This may be due to an issue where messages from the cloud are failing to reach your browser; refreshing the browser page <f5> or SHFT<f5>, in your Linn account should solve this issue.
- If this does not resolve this issue then, on this Space Optimisation, do an "Adjust", Recalculate and delete your original Space Optimisation if it still exists. (This calcluate may have been lost in the Cloud and not notified the WebApp of it termination or completion).
How do I apply an optimisation to my music system?
- Any optimisation may be applied to your music system by clicking on the radio button next to its name, in the list of optimisations below the Optimisations heading under the Space tab; note that application of an optimisation does not require a recalculation. See §2.3.4 of the user guide] for further information.
How do I see what filters the optimisation is applying?
- Bass and treble shelves are currently unsupported within your Linn account.
Incompatible Optimisation
- This is when your Space Optimisation does not match all of the speakers setup on the Linn DS/DSM.
- You can view any incompatible optimisations by switching ON the "Show Incompatible Optimisations?" in the SPACE tab. This will allow you to click on the three dots,
 , at the end of each Optimisation, select Details and view the configuration of that particular optimisation. The key points are the make and model of speakers and the audio channels they are assigned to. If you have an additional speaker or missing speaker then this is why they are incompatible.
Note: when "Show Incompatible Optimisations?" is enabled then this will show ALL of your optimisations in your account. We would therefor recommend that you name each Space Optimisation after compiling so you have a good reference marker in the name.
Room steps
Why should I ignore small geometrical features with dimensions less than 10 cm?
- Due to the spatial discretisation employed by the method of acoustic modelling used by Space Optimisation small geometrical features with dimensions less than 10 cm can cause inaccuracies in the model. Considering again the analogy of a fishing net laid over a pond, we can imagine a small island in the pond: if this small island lies between knots it will be ignored by our discrete measurements; however, if this small island lies on a knot it will invalidate our measurement at this knot, causing an error which would propagate away from the small island.
Why should I ignore hard furnishings?
- Where rooms contain hard furnishings it is recommended to ignore these; at low frequencies such hard furnishings are usually almost acoustically transparent. While certain hard furnishings, such as cupboards and wardrobes, may add extra resonances of their own, the effects of such resonances are usually highly localised.
How do I add a free-standing wall?
- Free-standing walls are currently unsupported. However, where rooms contain free-standing walls it is recommended to ignore these; at low frequencies such free-standing walls are usually almost acoustically trans-parent. See §3.4.2 of the user guide for further information.
What are there YELLOW wall(s) in my floor plan?
- This is for you the check the angle between the walls. This is stating that the angle is not 45 degrees or 90 degrees. If the wall angle is correct then ignore this highlight
How do I enter my open plan room?
- When entering an open plan room all rooms open to the main listening room should be entered; antechambers and additional cavities will add extra resonances and affect decay times. See §2.3.1 of the user guide for further information.
How do I enter the length of a wall?
- In the Floor Plan step you may select any corner with a click, and drag it to any desired location to define the length of a wall. Manual input by typing the length of the wall is not supported, as this would cause a knock-on effect around the other walls of your room as corners are shifted to accommodate the new length. See §2.3.1 of the user guide for further information.
Why is the minimum grid size on the Floor Plan step 1 cm?
- Space Optimisation considers only frequencies below 80 Hz; this corresponds to a wavelength of around 4m. A grid size of 1 cm allows for accurate entering of wall lengths to 5 mm, which gives an accuracy of around 0.1 % at 80 Hz.
How do I find out the construction materials of my room?
- The construction materials of your room can be found from the building plans. If you cannot obtain the building plans, simply knock on each surface; a hollow sound would suggest Suspended or Partition construction, whereas a sharp sound would suggest Concrete construction. In order of a hollow to a sharp sound, the common construction materials of walls are Partition, Drywall, and Concrete. Similarly, the common construction materials of floors are Suspended Floor and Concrete, and of ceilings are Suspended Ceiling and Concrete. See §2.3.1 of the user guide for further information.
What do the "Custom Room Materials" do?
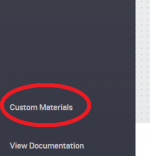
- Custom Materials may be defined to be used in place of any of the default room construction materials. Access to the Custom Materials view can be found in the bottom left of the Room editing app.
- In this view, new custom materials can be added, edited or deleted. A new custom material can be added by pressing the floating add button in the bottom right of the Custom Materials page. This will bring up a dialog where the Name and Absorption bands of the material can be defined. There is also an option to provide starting values for Absorption bands based on one of the existing materials which might be useful if unsure about these values. Acoustic treatment products should typically provide a chart with these values.
- Note that deleting a custom material if it is used as a material for any of the room surfaces will reset that surface to the default material based on its type.
How do I measure my room features?
- When measuring room features only the feature itself, and not any trimmings, should be measured: for a door only the door panel should be measured, and not the door frame; for a window only the window pane should be measured, and not the casement. Any non-rectangular features, such as circular windows, should be modelled as a rectangular feature of equal area.
Why should I ignore soft furnishings and decorations?
- Where rooms contain soft furnishings, such as carpets and curtains, and any decorations, such as paintings and mirrors, it is recommended to ignore these; at low frequencies such soft furnishings and decorations are acoustically transparent.
Why do features disappear when I change my room dimensions?
- When features have been added to a room, and subsequent changes are made to the room dimensions, the features on any affected surfaces will be removed; since the surface dimensions have changed, there is no guarantee that the features on this surface remain valid, and so they are removed. The setup process of Space Optimisation has been designed in a step-based manner; you should complete each step before moving on to the next.
––––––––––––––––––––––––––––––––––––––––––––––––––––––––––––
How do I add floor and ceiling features?
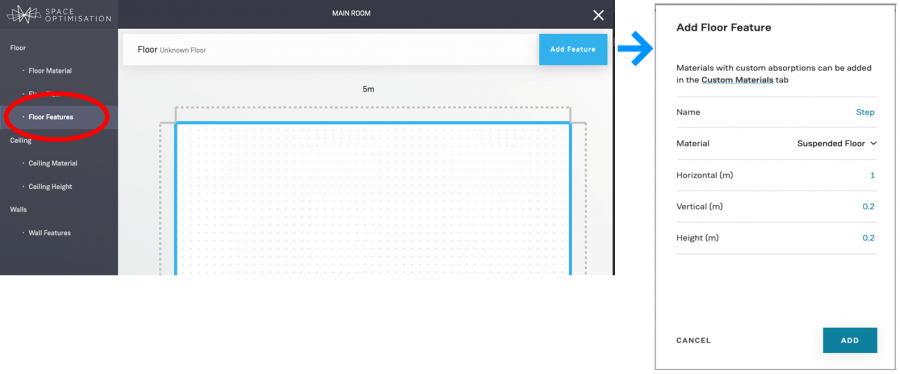
- Floor Features allow modelling of non-flat floors as well as features in the room present on the floor such as kitchen islands or stairs. They can be added in the ‘Floor Features’ step in Room Design.
- For floor features, it is advised to only model hard construction material features that have a non-negligible impact on how the lower frequencies travel throughout the room. Soft furnishings such as sofas have little impact on bass frequencies and are not recommended to be added.
- Adding a Feature
-
- The surface shown for adding floor features is in the same layout as the Floor Plan in the previous step, with the front wall at the top and shown as viewed from above the room. The Add Feature modal can be opened by the ‘Add Feature’ button in the top right of the screen.
- Horizontal: specifies the length of the feature in meters when measuring from above.
- Vertical: specifies the width of the feature in meters when measuring from above.
- Height: specifies the height of the feature in meters when measuring from the lowest point in the room to the top of the feature.

- Shapes
- Only rectangular floor and wall features are currently supported. To model features with more complex shapes, for example L shaped islands, features can be put next to each other.
- Void Feature
- This relates to a feature with an open space. This can be, for example, an open walk-way between rooms, an open counter between Kitchen and Diner or open walls on an outdoor canopy/patio area
- Positioning
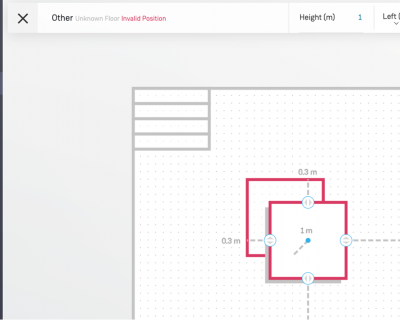
- Floor height features may be put next to one another, next to a wall or stacked on top of one another. Floor height features are not allowed to intersect boundaries as this could cause confusion about the resulting shape to model. Floor features may also not be higher than the height of the room. If a feature is in an invalid position, it will be highlighted red.
- If stacking features on top of one another, ensure the ‘Height’ parameter is specified as height from the lowest point in the room, e.g. a feature 1m high on top of another feature 0.2m high should specify its height as 1.2m.
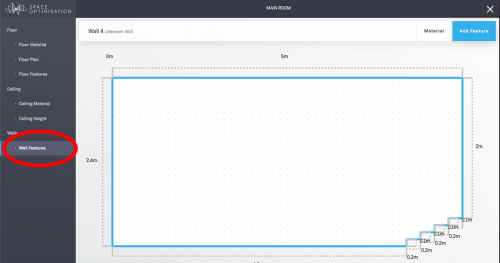
Floor features can use ‘Custom Materials’ to be able to set any of the predefined room construction materials or user defined materials as the material of the feature.
––––––––––––––––––––––––––––––––––––––––––––––––––––––––––––
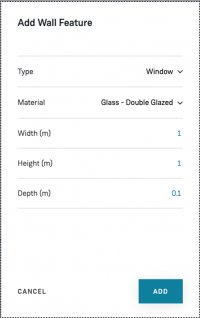
How do I add wall windows depth, alcoves etc?
- Wall Depth Features
- Wall features can specify a ‘Depth’ parameter to model features that are extruding in or out of the wall, for example inset windows or alcoves. A positive depth specifies a feature as extruding out of from the room, such as an alcove. A negative depth specifies a feature extruding into the room, such as a fireplace. The depth is measured from the wall surface as the starting point, so if we had an alcove of 0.5m in Depth and an inset window within the alcove that’s 0.2m inside the alcove, the inset window depth would need to be specified as 0.7m.
- Similarly to floor features, it is advised not to model soft furnishings and lighter material features that would have little impact on the bass frequencies in the room such as shelves
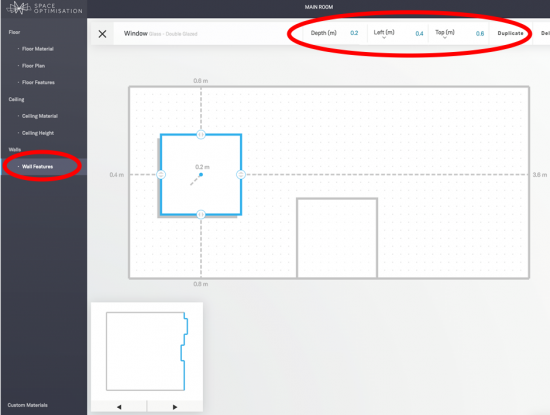
- Positioning
-
- As a visual aid, Wall Depth features show up as part of the room plan on the mini-map in the bottom left of the Wall Features step. This should provide a guide as to the depth positioning of the feature in the room, as well as a check for when using nested depth features or features that are intersecting from different walls.
- Wall Depth features can be placed next to each other and nest inside each other. Positive depth features may be placed anywhere along the wall boundary.
- Wall Depth features may not intersect each other on the same wall or intersect each other across the room from separate walls. Negative depth wall features may also not be positioned next to a side of the wall or top of the wall but may be placed along the floor, for example to model a partial height partition wall. Any invalid feature positions will be highlighted red on the wall and/or room mini-map. Invalid position features will need to be fixed or removed before being able to save a room.
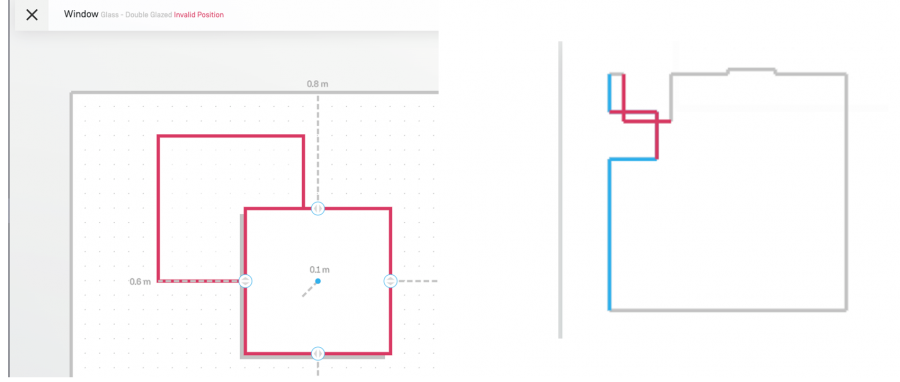
––––––––––––––––––––––––––––––––––––––––––––––––––––––––––––
Ceiling heights
- You get some ceilings that are not flat, you may have slopes, how do you deal with this?
- This is by defining the Ceiling Type as Variable Height Ceiling
- Ceiling heights points
- This will allow you to define points of different heights of the ceiling. This allows you to define, and add additional points to create a fresh ceiling state.
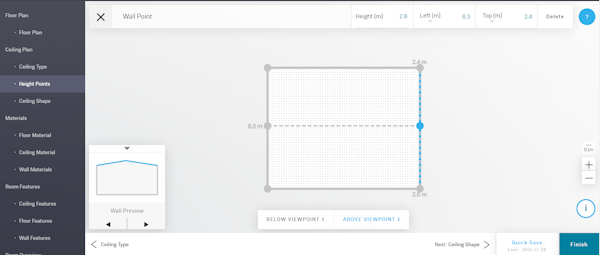
- In the above example, each corner has a height of 2.4M. The additional height points in the middle of the side walls, with a height of 2.8M. This would create a peaked roof, as can be seen in the wall preview picture - bottom left of above image.)
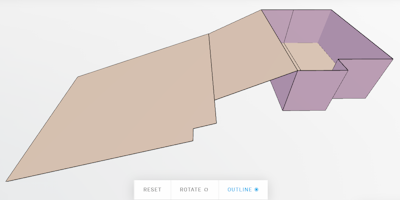
- With a room with a more complex shape, you will have to enter the correct heights for each corner within the room. But when you look at the ceiling shape, it is nothing like the actual ceiling.
- e.g.

- This can be fixed by either:
- Fix button, on the Ceiling shape page. The issue with multiple ceiling heights is that it can link to other height points. The FIX button will allow you to join the height points together and fix the ceiling lines
- The other is adding a Ceiling feature and adding a Feature of Material - Suspended Ceiling, or more depending on the room corners:
- With a positive height, this moves the suspended ceiling ABOVE the current. That is out of the room.
- With a negative height, this will bring the suspended ceiling INTO the room.
- e.g. Suspended ceiling negative height
- This can be fixed by either:
- Note: this can also be done on floors with the Floor Feature - Material - Suspended floor
Speaker Steps
Where should I put my speakers?
- The Tune Dem method should be used to find the ideal locations for your speakers; these are the locations where it is easiest to follow the tune. Correct identification of the ideal locations for your speakers is essential if you wish to achieve the full potential of both your music system and Space Optimisation; Space Optimisation is able to recreate the sound of your speakers in their ideal locations, even if you have been forced to move them to a more practical location due to domestic constraints, to give you the best of both worlds. See §2.1 of the user guide for further information.
Where do I measure to on my speaker?
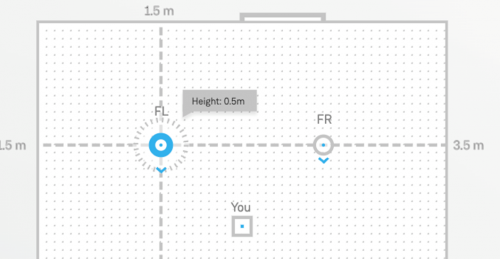
- In the Speaker Location step, when a speaker is selected helpful hints will appear in the bottom left-hand corner with guidance on where measurements should be made to on the speaker. See §2.3.2 of the user guide for further information.
How do enter the speaker orientation?
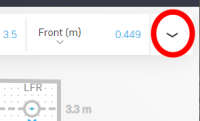
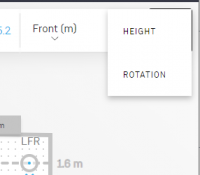
- On the top right of the screen you have options to also adjust the
- Height of the floor,
- In the case of a Sub-Woofer the Roll off point frequency by enabling roll off and entering the setting.
- Speaker orientation / rotation
- Speaker rotation definition
- Speaker Rotation may be defined in one of two ways: from Plan South and from Listening Position.
- Rotation from Plan South: This defines a 0-degree rotation of the speaker as facing the Plan South of the room plan (pointing down on the screen). From this base, positive degrees rotate the speaker in a clockwise direction and negative degrees anticlockwise to a maximum of 180 degrees either way.
- Rotation from Listening Position: This defines a 0-degree rotation as the measurement point of speaker pointing directly towards the listening position. From this base, positive degrees rotate the speaker in a clockwise direction and negative degrees anticlockwise to a maximum of 180 degrees either way. This input mode may be useful for oddly shaped room plans where measuring the rotation from the south wall is tricky or as an easy way of approximating the rotation if the speaker is pointing towards the listener and no rotation measuring tools are available.
- Note: that Listening Position rotation does not automatically update speaker rotation if the listening position moves so its best to define the speaker rotation with this method once the listening position is already set.
Speaker Placement with Room Depth/Height Features
- Floor Height and Wall Depth features will appear in the Speaker Locations step as areas, depending on the specified height off the floor and physical speaker height of the selected item. Available areas are gridded, unavailable areas are filled white.
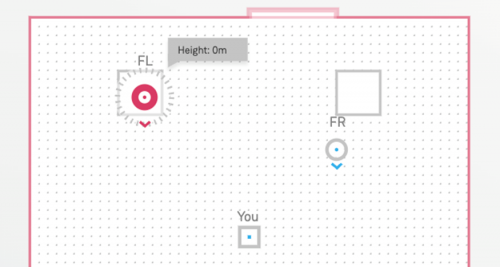
- Floor Height Features
- Floor Height features will be visible as unavailable areas if the specified height of the selected speaker or listening position is lower than the height of the floor feature to indicate areas where placement is not allowed (as the item would be inside the feature).
- Note - The speaker base height is measured relative to the lowest floor height (zero point).
- If the specified height of the item is the same as a floor feature height or greater, the unavailable areas will disappear and the speakers or listening position may be placed on top or above the feature.
––––––––––––––––––––––––––––––––––––––––––––––––––––––––––––
How do I place the speakers in Alcoves etc
- Wall Depth Features...
If the available height is less than the loudspeaker height, then the measurement line is drawn to show the loudspeaker positioning restrictions i.e. measured to the wall instead of the depth feature extrusion.
- Wall Depth features will show as unavailable areas if the specified height of the speaker or listening position is lower than the height of the feature, off the floor. Or if the physical height of the speaker does not match the height range of the feature.
- That is, if the available height is less than the loudspeaker height, then a line drawn to show the loudspeaker positioning restrictions. That is, you cannot fit 360 loudspeakers into a 1M high alcove!
- Or the loudspeaker has a height position of 0M, but you are trying to place it in a feature/zone that has a raised or lowered floor height area,
- Wall Depth features will show as unavailable areas if the specified height of the speaker or listening position is lower than the height of the feature, off the floor. Or if the physical height of the speaker does not match the height range of the feature.
- Changing the specified position height of the loudspeaker, so it would fit inside the feature location at the same heights.
- Or double check that the loudspeaker will actually fit within the feature area, and you have entered all the dimensions correctly within Manage System Room Design.
––––––––––––––––––––––––––––––––––––––––––––––––––––––––––––
In-Wall Speakers
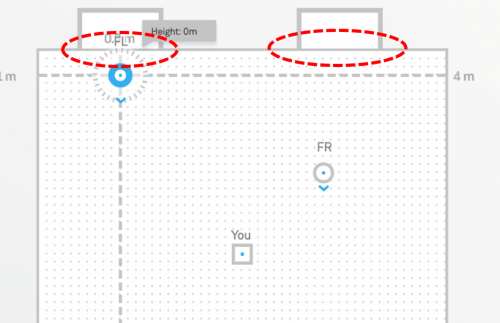
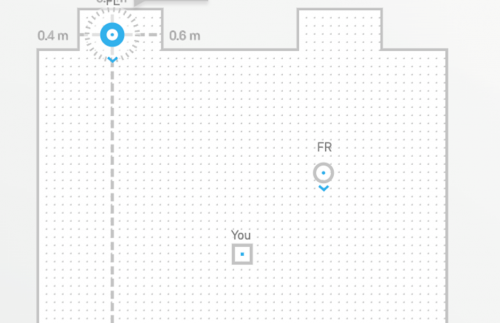
- Speakers that are partially or fully in-wall may now be positioned as such in the ‘Speaker Locations’ step.
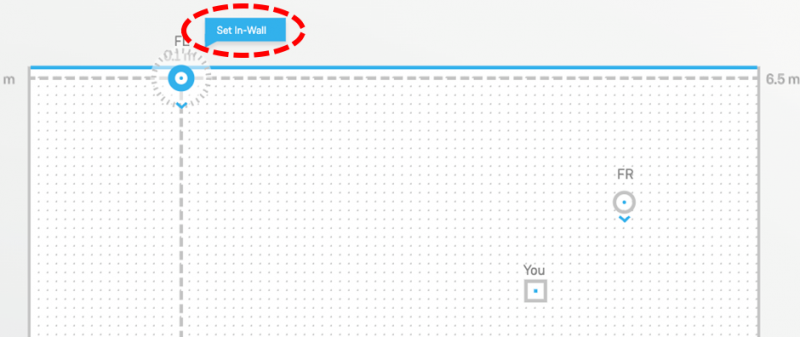
- To specify a speaker as in-wall, drag a speaker position next to a wall until a ‘Set In-Wall’ button appears above a speaker. The speaker may need to be rotated so the measurement point can come close to the wall without drive units going outside and causing an error highlight. A wall will be highlighted blue, indicating which wall the speaker is to be set in.
- Adding in-wall speakers
––––––––––––––––––––––––––––
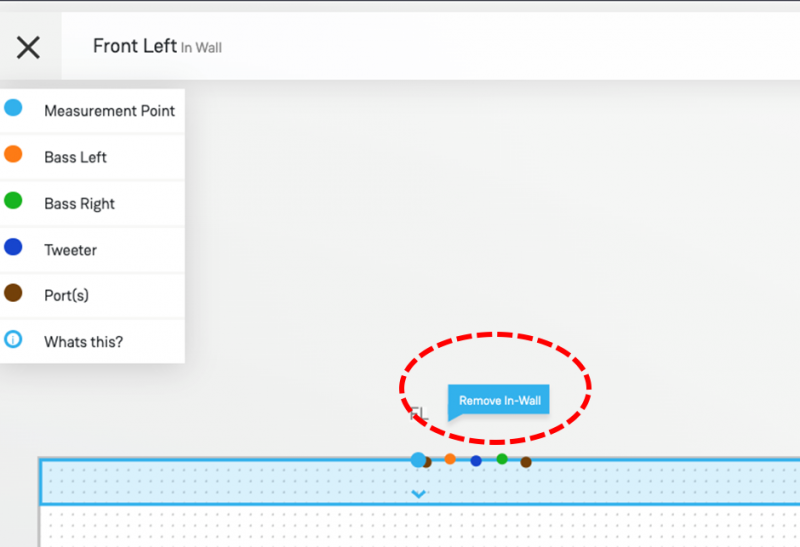
- Removal of in-wall speakers
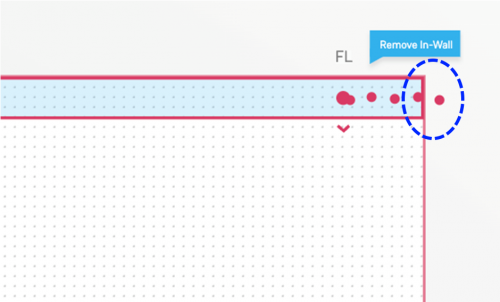
- Pressing the ‘Remove In-Wall’ button removes this ability. A blue area will appear, indicating the allowed area of positioning.
––––––––––––––––––––––––––––
- Positioning
- In-wall speaker measurement point may be placed on the but not beyond the wall. Speaker drive units may be behind the specified wall but not to the left or right of it.
––––––––––––––––––––––––––––––––––––––––––––––––––––––––––––
How do I measure my listening location?
- The listening location should be measured to the average location of the centre of your head during normal listening. See §2.3.2 of the user guide for further information.
How do I define Viewing Speaker Drive Unit Locations
- For speakers that are measured for Space Optimisation (* measured for Space Optimisation in Add Speaker dialog), a show/hide Drive Units toggle is available as a way to preview drive unit and port positions in the floor plan when placing speakers. This may be used as an aid when placing speakers near a wall and as a check to make sure the speakers are measured from the correct measurement point.
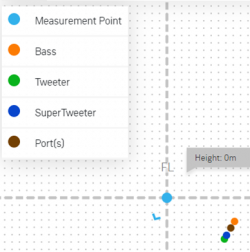
- When toggled on, the speaker drive units and ports are shown on the grid, representing their position in the room. A legend in the top left of the screen indicates whether the colour represents a drive unit, port or measurements point. The drive unit/port items are for information only and non-interactive.
Optional Steps
How do the Environmental options affect the optimisation?
- Increasing the absorption will result in an optimisation that takes shallower, broader cuts at the frequencies artificially distorted by your room; decreasing the absorption will result in an optimisation that takes deeper, sharper cuts at the frequencies artificially distorted by your room. It is important that the absorption of the construction materials of your room is set correctly, otherwise Space Optimisation will incorrectly predict the amount of correction required at the frequencies artificially distorted by your room; incorrect setting of the absorption of the construction materials of your room will result in an uneven bass sound. See §3.2 of the user guide for further information.
How does the Optimisation Preference affect the optimisation?
- In the Optimisation Preference step, moving the slider toward Flatter Frequency Response will result in an optimisation that takes deeper cuts and applies less decay control at the frequencies artificially distorted by your room; moving the slider toward Shorter Decay Time will result in an optimisation that takes shallower cuts and applies more decay control at the frequencies artificially distorted by your room. While the optimisation has been designed to give a good balance of low- and mid-frequency energy, your personal preference may differ to the default balance. See §3.3 of the user guide for further information.
Optimisations
From July 2022 the way we use the Optimisations has changed.
- The status is the Optimisations are now shown as:
Starting
- Space Optimisation2 is calculated online by Amazon Web Services. The "Starting" message is stating that is has now been put into the queue for calculation
Calculating
- This is reporting that your Optimisation is being calculated on-line.
Old Room Version
- This is only showing this Space Optimisation calculation is using an older "Room Design". (Definition: "Room Design" is the setup of the rooms wall/ceiling/floor dimensions and the materials used in this room. )
- Space Optimisation compiles only uses the current Room design.
- If you adjust this room design configuration, there is a warning stating that any Space Optimisations using this Room Design will also change,
- Any previously run Space Optimisations using this Room Design will show the "Old Room Version" message and any adjustments will use the latest Room Design
.
- If you want to make A-B comparisons for room design you can 'Clone' that room design to allow you to make an alternative of this original room design.
Incomplete
- This Room design is incomplete in setup and requires more information before any calculation can be performed.
Error
- There has been an error in calculaiton. Please recheck your room design and do another calculation. If the error still occurs then please report to Linn Helpline
Nothing reported against Room Design
- If no status is shown then this is showing a COMPLETE, calculated Space Optimisation
Deleted Room
- This room that this setup been created from no longer exists in the Room listings
Imported
- This setup has been imported Space Optimation that can be recalled but cannot be adjusted.
- This Space Optimisation Room Design and calculation is now shared with another Linn Account. This allow Linn Accounts to shared their setup with their Retailer, installer etc.
Change/Improvements Log
9th April 2019 (Wall step, Floor plan step & Speaker location step)
Click for more....
15th April 2019 (Floor plan step)
Click for more....
19th April 2019 (Floor plan step)
Click for more....
2nd July 2019 (Subwoofer addition)
Click for more....
23rd November 2019 (Exakt System support.)
Click for more....
27th November 2019 (Klimax 350)
Click for more....
19th December 2019 (Multi-Channel support)
Click for more....
9th December 2021 (new deployment of code)
Click for more....
10th July 2022 (User Interface improvements)
Click for more....
22nd July 2022 (User Interface change)
Click for more....
29th March 2023 (Room detail features)
Click for more....
15th June 2023 (Room detail features)
Click for more....
12th July 2023 (Filtering Optimisations)
Click for more....
25th Sept 2023 (2D/3D option, Ceiling features/heights...)
Click for more....
