Kloud Konfig / Cloud Management / Manage systems
Introduction
The Linn Manage systems/Kloud Konfig, will allow you to set up and re-Konfigure your Linn DS/DSM from a webpage. This can work with the Linn Konfig app, except for Space Optimisation.
These options are only a summary of what MAY be available on your Linn DS/DSM. (Due to software improvements and hardware improvements, these may change at any time.)
Installation
Linn Account creation and adding/removing Linn DS/DSM from your account
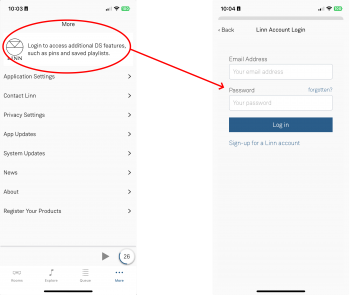
The Linn Account Manage system requires your Linn DS/DSM to be attached to a “Linn Account”. You can do this by using the Linn App:
- First log into your Linn Account, (Or create one if you do not have one).
In Linn App login into your Linn Account
- 1. Press the
 in the bottom right of the Linn App. in the bottom right of the Linn App.
- 2. In the Settings Screen, the top section will show what Linn Account you are using.
- 3. If you are not logged into your Linn Account, then press the Linn Icon and proceed to the Login screen.
- If you do not have a Linn Account, then select the "Sign-up for a Linn Account" text.
- Add or remove products from your Linn Account
1. Make sure that you are on the same ethernet network as your Linn products. (In other words, make sure that you can see your Linn Products in the Linn App)
2. Check that you are logged into your Linn Account by pressing the Linn App settings button. The top of the settings menu will tell you the Linn Account used or show a Linn Account message to log in.
3. After you check, you are logged in
- 3.1 Click on the Settings > Linn Account Linn icon and "Add/Remove Systems"
- 3.2 This will show ALL the products on your network, even ones NOT of your Linn account, as well as the products already linked to your Linn Account.
- 3.3 Hit the
 to ADD the product to your Linn Account. to ADD the product to your Linn Account.
- 3.4 Hit the
 to REMOVE it from the Linn Account it is associated with ANY Linn Account. to REMOVE it from the Linn Account it is associated with ANY Linn Account.
- 3.4.1 If you are not connected to the same network as the Linn DS/DSM you can only remove from YOUR Linn Account. That is, the one that you are currently logged in to.
- 3.4.2 If you ARE connected to the same network as the Linn DS/DSM, (you can typically see an image of the Linn DS/DSM), hitting this symbol will remove from ANY associated Linn Account. This will allow you to now locally associate this Linn DS/DSM to your Linn Account without having to find who was previously attached.
4. Complete
- Note
- Registering a product does NOT add it to your Linn Account.
- Note
- Products, such as the Kustom DSM Z4/Z8, will not show in Kazoo room listing as they are not initially configured. But they WILL shown in this product listing and can be added to your account.
Accessing the Linn DS/DSM in your account
After adding the Linn DS/DSM players to your Linn Account:
- go to www.Linn.co.uk
- Select the Full Menu (top right) and go down to “My Account”
- Within the “My Account” select Manage systems.
- This will enter you into the System management page and “Edit Settings” or your Linn DS/DSM
- If you have just registered and added these to your Account, it may take a couple of minutes to show you Linn DS/DSM setup. If nothing changes then try refreshing your web-browser page, (typically function key F5 or CTRL-F5 in the browser).
- The Space tab will not appear until you have assigned speakers to your Linn DS/DSM in the “GENERAL” tab.
- with the speakers setup, you will now be able to create/update/delete/rename your Space Optimisation settings created by this application.
Note: If you have any issues logging in to your Linn Account, check your web-browser doesn't have some security/privacy blockers such as "Ghostery, uBlock etc. These "security or Privacy" apps can block the communication is allowed login.
Or you can access Manage Systems from your Linn App:
|
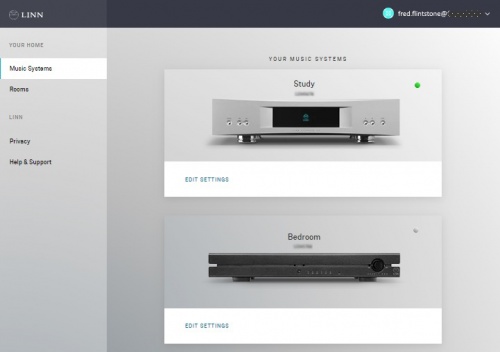
Music Systems
- When you first open the Manage systems page, you will be given a list of Rooms assigned to your account.
- Click on EDIT SETTINGS or the room picture to Konfigure this room.
 indicates Room view up/down list, press the change to block view
 : indicates Room view in blocks, press to change to list view
- If you have many rooms, you can filter the rooms that you see. Check below Filter view section
- If the Linn DS has mains power and has internet access, then this Linn DS/DSM will be shown with a green dot on the right-hand side of the product image.
- E.g. on right, Master Bedroom is ONLINE with the GREEN dot.
- But the Kitchen is offline with the GREY dot.
Filter view
- You can search all the rooms in the Manage system - Music Systems view
- Option1: Will allow you to filter the view by Room name, product name, email, serial number, Label, etc
- Option2: filter the view by,
- ONLINE: Which products are power on and are available.
- OWN DEVICEYour own device, (in your account).
- NON SHARED DEVICE Not shared with any other Linn Account
- if shared,
- SHARED BY you can filter who has shared System(s) with you.
- SHARED WITH you can filter who you have shared System(s) with
Labels
- Labels can be used to group and filter the associated music systems list.
- To add a label, click on the option's dropdown of the desired music system and navigate to “Labels” menu.
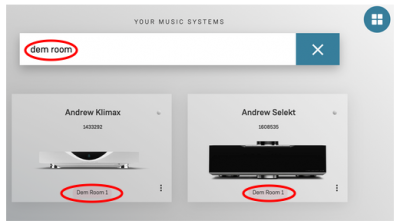
Labels filter
- Labels for a system will be shown in the bottom area of the music system image.
- Labels can be used in search and filter functionality.
- Using the search bar, searching for the label name will return all systems that have a label that matches the search term.
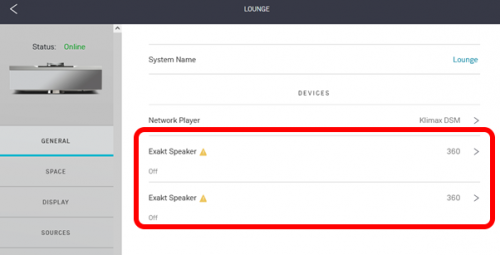
GENERAL
- System Name to change Room name
DEVICES
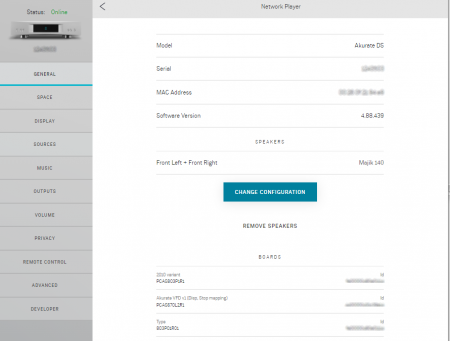
Network Player
- To get the details of your Linn DS/DSM Model name, Serial number, MAC Address, Software version (also known as Firmware) & BOARDS. (These are the circuit boards and their identification numbers.)
- This will also show any Exakt products, (Loudspeakers, ExaktBoxes and Phono stage - Urika-II are connected to this Linn DS/DSM)
- Hit the > button to change the configuration
- If you are using a Selekt DSM you can select what the cartridges will be used for
- Stereo: Stereo if more than one cartridge then this for the Exakt crossover
- Stereo Passthrough: If the cartridges are used for Bi-Amping or Tri-Amping
- Surround Passthrough: To configure the cartridges for 5.1 surround, (or 7.1 with additional Exakt products)
- Note
- You may have to bring the Linn DSM out of Standby to change configuration.
- Check the Standby option further down this page. Slide the button LEFT to bring the Linn DS/DSM to turn STANDBY OFF and PRODUCT ON
START-UP MODE
- A number of different settings can be applied to customise the way your device starts up
Start-Up Mode
- Normally, your device will power up in Sleep (aka standby).
- Select Active to skip sleep mode and go straight to playback mode on power up
Auto-play
- Normally, you must press play to start playing audio.
- Change this setting to On to make your device play audio immediately when a source is selected (only relevant to Playlist, Radio, and Songcast)
Startup Source
- Normally, your device will start up on the last source you were listening to.
- You can change this setting to make sure the device starts up on a specific source instead
IPv6
- If applicable to your Linn DSM, this switch the network operation to IPv6. (It makes no difference in the sound quality, It is only to support evolving ethernet networks).
Bluetooth
- If applicable to your Linn DSM, this will allow your Linn DSM to receive Bluetooth audio. This can be from your phone, Alexa etc
- Note
- It will have paired with your Bluetooth device first. Check your product page in this wiki for more information
Analog Input Mode
- This is for the Majik DSM (2020 variant). This allows the Analogue input to be configured as a Line-level input, or for a Moving Magnet turntable cartridge.
XLR Output
- This is for the Klimax DSM (2020 variant) to enable the XLR Output
RCA Output
- This is for the Klimax DSM (2020 variant) to enable the RCA Output
RCA Output Transformer
- To electrically isolate the audio on the RCA sockets
Standby
- This is used to remotely switch on the products and set up the Exakt products remotely
- Turn ON to put the product INTO STANDBY
- Turn OFF to put the product OUT OF STANDBY
REBOOT DEVICE
- Pressing this text will force the Linn DS/DSM to restart
RESTORE FACTORY DEFAULTS
- Pressing this reset all the settings to default.
- Note that this will also remove this product from your Linn Account, and it will have to be reattached to your account before any further setup
- This function is also possible using the Linn App
UPLOAD DEVICE LOGS
- This is for diagnostics only and should only be used when told to by Linn personnel.
- If you want to report any issues to Linn then use the "REPORT TO LINN" on the Linn App
RECOVER DEVICE FIRMWARE
- RECOVER : This is to reload the software in to the Linn DS/DSM. It should only be used when instructed by Linn personnel.
-
- You will need to REMOVE your existing speakers first before you can change these to a different speaker
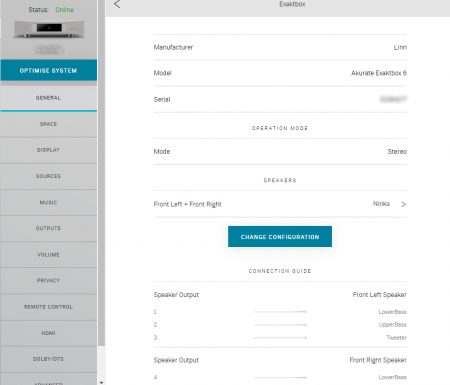
Exaktbox
- Hit the > button to change the configuration
- Under Speakers, press > to change the Exakt filter profile used.
- CHANGE CONFIGURATION : to add/remove/change your speaker definition.
- Also shows the CONNECTION GUIDE
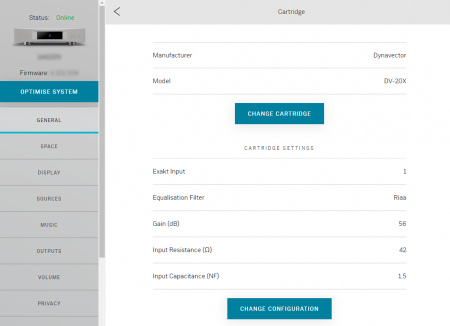
Phono Stage (Urika-II)
Hit the > button to get details of the Urika-II
- Hit the Cartridge button to get details of the Urika-II
- This page will allow you to
- or
-
- Exakt Input definition (1 or 2)
- Equalisation Filter: RIAA
- Gain (dB): to adjust the photo stage gain
- Input Resistance: Resistive load presented to the cartridge
- Input Capacitance: Capacitance load presented to the cartridge
DEVICE SETUP

- This allows you to configure the system on your Linn DS/DSM
- Clicking on the button will show you all the products to configure:
- e.g
- Selekt DSM (Digital Out) : Configure the SPDIF OUT socket on the Selekt DSM
- Selekt DSM (Modular Speakers): Configure the Selekt DSM cartridges
- Akurate Exaktbox 6 (1234567): Configure the Exaktbox6 serial #1234567
- 360 (234567): Configure Exakt loudspeaker serial #234567
- Akurate DS: configure the Akurate DS speaker
- ..
- Press CHANGE to change each device setup, and continue on the CHANGE CONFIGURATION section
Change Configuration

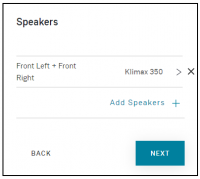
Speaker
- This allows you to add new speakers
- Or delete the speaker setup by hitting the X on the right side of the listing
- OR
Firmware Mode
- This is ONLY for ExaktBox /Selekt products.
- Typically you will have:
- Mono: To work as an Exakt/Aktiv crossover for one loudspeaker
- Stereo: To work as an Exakt/Aktiv crossover for a pair of loudspeakers
- Stereo Passthrough:ONLY for Selekt DSM. This will allow each Selekt cartridge to play the same stereo audio channels with no Aktiv.Exakt filtering.
- Surround Passthrough: To define the Surround channels assigned and what loudspeaker is being used.
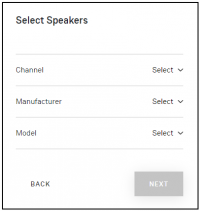
Selekt Speaker
- Channel: This refers to the audio channel for this/these loudspeakers.
- If you have set for Mono mode above, this will show single channels, FL, FR, Cen...
- All other modes will allow to setup for channels pairs and single channels.
- Manufacturer: This is the Manufacturer of the speaker attached to the defined channel. E.g. Linn
- Model:This is the model of the speaker attached to the defined channel. E.g. Klimax 350
- (In Mono & Stereo mode, this is used for the Exakt crossover profile.
- In Stereo Passthrough & Surround Stereo mode, this is used for Space Optimisation and speaker distancing.)
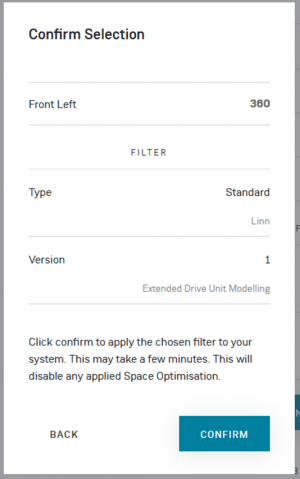
FILTER
- This only applies to Exakt speakers:
- Type: This defines if this is Standard or, for example, Binged type of speaker
- Version:
- The filters depend on the loudspeaker development. (Exakt design has evolved over the years and these options allow you to decide what version of filter you want to use check Exakt_filters
- In Surround Passthrough mode, it will then ask you if you want to add more loudspeakers for more Surround channels
Confirmation Selection
- This is to confirm your configuration and include any wiring diagrams before programming the system
- The > X allows you to delete these channels from the configuration.
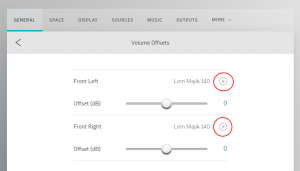
Test Tones/Volume Offsets
This allows you to trim the channels. Hit the Play button against each channel (marked in RED) and adjust the channel trim level.
|
Setting up Exakt loudspeakers for first time
|
To set up Exakt speaker(s) :
- On initial set up, the Exakt speakers will not be assigned a channel or filter to use
- Setup Exakt Speaker
-
- In this case, it is stating that your Exakt loudspeaker will need to be configured for operation:
- Select Channel
-
- Assign this Exakt speaker to Front Left/Front Right/Centre/........
- Selekt Filter Version & type
- The filters depend on the loudspeaker development. (Exakt design has evolved over the years and these options allow you to decide what version of filter you want to use check Exakt_filters
- Finally, confirm these are correct and repeat the same procedure for the other Exakt loudspeakers
- Note
- On confirmation, this will upload all the configuration and setup into the loudspeaker. This will take a few minutes to complete.
|
SPACE
|
This tab will only appear if you have speakers assigned in the GENERAL tab.
Detail of how to use this is covered with Linn Account Space Optimisation User Guide in this section
- You may get the warning below. This is stating that the Linn DS/DSM is in Standby and you will have to bring it out of Standby, turn Standby OFF, i.e. turn product ON to load/apply Space Optimisation. Press the STANDBY OFF to turn the product ON
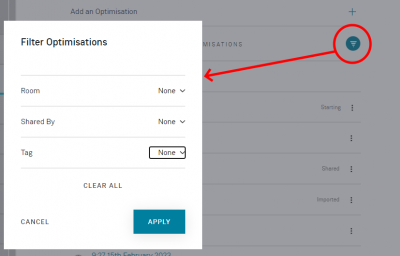
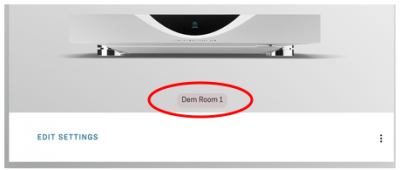
- Filtering Optimisations
- If you have multiple Space Optimisations for this product, for example as a Retailer with multiple Dem rooms and speakers. You can filter the Space Optimisations to give a better list of the configuration you are using.
Room: To filter using the Room design used.
Shared By: Filter by who has shared the Space Optimisation.
Tag: If you edit the DETAILS of a Space Optimisation
* scroll down to the bottom of this page and this show the Tag option.
* You can add multiple Tags, of your own text, for your own reference.
|
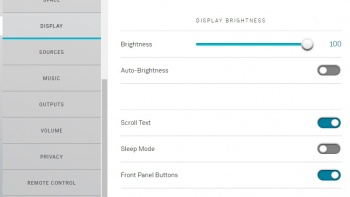
DISPLAY
|
These options are only a review of what MAY be available on your Linn DS/DSM.
- Brightness: If Auto-Brightness is turned off, then this will allow you to set the brightness of the Linn DS/DSM display.
- Auto-Brightness: Enabled will allow the Linn DS/DSM to detect the external brightness via it front panel sensor and adjust the display brightness accordingly.
- Scroll Text: When enabled, this will scroll the text on the front panel when media changes.
- Sleep Mode: Put the display to sleep if there are no display updates after a certain amount of time.
- Front Panel Buttons: This will stop ALL front panel buttons working, including SLEEP. This is to stop kids from playing with the buttons and turning up your volume when you are not there.
- Power Indicator (Active Mode): Illumination control of either the Linn DSM name or front glow when out of standby
- Power Indicator (Sleep Mode): Illumination control of either the Linn DSM name or front glow when in standby
- Wake Display on Proximity Detection: if a hand is brought close to the front panel or dial, then this will bring the display out of sleep mode
- Discrete Mode: Minimal front panel display. That is, no track change information.
|
SOURCES
|
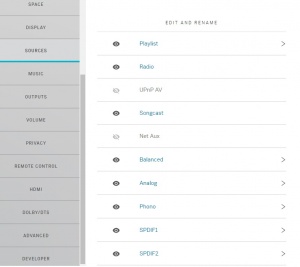
This section will allow renaming the inputs and make the inputs invisible. These of these Source options are dependent on the model of Linn DS/DSM and not available for your Linn DS/DSM .
Click on the  icon to make the input invisible from the front panel selection and the Kazoo app. icon to make the input invisible from the front panel selection and the Kazoo app.
On sources with the  icon, click on this to expand the settings. icon, click on this to expand the settings.
Some of these settings can be:
- Name: the name displayed on Kazoo/Linn app/ front panel display.
- Maximum Number of Tracks: This is mainly used for control systems that only have a smaller playlist. Max value 1,000 tracks.
- Unity Gain: Turns OFF the volume control on this input only.
- Volume Offset: this to raise or lower the comparative volume level on this input compared to other inputs. E.g. an LP12 may require a +5dB offset, but a CD player may be -8db
- INPUT LEVEL: to define the incoming source input level. Set the analog input level for the given source in Vrms. This value should match the output level of the corresponding external source.
- Digitise: When enabled, this source is Space optimised and shared to other Rooms with Songcast. Otherwise, no digital processing is carried out.
- Bypass Transformer: Only for the Klimax DSM. This allows you to bypass the internal source audio transformer and directly feed in the Klimax DSM.
- Delay mode: to define the Songcast delays to other rooms.
|
MUSIC
|
This section is to define the desired audio quality from the streaming services. (Internet radio streams).
Spotify Audio Quality
Within the Konfig app and Linn Account Manage systems section you can change the audio quality of Spotify.
Options available are:
You can adjust these settings to control the quality of your incoming stream if you have internet issues. If any of these settings are changed then the next Spotify track played will be at the newly selected streaming rate.
- Low(96 kbit/s)
- Medium(160 kbit/s)
- High (320kbit/s)
- Note: The highest streaming can also be controlled by your Spotify subscription and will limit you on the free service.
- Songcast Sync: Due to the response timing required by Spotify, Linn DS sharing this Spotify to other rooms via Songcast may not be in perfect sync with this Spotify receiving room. Switch this ON put all Songcast rooms in sync with the Spotify room.
Roon settings
Within the Konfig app and Linn Account Manage systems section, you can change the roon protocol and DSD Decoding of Roony.
Roon Protocol options available are:
Choose how your DS connects to Roon. Roon Ready allows multiroom with non-Linn streamers. Linn Streaming allows multiroom with older Linn DSMs.
- Linn Streaming : This is when you want Roon to group playback with older Linn products that do not support "Roon Ready"
- Roon Ready : For Roon Grouping of all products that support "Roon Ready" (Linn & Non-Linn)
- Note:This should only be changed if you are using Roon as your control interface.
DSD Decoding options available are:
Choose whether DSD is decoded by Roon or played natively. If your Linn DS can support DSD playback, check HERE, you can selekt "Linn Plays". You can choose if you think the Linn direct sounds better or the "Roon Decodes" sound better.
- Linn Plays : DSD is played directly from the Linn DS/DSM.
- Roon decodes : DSD is decoded within Roon and sent as FLAC/WAV to the Linn DS/DSM.
Tidal Audio Quality
Within the Konfig app and Linn Account Manage systems section you can change the audio quality of Tidal.
Options available are:
- Enabled: To make this Tidal input visible/invisible in Kazoo.
You can adjust these settings to control the quality of your incoming stream if you have internet issues. If any of these settings are changed then the next Tidal track played will be at the newly selected streaming rate.
- Low(96 kbit/s)
- High(320 kbit/s)
- Lossless (CD quality)
- Note: The highest streaming can also be controlled by your Tidal subscription and may only limit you to HIGH(320 kbit/s) on the standard service.
Qobuz Audio Quality
Within the Konfig app and Linn Account Manage Systems section you can change the audio quality of Qobuz.
Options available are:
- Enabled: To make this Qobuz stream visible/invisible in Kazoo/Linn App.
You can adjust these settings to control the quality of your incoming stream if you have internet issues. If any of these settings are changed then the next Qobuz track played will be at the newly selected streaming rate.
- Low(320 kbit/s)
- Lossless(44.1 kHz kbit/s)
- Lossless(96 kHz kbit/s)
- Lossless(192 kHz kbit/s)
- Note: The highest streaming can also be controlled by your Qobuz subscription and may only limit you to Low(320 kbit/s) on the standard service.
Deezer Audio Quality
Within the Konfig app and Linn Account Manage Systems section you can change the audio quality of Deezrer.
Options available are:
- Enabled: To make this Deezer input visible/invisible in Kazoo/Linn App.
You can adjust these settings to control the quality of your incoming stream if you have internet issues. If any of these settings are changed then the next Deezer track played will be at the newly selected streaming rate.
- Standard(128 kbit/s)
- High(320 kbit/s) "High Quailty"
- Flac (1411kbit/s) in other words CD quality / "HiFi" / "High Fidelity"
Note: The highest streaming can also be controlled by your Deezer plan subscription and may only limit you to Standard(128 kbit/s) on the standard service.
CALM RADIO
Switch this ON to enable Calm Radio in the MUSIC tab
Radio Presets Provider ( TuneIn / airable )
- Linn Account Manage systems section you can change the internet radio to be either
 or Tunein. or Tunein.
- For more information on
 check HERE check HERE
TUNEIN RADIO
- Scroll to TuneIn Radio
- Enabled this service
- Enter/rename your TuneIn Username into the "TuneIn Username" field.
|
OUTPUTS
|
These options are only a review of what MAY be available on your Linn DS/DSM.
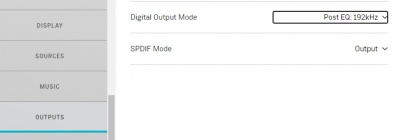
DIGITAL OUTPUT MODE
This refers to the Digital output (if fitted/enabled) what outgoing sample rate will be and has NO volume control on this output in any setup..
- Raw: Digital output is the original bit rate.
- 88/96kHz: Digital output is the either 88.2k or 96k.
- 176/192kHz:Digital output is the either 176/2k or 192k.
- Post EQ: 192kHz: Digital output for front left/right speakers with Space Optimisation.(Only available on some products, ONLY applicable to SPDIF1 and has NO volume control.)
- Disabled: No Digital output.
Analogue output
When Exakt speakers are set up on this Exakt DSM, then the analogue output is disabled, as this audio will NOT be in sync with the Exakt audio. If you want to have both analogue and Exakt front L/R outputs, this must be enabled. (Default: DISABLED)
SPDIF Mode
On some products, the SPDIF1 socket can be configured for an Output, instead of the default input. The Input or Output mode is set here.
- Set to Output and Digital Output mode Post EQ, this can also be used with Digital speakers.(This does not support volume controlled output.)
Headphone Mode
Select:
- Auto: To dynamically enable and disable headphones based on whether headphones are connected to the output jack.
- On: To force the headphone output to always be enabled. (No audio to loudspeakers).
- Off: To disable headphone output. (No audio action when inserting headphones).
- This is for use with Stereo playback only. If you have a Selekt cartridge configured for LFE Surround and your Subwoofer has two inputs, you can fed one input from the LFE output and the other Sub-woofer input from the SUBOUT output.
- Subwoofer
- Options:
- * ENABLED to enable these back panel outputs.
- * DISABLED to disable these back panel outputs.
- Subwoofer Filter
- Enabled SUBOUT L+R set by crossover frequency 60Hz, 80Hz, 120Hz .
- Disabled SUBOUT L+R crossover frequency 1kHz, the LHC/RHC audio is flat.
- Subwoofer Crossover Frequency
- If Subwoofer filter is enabled:
- 60 Crossover frequency 60Hz
- 80 Crossover frequency 80Hz
- 1200 Crossover frequency 120Hz
- Subwoofer Crossover Type
- Bass redirect Audio above the Subwoofer Crossover Frequency frequency is sent to the F+R channels. (Audio below this frequency is redirected to the SUBOUT outputs.)
- Bass Reinforcement Audio to the F+R channels is as a flat response.
- Subwoofer Channels
- Mono L+R subwoofer combined into one output.
- Stereo separate LHC and RHC subwoofer outputs
|
VOLUME
|
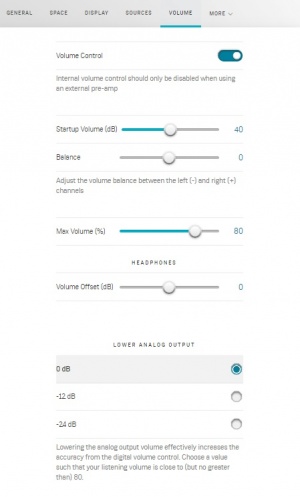
These options are only a review of what MAY be available on your Linn DS/DSM.
- Volume Control: To enable/disable the volume control on ALL inputs. This will also disable your Exakt speakers.
- Startup Volume (dB): Volume settings when you bring the Linn DS/DSM out of Sleep/Standby.
- Balance: Left/right balance setting
- Max Volume(%): The highest volume level the user can go to.
Note: Volume 80 is unity gain, (what comes in goes out) any higher volume may distort the audio.
HEADPHONES
This can make your headphone output quieter or louder for that volume setting. This can be adjusted so that with quiet headphones, if you unplug them the speaker volume is not too loud at the same volume setting.
LOWER ANALOG OUTPUT
This is done to provide a finer volume control. That is, the audio output is attenuated, but you will have a smaller change in audio volume for each step in the Volume control.
|
PRIVACY
Send Anonymous Usage Stats
Enable to allow your Linn DS/DSM to send usage data to Linn. This will help us decide where to allocate time for new features or improvements.
NOTE: No personal information is sent to Linn as a result of this option being checked.
Send Crash Reports
Enable to allow your Linn DS/DSM to send crash data to Linn in the event of a failure. This will help us in diagnosing and addressing existing issues. This is used by the Linn Helpline and Service department to check and what has caused the Linn DS/DSM to reboot itself.
If you select No, this makes it more difficult to help diagnose remotely what has happened to your product.
NOTE: No personal information is sent to Linn as a result of this option being checked.
REMOTE CONTROL
|
BUTTONS
This is for use with the REM020 Remote control and select which button on this remote control will select which source.
ACCEPTED COMMANDS
The Linn DS/DSM use Philips RC5 remote control protocol. This will mean that some other manufacturer's remote control may also control the Linn DS/DSM. This option will tell the Linn DS/DSM what commands to accept.
Star Key Held Action
From Davaar107 firmware this will allow you to control either Display brightness , Lip-Sync, Balance, Analog Output Mode & DSP Decode mode, As defined on this setup page. (The options will vary from product to product.)
|
HDMI
|
These options are only a review of what MAY be available on your Linn DS/DSM.
All Linn DSM with HDMI input sockets
HDMI
- Totally disable HDMI sockets from operation
Pass-Through (Sleep)
- When the Linn DSM is in Sleep mode, the last HDMI audio/video is passed through to the TV/Projector.
"HDMI 2.0"/"ARC only" Products
Turn HDMI Off in Sleep
- When enabled, this will stop HDMI connection to the TV/Projector when the Linn DSM in in Sleep.
eARC mode
- Auto detection of eARC connection or
- Off/Disable eARC and only use ARC connection
- Some Manufacutuers need CEC enabled for eARC
CEC
- Enable Consumer Electronics Control of the Linn DSM
- When you have the ARC enabled on your TV and the Linn DSM is listening to your TV via the HDMI ARC input, this will pass through the Volume, Mute & Standby commands from your TV Remote to control the Linn DSM.
CEC Auto Source / Power Control
- Enable to auto-switch to TV ARC connection and action TV standby if CEC commands are available.
|
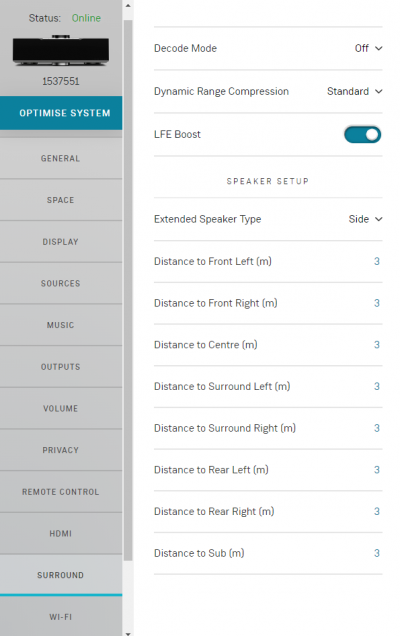
SURROUND
Decode Mode
- Off - No up-mixing performed
- Auto - PCM streams up-mixed using DTS Neo 6 Auto algorithm
- DTS Neo 6 Music - PCM streams up-mixed using DTS Neo 6 Music algorithm
- DTS Neo 6 Video - PCM streams up-mixed using DTS Neo 6 Movie algorithm
The Decode Mode setting is applicable to audio received by the following sources:
- HDMI, HDMI ARC, HDMI eARC, SPDIF and Toslink
Streaming sources (radio, Qobuz, etc.) and analogue inputs cannot be up-mixed. These will always be presented in stereo.
For all modes above downmixing if required will then be performed based on the number of speakers in the system.
Dynamic range compression
- Standard
-
- This mode has the widest dynamic range (the difference between the quietest and loudest sounds).
- Quiet remains quiet, loud remains LOUD (i.e. explosions will "blow your socks off!")
- Medium
-
- This mode has a medium difference dynamic range.
- Making quiet sounds louder and louder sounds quieter (not as big a difference in sound volume)
- Maximum
-
- This is maximum compression
- Making quiet sounds louder and louder sounds quieter (not as big a difference in sound volume and "keeps your socks on")
Speaker Distances
Enter the distance from your main listening position to each configured speaker. These manual settings are only available and applied with Space Optimisation disabled.
|
WI-FI
|
These options are only a review of what MAY be available on your Linn DS/DSM.
- Wi-Fi Enabled: To enable/disable the Wi-Fi option on your Linn DSM. (Any changes will require the Linn DSM to be rebooted before setup of the Wi-Fi).
- Wi-Fi Status
-
- Current Status: Shows the current status of your Wi-Fi connection
- Network Id: The SSID name used to discover the Linn DSM during setup
- CONFIGURE button: This will allow you to
- Choose Network: View the existing local networks , select an SSID, then add the password.
- Manually enter Network Details: If you know the SSID and password of your Wi-Fi, then this can be set up manually.
- Remove Network: to remove these Wi-Fi setting from your DSM.
NOTE: If you are using a wired LAN connection on you Linn DSM. This wired connection will have to be unplugged and the Linn DSM power-cycled BEFORE it will use the WI-FI connection.
Please remember to unplug the LAN and POWER-CYCLE the Linn DSM before using the Wi-fi connection
|
ADVANCED
|
These options are only a review of what MAY be available on your Linn DS/DSM.
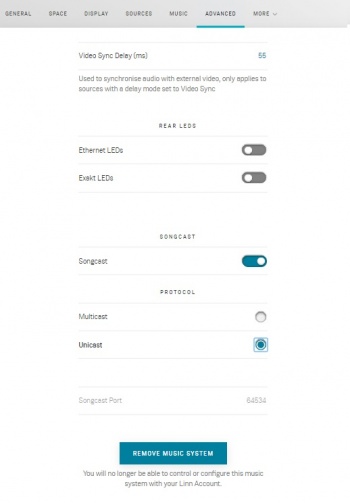
- Video Sync Delay (ms): When a source/input has a "Video Sync" delay, this is the delay used . This can also be adjusted by the IR handset.
- Note: Exakt speakers/ExaktBox's add a cross-over processing delay of approx. 60mS.
- For non-Exakt speakers, this can be as low as 15mS.
REAR LEDs
- Ethernet LEDs: When disabled, these ethernet sockets will turn OFF after initial boot-up/power ON.
- Exakt LEDs: When disabled, these Exakt sockets on the rear of the Linn DS/DSM will turn OFF after initial boot-up/power ON.
SONGCAST
- Songcast: Turned OFF the Linn DS/DSM will no longer share its Music to other Rooms.
Protocol
- Multicast: This is a network dependant setting that should only be changed if the network/LAN can support this.
- Unicast: Default setting. This allows this Linn DS/DSM audio to be shared with up to FIVE Songcast rooms.
- Songcast Port: This should NOT be adjusted and only used for reference to network used.
- Verbose Device Logging : This should NEVER be enabled. It is for Linn software diagnostics ONLY.
Software Updates
- Channel. This allows you to select either the main release Stable (default) or the Beta development release.
- The Beta release is only for testing a software release before official release and may have some bugs in it.
Delegated Admin Mode
Delegated Admin Mod
- This is a Retailer-based service to, when enabled, stop the notifications on the front panel or on Linn App of any software updates. This will leave the Retailer to update, as required, any updates in a controlled manner. This will then allow the customer to use and configure the system with some protection. But give the "Delegated Administrator" i.e. Retailer/installer, to govern any software updated and Space Optimisation changes
- This will also stop the Linn DSM user from getting software updated notifications that are not relevant to their setup and allow their Retailer to manage the software.
In other words:
- Delegated Admin Mode: For Retailers/Installers to limit the software update notifications on:
- The Linn DSM product's front panel display
- The user's Linn App up "System Updates"
- The user's Manage Systems "System Updates" page
- And it also disables the ability to delete Space Optimisations
Requirements
- The Linn DSM is SHARED on the users account with another Linn Account
- Linn DSM running Davaar 109 or newer
- Only applicable to Linn DS/DSM with newer, CORE4 processors.
Results
- In Manage Systems > Linn DS/DSM > ADVANCED tab
MANUAL FIRMWARE REPROGRAM
- Manifest Uri: This is the web address of the Manifest that will present the new firmware
- RECOVER : Force the Linn DS/DSM to reload the latest firmware with factory reset.
Custom Filters
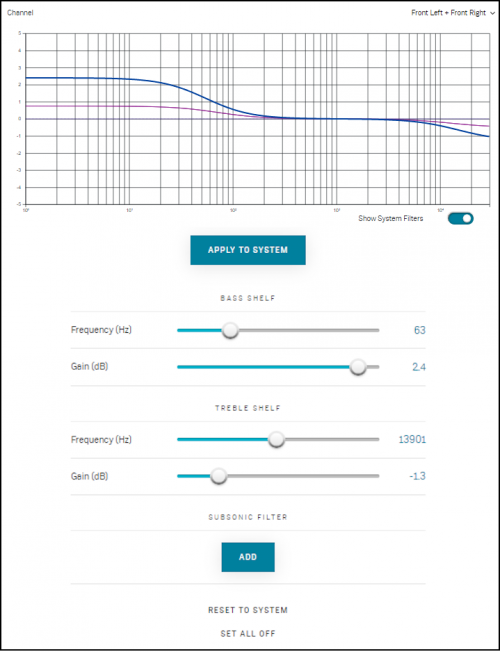
The Bass & treble shelf options have been introduced in to Manage systems in the ADVANCED tab (bottom of ADVANCED page). This will allow you to trim the music playback and add/attenuate the Bass and/or treble signals.
This can be used with OR without Space Optimisation.
The graph shows you the frequency response graph with showing:
- The Gain -5dB to +5dB, in 1dB steps,
- versus
- The frequency 100=1Hz, 101=10Hz, 102=100Hz, 103=1kHz, 104=10kHz.
- Channel
- Front Left + Front Right : by default this is set for these channels, but click to view any other applicable channels in the system.
- Show System filters: Show any current filters applied.
- APPLY TO SYSTEM Upload change to Linn DS/DSM.
- BASS SHELF1 (For all passive and/or Exakt speakers/Exaktbox channels)
- Frequency (Hz): The crossover frequency of the Bass shelf.
- Gain (dB)1: The gain, or attenuation, for this bass crossover point.
- TREBLE SHELF1 (For all passive and/or Exakt speakers/Exaktbox channels)
- Frequency (Hz): The crossover frequency of the Treble shelf.
- Gain (dB)1: The gain, or attenuation, for this Treble crossover point.
- SUBSONIK FILTER2 (for non-Exakt systems. I.e. Passive only channels)
- ADD Allows you to add a subsonic filter on the channels selected.
- Frequency (Hz): Define the cut-off for this filter.
- RESET TO SYSTEM: Load currently applied Custom filters values for further fine adjustment.
- SET ALL OFF: Disable all Custom Filters
Note
- 1 The Gain and frequency values can be directly entered using the keyboard by clicking on the respective number value. This allows you to finely tune the frequency and again in smaller steps than available on the sliders.
- 2 This is for passive/Non-Exakt outputs only.The Sub-sonic filter brings immense benefits to midrange performance and improves the overall musicality of the system. By reducing the cone movement at inaudibly low frequencies, the bass/mid-drive unit retains better linearity through the midrange. The filter cut-off should typically be set quite low; about 7-12 Hz for a large loudspeaker, and 20-30 Hz for a small stand-mount speaker.
- Do not use a bass heavy track to set this subsonic filter. You may find some recordings have studio noise that adds inaudibly low frequency to the recording. E.g. Bob Dylon's - Subterranean Homesick Blues. This would be an ideal setup track to improve the musicality of the system.
|
DEVELOPER
Ignore this section, this is for software development.
SHARING KONTROL
You can share your Linn DS/DSM with another Linn-Account. This can be used for Retailers to give remote support for their customers. This is done by the customer granting access to the Retailer, or vice versa. But note that if the Linn DS/DSM is reset to Factory Defaults <RESTORE>, this action will remove the Linn DS/DSM from ALL Linn accounts.
- Click on the
 and select
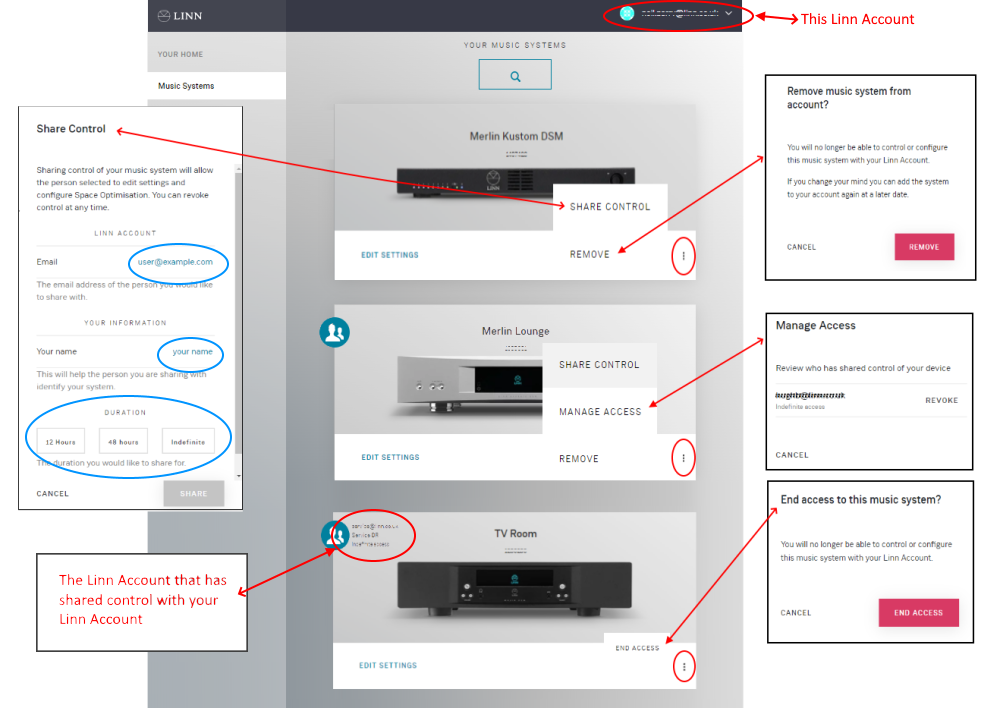
- SHARE CONTROL with another Linn Account.
- Add the Linn Account emails and your name to the other Linn account.
- You can choose to share this linn DS/DSM for a limited time 12 hours/48hours or forever-Indefinite. Or until the Linn DS/DSM has a factory reset-RESTORE.
- You can also share control of this Linn DS/DSM with other Linn Accounts by repeating the SHARE CONTROL button and each time stating a new Linn Account
- TRANSFER CONTROL: to transfer primary control ownership to another Linn Account. (This still has the option to share this with your Linn Account.)
- REMOVE: to remove this Linn DS/DSM from your Linn Account.
- MANAGE ACCESS: If you have shared your Linn DS/DSM with another Linn Account(s) then you can selectively REVOKE/remove these Accounts access to your Linn DS/DSM.
- END ACCESS: If you have been granted access to another Linn-Accounts Linn DS/DSM, you can remove access from your Linn Account
- Signifies that this Linn DS/DSM has shared control by more than one Linn Account. If shared TO this account, then it states who has shared it.
- In the example below:
- Merlin Kustom DSM: is linked to the current Linn Account only
- Merlin Lounge: is linked to the current Linn Account AND SHARED with another Linn Account. You can share this to multiple Linn Accounts and well as be removed from other Linn Account(s).Or finally remove this Linn DS/DSM from your account.
- TV Room: has been SHARED with this Linn Account. This only has the option to return full Konfiguration to the original Linn Account
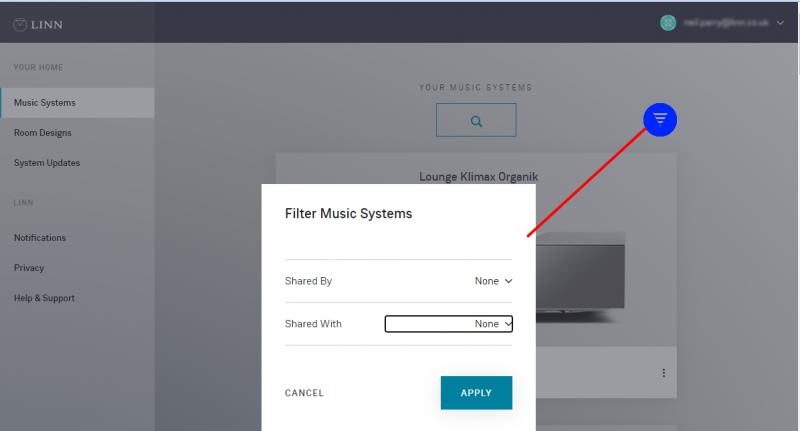
Filtering the Music systems using the Linn Account that has been shared from/to
- If you have a lot of Music systems to manage, and you have either been given sharing access. Or, if you have shared with another Linn Account, you can filter the listing.
- Press the
 to open the filter window and select the Linn Account to up wish to see.
Room Designs
- This is the Room library used in Space optimisation. This will allow you to Create / Edit rooms that are used in new or existing Space Optimisations.
Check Linn_Account_Space_Optimisation for more information.
Software Updates
- When you first select this page it appear to be empty. Give this a few seconds and it will report any updates with any products linked to your Linn Account.
- Select a relevant products and "UPDATE NOW"
- This will tell the Linn DS/DSM to remotely update the Linn DS/DSM firmware to the requested version.
If you have any issues then go to the local network and use the Linn App to load or recover your Linn DS/DSM software.
Notifications
- This will report any downtime or changes to the Manage system pages
FAQ's
My Linn DS/DSM will only show offline even though it is power on
This can be caused by a loss of internet access on the Linn DS/DSM.
Try the following:
- Power cycle the Linn DS/DSM. That is, remove mains power from the Linn DS/DSM for a minimum of 30 seconds and reapply mains.
- Wait for approx 5 minutes for the Linn DS/DSM to power on and do house-keeping.
- On the manage systems web-browser, press F5 or SHFT-F5 to refresh the screen.
How do I remove a Linn DS/DSM from my Linn Account
There are THREE ways to do this:
1. If you are on the same network as the Linn DS/DSM then:
- a) go into Kazoo Settings > Linn Account and log in to the Linn Account that currently has the Linn DS/DSM
- b) This will give a list of Linn DS/DSM on this network and REMOVE the required Linn DS/DSM.
- c) Complete
2. If you do not have access the Linn Account that the Linn DS/DSM is linked to:
- a) Open Konfig
- b) Goto the ADVANCED tab
- c) Select the Linn DS/DSM to be unlinked from the Linn Account and hit the <RESTORE>. This will do a factory reset on the Linn DS/DSM and remove this from the Linn Account.
3. If the Linn DS powered off and is on your Linn Account and you want unlink it from your Account:
- a) Open Manage account
- b) Select the Linn DS/DSM you want to remove. If the room is OFF (that is, no mains power), the web-page will state that the Room is offline. This page will also give you the option to REMOVE MUSIC ROOM. Select this option to unlink this Linn DS/DSM from your Linn Account.
DEVELOPER
Ignore this section, this is for software development.
SHARING KONTROL
You can share your Linn DS/DSM with another Linn-Account. This can be used for Retailers to give remote support for their customers. This is done by the customer granting access to the Retailer, or vice versa. But note that if the Linn DS/DSM is reset to Factory Defaults <RESTORE>, this action will remove the Linn DS/DSM from ALL Linn accounts.
- Click on the and select
- SHARE CONTROL with another Linn Account.
- Add the Linn Account emails and your name to the other Linn account.
- You can choose to share this linn DS/DSM for a limited time 12 hours/48hours or forever-Indefinite. Or until the Linn DS/DSM has a factory reset-RESTORE.
- You can also share control of this Linn DS/DSM with other Linn Accounts by repeating the SHARE CONTROL button and each time stating a new Linn Account
- TRANSFER CONTROL: to transfer primary control ownership to another Linn Account. (This still has the option to share this with your Linn Account.)
- REMOVE: to remove this Linn DS/DSM from your Linn Account.
- MANAGE ACCESS: If you have shared your Linn DS/DSM with another Linn Account(s) then you can selectively REVOKE/remove these Accounts access to your Linn DS/DSM.
- END ACCESS: If you have been granted access to another Linn-Accounts Linn DS/DSM, you can remove access from your Linn Account
- Signifies that this Linn DS/DSM has shared control by more than one Linn Account. If shared TO this account, then it states who has shared it.
- In the example below:
- Merlin Kustom DSM: is linked to the current Linn Account only
- Merlin Lounge: is linked to the current Linn Account AND SHARED with another Linn Account. You can share this to multiple Linn Accounts and well as be removed from other Linn Account(s).Or finally remove this Linn DS/DSM from your account.
- TV Room: has been SHARED with this Linn Account. This only has the option to return full Konfiguration to the original Linn Account
Filtering the Music systems using the Linn Account that has been shared from/to
- If you have a lot of Music systems to manage, and you have either been given sharing access. Or, if you have shared with another Linn Account, you can filter the listing.
- Press the to open the filter window and select the Linn Account to up wish to see.
Room Designs
- This is the Room library used in Space optimisation. This will allow you to Create / Edit rooms that are used in new or existing Space Optimisations.
Check Linn_Account_Space_Optimisation for more information.
Software Updates
- When you first select this page it appear to be empty. Give this a few seconds and it will report any updates with any products linked to your Linn Account.
- Select a relevant products and "UPDATE NOW"
- This will tell the Linn DS/DSM to remotely update the Linn DS/DSM firmware to the requested version.
If you have any issues then go to the local network and use the Linn App to load or recover your Linn DS/DSM software.
Notifications
- This will report any downtime or changes to the Manage system pages
Help & Support
- This section gives you a linked to the Linn Customer Helpline and also allows you to create "Tickets", with real-time product information for product trouble and support.

|
Click on this page, and it will take you to the Linn webpage with contact details for the Linn Helpline
|

|
For Problems, or Enhancements, click on the Contact Linn
|
You will then be prompted with these pop-up pages
|
Select report a problem or enhancement:
Now give as much detail as you can,
For problems: details of the issue you are having and how this can be replicated.
For an enhancement, please add in as much detail as possible.
Fill in your forename, surname and email address to allow the Linn Helpline to reply to you.
|

|
|
|
In the Device Logs window:

A DS will need to be manually picked from the list to specify which logs to attach.
(Filter options are available here, same as the music systems list.)
These logs, if taken quickly at the time of the issue, can pass a record of what is happening within the product.
In the Bowser Activity window:

This will record any subsequent actions, within Manage Systems.
This will show the Linn personel the issue you are having on screen.
|
FAQ's
My Linn DS/DSM will only show offline even though it is power on
This can be caused by a loss of internet access on the Linn DS/DSM.
Try the following:
- Power cycle the Linn DS/DSM. That is, remove mains power from the Linn DS/DSM for a minimum of 30 seconds and reapply mains.
- Wait for approx 5 minutes for the Linn DS/DSM to power on and do house-keeping.
- On the manage systems web-browser, press F5 or SHFT-F5 to refresh the screen.
How do I remove a Linn DS/DSM from my Linn Account
There are THREE ways to do this:
1. If you are on the same network as the Linn DS/DSM then:
- a) go into Kazoo Settings > Linn Account and log in to the Linn Account that currently has the Linn DS/DSM
- b) This will give a list of Linn DS/DSM on this network and REMOVE the required Linn DS/DSM.
- c) Complete
2. If you do not have access the Linn Account that the Linn DS/DSM is linked to:
- a) Open Konfig
- b) Goto the ADVANCED tab
- c) Select the Linn DS/DSM to be unlinked from the Linn Account and hit the <RESTORE>. This will do a factory reset on the Linn DS/DSM and remove this from the Linn Account.
3. If the Linn DS powered off and is on your Linn Account and you want unlink it from your Account:
- a) Open Manage account
- b) Select the Linn DS/DSM you want to remove. If the room is OFF (that is, no mains power), the web-page will state that the Room is offline. This page will also give you the option to REMOVE MUSIC ROOM. Select this option to unlink this Linn DS/DSM from your Linn Account.