New Product template

Contents
Product info
- Product Name: XYZ
- Date of Introduction: September 2199
- Type: Integrated digital music player and preamplifier
- Versions:
- Features
Manuals
Installation
Please read the following carefully before installing the unit in your system – your unit may need to be reconfigured by your Linn retailer.
For further assistance, try our customer support pages .
Stable mains supply
- 100-120V rms 50~60Hz,
- 220-240V rms 50~60Hz
We recommend that your ****** are unpacked, installed and adjusted by an authorised Linn retailer. To get the best from your Linn product, it is important that they are positioned and levelled correctly.
Please note, in order to achieve the very best from your Linn product, some adjustment may be required after positioning, levelling and connecting. See the Fine adjustment section.
Unpacking
Fitting the Stand
Positioning
Hardware Upgrades
- *Selekt 2-channel line-out cartridge - 2 channel line level audio cartridge that can be used in Stereo or assigned a Surround sound channel setup.
- *Selekt 2-channel power amplifier cartridge - 2 channel line level audio cartridge that can be used in Stereo, Bi-Amp, Tri-Amp or assigned a Surround sound channel setup
- *Selekt combined power amplifier and line-out cartridge - 2 channel cartrdige with:
- * One channel for Line-level playback (for Sub-Woofer) and
- * One channel for Power Amplifier Centre Channel playback. (This is designed to be used with other Selekt Power Amplfier cartridges.)
- *Selekt Standard DAC module - DAC module using the standard DAC
- *Selekt Katalyst DAC module - DAC module using the Katalyst DAC
- *Selekt HDMI Switching module & Linn Surround module - This allows the addition of HDMI switching and a further upgrade to Surround sound
Note:'
- It should be noted that information may at times be out of date and should not be used as a current list of what is upgrades available.
- Adding more than one cartridge and/or an HDMI switching module on early Selekt DSM's may require a power supply upgrade. Please information can be found by your Linn Retailer at time of ordering.
Support
Latest software
Manuals
Controlling the product User Guide
Product setup:Manage Systems user manual
Third Party Software Copyright
Network Setup
Front Panel

- Creation on PINS can be found in the Kazoo Manuals for
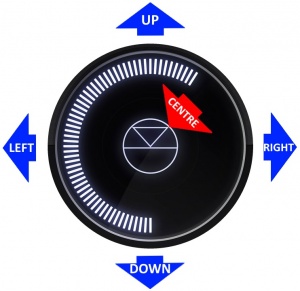
- GO INTO SLEEP:
- Press the dial CENTRE and continue to press the CENTRE (approx 2seconds) until the volume indicator dial starts to decrease.
- BRING OUT OF SLEEP:
- Press any of the UP/DOWN/LEFT/RIGHT or CENTRE of the dial.
- SOURCE SELECT
- Press the dial DOWN to list the inputs available menu
- Scroll UP/DOWN the selection.
- Press RIGHT to select source or LEFT to cancel selection menu
- PLAY/STOP/PAUSE- MUTE/UNMUTE
- A quick press of the dial CENTRE will toggle between PLAY and STOP/PAUSE
- (Radio-PLAY/STOP, Playlist-PLAY-PAUSE).
- (Other sources-Mute/Unmute).
- TRACK/PRESET PREV/NEXT
- A quick press of the dial LEFT/RIGHT jump to Playlist tracks or Radio stations.
- Volume
- Rotate dial clockwise to increase volume, anti-clockwise to reduce volume. The dial indicators will tell you the present volume.
- SURROUND TRIM
- With the Selekt DSM out of Sleep mode
- Press dial UP to enter Settings menu
- Press RIGHT to select or LEFT to cancel Settings menu
- Scroll UP/DOWN to highlight "Surround"
- Press RIGHT to select or LEFT to cancel Surround menu
- Select a the channel and trim with UP/DOWN
- SELEKT INFORMATION
- Software version
- With the Selekt DSM out of Sleep mode
- Press dial UP to enter Service menu
- Scroll UP/DOWN to highlight "Software Update"
- Press RIGHT to select or LEFT to cancel Service menu
- Selekt "Properties" (Room name, device name, IP address etc)
- Press dial UP to enter Service menu
- Scroll DOWN to highlight "Properties"
- Press RIGHT to select or LEFT to cancel Properties menu
- Selekt "Settings" (|Balance, Lipsync, Surround volumes etc)
- Press dial UP to enter Service menu
- Scroll DOWN to highlight "Settings"
- Press RIGHT to select or LEFT to cancel Settings menu
Note: Cancel any previous menus by pressing LEFT key.
My Selekt DSM has a RED Linn symbol on the dial, what does this mean?
 If you do not have a live network/LAN connection on the Selekt DSM the Linn symbol on the dial will go red.
- If your network cable is plugged in and your network/LAN is alive then check that you have the network/LAN cable plugged into the LAN socket (#3 on the back panel diagram) and NOT the Exakt socket (#10 back panel diagram).
 After a live network/LAN connection is made the LINN symbol on the dial will turn white after 5-10 seconds.
I get a flashing Linn icon on the volume dial, what does this mean?

- This means that the Selekt DSM is in :
- Searching for Exakt speakers after being woken from Standby (typically only flashes for a couple of seconds after waking from Standby)
- or
- FALLBACK mode : Fallback is a state that means that the product is waiting for a software update. To stop this flashing either:
What does the shimmering dial mean?

This is to show that the Selekt DSM is starting up after a mains power on. It will typically do this in 30–45 seconds, but if the Linn Selekt DSM is performing a software update, this may take a little longer.
What does a dim/bright dial mean?

This is to show when the Selekt DSM is in Mute mode.
- To show the current volume value and mute condition.
- This is your Selekt DSM telling you that a software update is available.
- The update is not compulsary, just an indication that an update is available.
- A Software update is performed by the Manage Systems - Software Updates, IR handset or Linn App. Instructions on how to do this update are listed HERE
- Using the IR handset i button to wake up and furhter presses allow you to scroll throught the display available.
- On the Playlist this is typically Artist, Album & codec information. The lower bar will show the track position information
- On a Radio source this will show the information provided by the radio station and the coedc information
- ......
- Show the Play/Stop/Pause/Buffering symbol to show the current transport state.
Back Panel Connections
Selekt DSM with Line-level cartridge

Information of what each connector is and a basic specification of these connectors
- MAINS INPUT - To connect to the mains electricity supply.
- FALLBACK - To put the device into Fallback mode (used when reprogramming)
- ETHERNET - To connect to a network (100Base-T)
- HDMI ARC (HDMI)5 - To connect to a TV Audio Return Channel (ARC) connection
- USB6 - To connect to a PC/MAC for Class 2.0 PCM USB Audio playback
- DIGITAL INPUTS (Toslink)5 - To connect sources with Toslink (optical) digital outputs.
- ANALOGUE INPUTS (RCAline level)1 & 2 - To connect sources with RCA analogue outputs.
- DIGITAL INPUTS (Spdif)5 - To connect sources with Spdif (RCA) digital outputs.
- ANALOGUE INPUTS (RCA MM/MC)2 & 3 - To connect a turntable with unbalanced (RCA) outputs.
- EXAKT LINK - To connect to Exakt compatible devices (Exaktbox, Exakt Speakers, Urika II etc)
- PHONO GROUND - To connect to a turntable grounding terminal.
- ANALOGUE OUTPUTS (XLR & RCA,variable level)4 - To connect to a power amplifier.
- POWER SWITCH - Mains power switch
Notes:
1 Analogue inputs: Input range adjustable 1V-4V rms, impedance 10kΩ
2 with ADC of 192kHz/24bit
3 RCA MM/MC:
- MM input impedance 47k, 100pf
- MM max voltage (1kHz): 67mV rms. (Gain +40dB)
- MC input impedance 100Ω 470p
- MC max voltage (1kHz): 5.5mV rms (Gain +54dB)
4 Analogue Output:
- RCA - 2V rms, 300Ω
- XLR - 4V rms, 600Ω
5 Digital inputs: 32kHz, 44.1kHz, 48kHz, 88.2kHz, 96kHz, 176.4kHz, 192kHz
6 USB Supported Sample rates: 44.1, 48, 88.2, 96, 176.4, 192