Klimax DSM /3 /Setup
Linn Setup Guide:
How to set up the Linn Klimax DSM
Contents
- 1 Product info
- 2 Initial Configuration
- 2.1 Unpacking
- 2.2 Wiring
- 2.3 BACKPANEL
- 2.4 Download App
- 2.5 Control of the Linn DS/DSM using a PC/MAC/Tablets & Phones
- 2.6 Setup and changes
- 2.7 Space Optimisation
- 2.7.1 What are the differences between the Konfig Space Optimisation and Linn Account (Kloud Konfig) Space Optimisation?
- 2.7.2 What is the difference between Space Optimisation & Space Optimisation+?
- 2.7.3 Is the Linn Account Manage systems only available for the new Linn DSM's
- 2.7.4 Why don't you use a Microphone in Space Optimisation?
- 2.7.5 Can I use "Linn Account Space Optimisation" with my Exakt system?
- 3 Using the Linn Klimax DSM
- 4 Spotify Connect
- 5 ROON
- 6 AIRPLAY
- 7 Troubleshooting
- 8 Technical Specifications
Product info
| • Product Name: |
KLIMAX DSM/3
|
| • Date of Introduction: | March 2021
|
|
| |
| • Type: | Digital music player with Organik
|
- Features
Hardware Upgrades
Note: It should be noted that this upgrade information may at times be out of date and should not be used as a current list of what upgrades are available
Initial Configuration
- Considerations before installation, make sure that you have
-
- A mains power socket
- Stable mains supply
- 100-120V rms 50~60Hz,
- 220-240V rms 50~60Hz
- An Ethernet/LAN connection to your broadband Router. (You may need to connect it to a wired network connection to allow setup and configuration. Then you can use the Wifi capabilities of your network to control and stream music to the Klimax DSM/3)
- The HDMI connection from you TV is not too long and is the correct specification cables.
 Linn recommend using Premium High Speed Certifiied HDMI cables for an optimal experience.
 - The product has adequate ventilation for operation.
- Positioning Information
Hardware Upgrades
Note: It should be noted that this upgrade information may at times be out of date and should not be used as a current list of what upgrades are available
Unpacking
- Remove the Klimax DSM from the packing and check you have all of the accessories.
Wiring
BACKPANEL
Klimax DSM (AV variant)
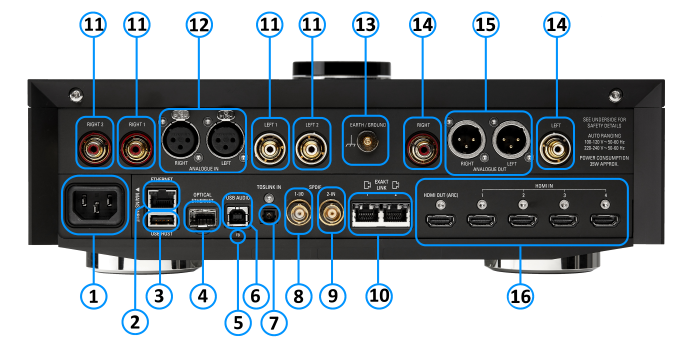
Information of what each connector is and a basic specification of these connectors
- MAINS INPUT - To connect to the mains electricity supply.
- ETHERNET - To connect to a network (100Base-T / 1000Base-T)
- USB-A socket: for Service Use only This socket does not accept USB sticks / USB-Drives
- FIBRE ETHERNET - SFP module socket to connect to a fibre network
- FALLBACK - To put the device into Fallback mode (used when reprogramming)
- USB-B socket - To connect to a PC/MAC for Class 2.0 PCM Asynchronous USB Audio playback6
- OPTICAL DIGITAL INPUT (TOSLINK)5 - To connect sources with TOSLINK (optical) digital outputs.
- DIGITAL INPUT/OUTPUT (SPDIF)5 - To connect sources with SPDIF(BNC) digital outputs or use as an SPDIF digital output.
- DIGITAL INPUT (SPDIF)5 - To connect sources with SPDIF(BNC) digital outputs.
- EXAKT LINK - To connect to Exakt compatible devices (Exaktbox, Exakt Speakers, Urika II etc)
- ANALOGUE INPUTS (RCA-Line level)1 & 2 - To connect sources with RCA analogue outputs.
- BALANCED INPUTS'(XLR-Line level)1 & 2 -- To connect sources with balanced (XLR) outputs.
- PHONO GROUND - To connect to a turntable grounding terminal.
- ANALOGUE OUTPUT (RCA,variable level)3 & 4 - To connect to a power amplifier, headphones etc..
- ANALOGUE OUTPUT (XLR,variable level)4 - To connect to a power amplifier, headphones etc...
- HDMI INPUTS' & HDMI OUTPUT with ARC/eARC (HDMI)7 - To connect sources with 1.4 & 2.07 HDMI output and TV with ARC capability.
Notes:
1 Analogue inputs: Input range adjustable 1V-4V rms, impedance 10kΩ
2 with ADC of 192kHz/24bit
3 RCA Output Audio transformer option ONLY
4 Independently switchable allowing either RCA or XLR, RCA and XLR outputs. Check HERE
5 Digital inputs: 32kHz, 44.1kHz, 48kHz, 88.2kHz, 96kHz, 176.4kHz, 192kHz
- SPDIF1 can be converted to a 2-channel SPDIF OUTPUT, audio that will support up to 192KHz via Manage Systems
- This output is a fixed volume control output..
- Only supports FL/FR channel output. (even if playing Surround audio)
- SPDIF2 is ALWAYS a SPDIF INPUT and CANNOT be configured as a SPDIF output.
- SPDIF1 can be converted to a 2-channel SPDIF OUTPUT, audio that will support up to 192KHz via Manage Systems
6 USB Supported Sample rates: 44.1k, 48k, 88.2k, 96k, 176.4k, 192k, 384k
7![]() Linn recommend using Premium High Speed Certifiied HDMI cables for an optimal experience. (supporting HDCP 2.2 up to and including 60Hz UHD.)
Linn recommend using Premium High Speed Certifiied HDMI cables for an optimal experience. (supporting HDCP 2.2 up to and including 60Hz UHD.)
Klimax DSM (Music variant)
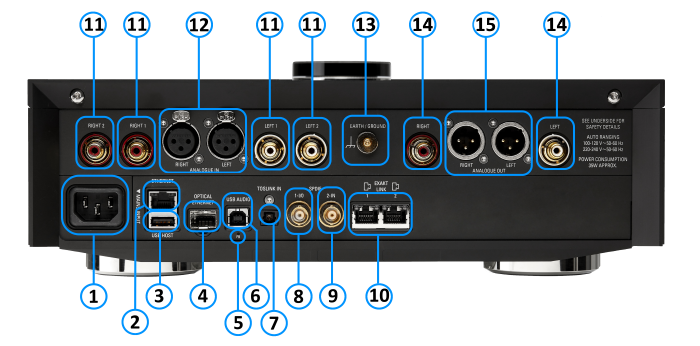
Information of what each connector is and a basic specification of these connectors
- MAINS INPUT - To connect to the mains electricity supply.
- ETHERNET - To connect to a network (100Base-T / 1000Base-T)
- USB-A socket: for Service Use only This socket does not accept USB sticks / USB-Drives
- FIBRE ETHERNET - SFP module socket to connect to a fibre network
- FALLBACK - To put the device into Fallback mode (used when reprogramming)
- USB-B socket - To connect to a PC/MAC for Class 2.0 PCM Asynchronous USB Audio playback6
- OPTICAL DIGITAL INPUT (TOSLINK)5 - To connect sources with TOSLINK (optical) digital outputs.
- DIGITAL INPUT/OUTPUT (SPDIF)'5 - To connect sources with SPDIF(BNC) digital outputs or use as an SPDIF digital output.
- DIGITAL INPUTS (SPDIF)5 - To connect sources with SPDIF(BNC) digital outputs.
- EXAKT LINK - To connect to Exakt compatible devices (Exaktbox, Exakt Speakers, Urika II etc)
- ANALOGUE INPUTS (RCA-Line level)1 & 2 - To connect sources with RCA analogue outputs.
- BALANCED INPUTS'(XLR-Line level)1 & 2 -- To connect sources with balanced (XLR) outputs.
- PHONO GROUND - To connect to a turntable grounding terminal.
- ANALOGUE OUTPUT (RCA,variable level)3 & 4 - To connect to a power amplifier, headphones etc..
- ANALOGUE OUTPUT (XLR,variable level)4 - To connect to a power amplifier, headphones etc...
Notes:
1 Analogue inputs: Input range adjustable 1V-4V rms, impedance 10kΩ
2 with ADC of 192kHz/24bit
3 RCA Audio transformer option ONLY
4 Independently switchable allowing either RCA or XLR, RCA and XLR outputs. Check HERE
5Digital inputs: 32kHz, 44.1kHz, 48kHz, 88.2kHz, 96kHz, 176.4kHz, 192kHz
- SPDIF1 can be converted to a 2-channel SPDIF OUTPUT, audio that will support up to 192KHz via Manage Systems
- This output is a fixed volume control output..
- Only supports FL/FR channel output. (even if playing Surround audio)
- SPDIF2 is ALWAYS a SPDIF INPUT and CANNOT be configured as a SPDIF output.
- SPDIF1 can be converted to a 2-channel SPDIF OUTPUT, audio that will support up to 192KHz via Manage Systems
6 USB Supported Sample rates: 44.1k, 48k, 88.2k, 96k, 176.4k, 192k, 384k
Klimax DSM (Hub variant)
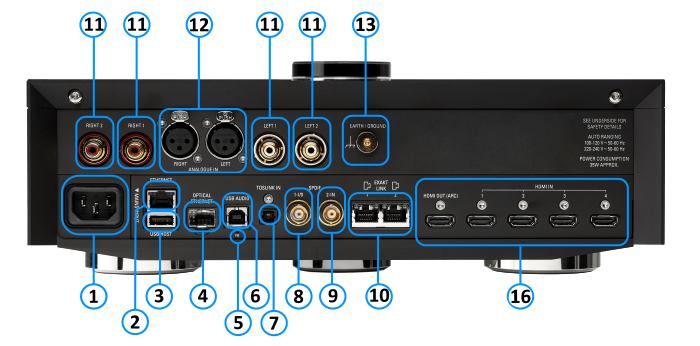
Information of what each connector is and a basic specification of these connectors
- MAINS INPUT - To connect to the mains electricity supply.
- ETHERNET - To connect to a network (100Base-T / 1000Base-T)
- USB-A socket: for Service Use only This socket does not accept USB sticks / USB-Drives
- FIBRE ETHERNET - SFP module socket to connect to a fibre network
- FALLBACK - To put the device into Fallback mode (used when reprogramming)
- USB-B socket - To connect to a PC/MAC for Class 2.0 PCM Asynchronous USB Audio playback4
- OPTICAL DIGITAL INPUT (TOSLINK)3 - To connect sources with Toslink (optical) digital outputs.
- DIGITAL INPUT/OUTPUT (SPDIF)3 - To connect sources with SPDIF(BNC) digital outputs or use as a SPDIF digital output.
- DIGITAL INPUTS (SPDIF)3 - To connect sources with SPDIF(BNC) digital outputs.
- EXAKT LINK - To connect to Exakt compatible devices (Exaktbox, Exakt Speakers, Urika II etc)
- ANALOGUE INPUTS (RCA-Line level)1 & 2 - To connect sources with RCA analogue outputs.
- BALANCED INPUTS'(XLR-Line level)1 & 2 -- To connect sources with balanced (XLR) outputs.
- PHONO GROUND - To connect to a turntable grounding terminal.
- 16 HDMI INPUTS' & HDMI OUTPUT with ARC/eARC (HDMI)5 - To connect sources with 1.4 & 2.05 HDMI output and TV with ARC capability.
Notes:
1 Analogue inputs: Input range adjustable 1V-4V rms, impedance 10kΩ
2 with ADC of 192kHz/24bit
3 Digital inputs: 32kHz, 44.1kHz, 48kHz, 88.2kHz, 96kHz, 176.4kHz, 192kHz
- SPDIF1 can be converted to a 2-channel SPDIF OUTPUT, audio that will support up to 192KHz via Manage Systems
- This output is a fixed volume control output..
- Only supports FL/FR channel output. (even if playing Surround audio)
- SPDIF2 is ALWAYS a SPDIF INPUT and CANNOT be configured as a SPDIF output.
- SPDIF1 can be converted to a 2-channel SPDIF OUTPUT, audio that will support up to 192KHz via Manage Systems
4 USB Supported Sample rates: 44.1k, 48k, 88.2k, 96k, 176.4k, 192k, 384k
5 ![]() Linn recommend using Premium High Speed Certifiied HDMI cables for an optimal experience. (supporting HDCP 2.2 up to and including 60Hz UHD.)
Linn recommend using Premium High Speed Certifiied HDMI cables for an optimal experience. (supporting HDCP 2.2 up to and including 60Hz UHD.)
Download App
Control of the Linn DS/DSM using a PC/MAC/Tablets & Phones
Initial installation
- Linn App
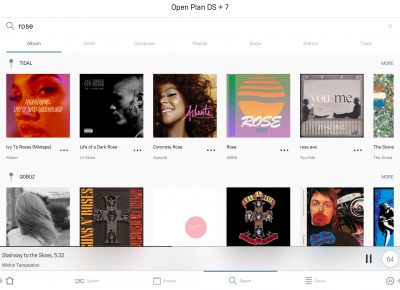
The Linn DS/DSM can be done from many control points at the same time.
- The name of this control App/software is Linn App
or
- Kazoo (Aug 2023 - Ceased all development)
The Linn DS/DSM can be done from many control points at the same time.
Note: from April 2023 : Tidal have removed support for the Linn Kazoo application on ALL platforms. We recommend trying the new Linn app (available on iOS and Android)
- The name of this control App/software is KAZOO..
- Kazoo control App/software is available for
-
| Windows Kazoo download - from April 2023 : Tidal have removed support for the Linn Kazoo application on ALL platforms. We recommend trying the new Linn app (available on iOS and Android)
-
- Kazoo control App/software is available for
MAC OSX Kazoo download- from April 2023 : Tidal have removed support for the Linn Kazoo application on ALL platforms. We recommend trying the new Linn app (available on iOS and Android)
 Android Kazoo for Android Phone/Tablet download
- from April 2023 : Tidal have removed support for the Linn Kazoo application on ALL platforms. We recommend trying the new Linn app (available on iOS and Android)
Using the Linn DS/DSM control software
As illustrated by the above section, there are multiple software/Apps for different control devices. Although Kazoo has the same style of control in each device, there are minor differences depending on what your control device is. This is why we have different Manuals.
These manuals should only be used as a basic guide for what the buttons can do. We would recommend just using the App/Software and only using the guide if you are having difficulty or want to see what more features are available.
These guides may show some features that are not available, or not have not been configured to work in your system. If you're required additional information, then please contact your Retailer or Linn Support Site
- iPad / iPhone / Android Linn App
- Windows Kazoo
- from April 2023 : Tidal have removed support for the Linn Kazoo application on ALL platforms. We recommend trying the new Linn app (available on iOS and Android)
- Windows7
- Windows 8 / 10 / 11
- MAC/MACBook Kazoo
- from April 2023 : Tidal have removed support for the Linn Kazoo application on ALL platforms. We recommend trying the new Linn app (available on iOS and Android)
- up to Yosemite (OSX 10.10)]
- El Capitan (10.11 >)
- Kazoo User Guide for iMac El Capitan (10.11 >) onwards.. (including OSX Catalina 10.15)
- iPad/iPhone Kazoo
- from April 2023 : Tidal have removed support for the Linn Kazoo application on ALL platforms. We recommend trying the new Linn app (available on iOS and Android)
- Android Kazoo
- from April 2023 : Tidal have removed support for the Linn Kazoo application on ALL platforms. We recommend trying the new Linn app (available on iOS and Android)
Setup and changes
Bluetooth & Wifi
Bluetooth and Wifi features are available on Klimax DSM/3
Quick setup can be done using the Pin buttons or the Klimax dial
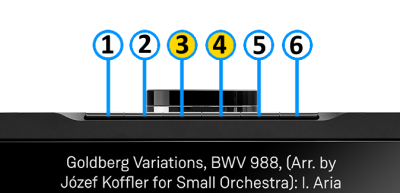
Setting up Bluetooth using the Pin buttons
- 1. Select the Bluetooth menu on your device for pairing
- 2. Press and hold Pins 3 & 4 on the Klimax DSM until "Bluetooth: Pairing..." appears on the front panel display
- 3. Select the Klimax DSM from the list of available Bluetooth devices on your device for pairing
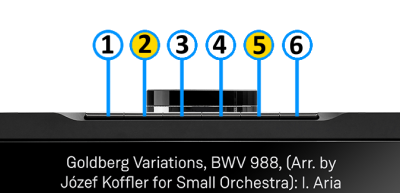
Setting up Wifi using the Pin buttons
- 1. Remove/disconnect any cable LAN connections from the Klimax DSM
- 2. Press the WPS button on your internet router
- 3. Press and hold Pins 2 & 5 on the Klimax DSM until "WPS: Connecting..." appears on the front panel display
- 4. The Klimax DSM should now automatically connect to the Wifi network
- Press and hold Pins 1, 2 & 5 to forget the Wifi network
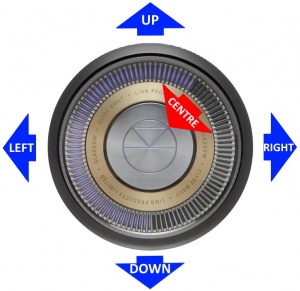
Setting up Bluetooth or Wifi using the Klimax dial
- 1. With the Klimax DSM out of Sleep mode. (If Wifi setup disconnect any cable LAN connections)
- 2. Press dial UP to enter Service menu
- 3. Scroll UP/DOWN to highlight "Connect"
- 4. Press RIGHT to select this menu
- 5. Scroll UP/DOWN to highlight the desired option and RIGHT to select
- Wifi (WPS): put your router into WPS discovery mode for auto pairing of the Klimax DSM
- WIfi (Reset): to clear any previous Wifi settings
- Bluetooth Pair: configure you Bluetooth device for pairing before selecting
- Press LEFT to cancel Service menu
Alternative Wifi Setup Method via Web Browser
- 1. With the Klimax DSM out of Sleep mode and cable LAN connections removed from Klimax DSM
- 2. Go to the Wireless settings on your device (e.g. iPad)
- 3. Find the Klimax DSM on the list of available networks. It will be called Klimax DSM - <serial number>
- 4. Select this Linn DSM as the wireless network
- 5. Now open a web browser on your device and type "https://setup.linn.co.uk" in the address bar
- 6. The Klimax DSM Wifi Setup page should now be displayed
- 7. Select the Wifi network you want to connect to
- 8. Enter the passkey for the Wifi network
- 9. Click on 'Set Network'
Note: If you cannot get any page from "https://setup.linn.co.uk", this may be due to added security on your phone/tablet. Check that the:
- VPN is disabled on your phone or tablet
- Go to Settings > WiFi > Select the Unsecured Network. Then tap the “i” next to that Wi-Fi network you’re trying to log in to and toggle OFF both “Auto-Join” and “Auto-Login.”
- Disable Location Services for Wi-Fi System Services for iPhone/iPad
- Go to Settings > Privacy > Location Services iOS system services for location and privacy settings
- Tap on System Services near the bottom of this page
- Locate "Wi-Fi Networking" or "Networking & Wireless" and toggle it OFF
- Retry the connection to "https://setup.linn.co.uk"
- This is extra network security and recommend that it is turned back ON after setting up the Linn DSM.
Wifi can also be setup using the Konfig App below
There are two ways to configure, (if required), your Linn DS/DSM player/Speakers etc:
Before you do anything you will need to have a Linn Account. This is a simple process and can only be performed using the Kazoo App or Linn App.
Details on how to create your Linn Account and how to use Manage systems can be found in the Manage Systems page.
This Konfig App can be downloaded from KONFIG App
This will allow changing the Room name, Linn DS/DSM name, input name and other settings. This can be changes by yourself and/or your Linn Retailer.
Details of most of the options are listed in the Konfig Manual, this covers many options
Konfig has been deprecated and replaced by Manage Systems.
- Note: Manage Systems has taken over from Konfig and we would prefer you to use Manage Systems to setup an configure your Linn products.
Space Optimisation
 for ALL Linn DS/DSM products |
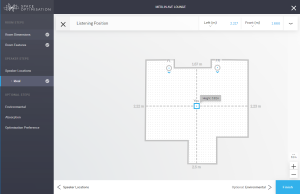 Linn Account Space Optimisation from Davaar64 ⇒ |
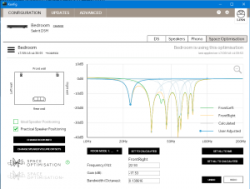 Linn Konfig Space Optimisation & Space Optimisation+ |
Linn Space Optimisation is currently configurable using either the Konfig app or the Linn Account Manage systems.
Click the above picture/icon for more information of that version of Space Optimisation.
More details of what Space Optimisation can be found can be found at www.Linn.co.uk
What are the differences between the Konfig Space Optimisation and Linn Account (Kloud Konfig) Space Optimisation?
- The new version of Space Optimisation uses highly sophisticated acoustic modelling to model the interactions between your speakers and the room; this acoustic modelling is based on the finite-difference time-domain method. A simple two-dimensional analogy to this method of acoustic modelling is of a fishing net laid over a pond; each knot in the net defines a discrete measurement location, so that when a stone is thrown into the pond, we can track the resulting ripple by measuring its height at each knot.
- The spatial discretisation employed by this method of acoustic modelling allows the new version of Space Optimisation to correctly consider the effects of:
- non-rectangular rooms;
- the placement of features like doors and windows;
- And the location and rotation of your speakers.
- Furthermore, the time-domain formulation of this method of acoustic modelling means that the new version of Space Optimisation can now reduce both the energy and decay time of any artificial distortions caused by the interactions between your speakers and the room, resulting in both a flat frequency response and a uniform decay time. :Finally, the new version of Space Optimisation has been designed to give a better balance of low- and mid-frequency energy.
What is the difference between Space Optimisation & Space Optimisation+?
- This is applicable to both Linn Konfig and Manage System/Kloud Konfig
- Space Optimisation is for NON-Exakt systems. This uses the direct analogue outputs of the Linn DS/DSM
Is the Linn Account Manage systems only available for the new Linn DSM's
- Both Applications can be used for ALL Linn Products.
- The only limitation is that the Linn DS/DSM must have Davaar64 to run Linn Account Manage systems]
Why don't you use a Microphone in Space Optimisation?
- The aim of Space Optimisation is to remove the effects of your room, to uncover the unique acoustic characteristics of your speakers; after all, this is what you fell in love with when buying your speakers. To achieve this, Space Optimisation needs to understand both the interactions between your speakers and the room and the unique acoustic characteristics of your speakers; the unique acoustic characteristics of your speakers are then subtracted from the interactions between your speakers and the room, leaving only the effects of your room.
- An acoustic measurement of the interactions between your speakers and room can have many sources of error which may affect the accuracy and repeat-ability of the measurement, including the choice of measurement stimulus, such as MLS or a log chirp; external noise, such as traffic noise and vibration; quality and calibration of the microphone, which can introduce distortion; and the microphone location, which can be sensitive to within a few centimetres. The use of acoustic modelling removes these sources of error: the model can apply an ideal impulse as stimulus; the modelling domain is free from noise; the model can use an ideal microphone; and the listening location is well-defined. It can thus be seen that acoustic modelling has a clear advantage over acoustic measurement in understanding the interactions between your speaker and the room.
- The unique acoustic characteristics of your speakers depend on many factors, including the shape and size of the drive units and ports; the constructive and destructive interference between the drive units, ports and any cabinet-edge diffraction sources; and the angle between the listening location and your speakers. Therefore, a simple on-axis anechoic measurement of your speakers is insufficient information; what is actually required is an anechoic measurement with your speakers in the same configuration as you have them in your home. While some manufacturers do publish anechoic measurements of their speakers, both on- and off-axis, it is extremely unlikely that they will have performed an anechoic measurement of your speakers in the same configuration as you have them in your home. The acoustic modelling of such a scenario is, however, straightforward; the model can simply turn your room into an anechoic chamber to obtain the unique acoustic characteristics of your speakers in the same configuration as you have them in your home. It can thus be seen that acoustic modelling once again has a clear advantage over acoustic measurement in understanding the unique acoustic characteristics of your speakers.
- From the above, it is clear that acoustic modelling is the best approach to Space Optimisation.
Can I use "Linn Account Space Optimisation" with my Exakt system?
- From November 2019 you can now use Linn Account Space Optimisation with Stereo and Surround Exakt systems.
Using the Linn Klimax DSM
Top dial and front panel operation
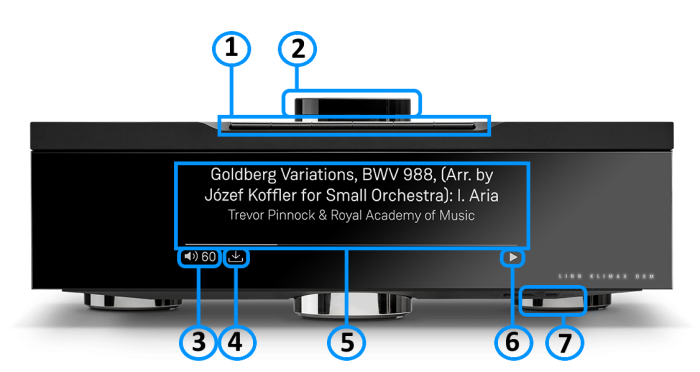
- * Press the button gently, turned as a "half press" to check what the button will do.
- * Fully press the press to button to action/select this PIN operation.
- Creation on PINS can be found in the Kazoo Manuals for
- GO INTO SLEEP:
- Press the dial CENTRE and continue to press the CENTRE (approx 2seconds) until the volume indicator dial starts to decrease.
- BRING OUT OF SLEEP:
- Press any of the UP/DOWN/LEFT/RIGHT or CENTRE of the dial.
- SOURCE SELECT
- Press the dial DOWN to list the inputs available menu
- Scroll UP/DOWN the selection.
- Press RIGHT to select source or LEFT to cancel selection menu
- PLAY/STOP/PAUSE
- A quick press of the dial CENTRE will toggle between PLAY and STOP/PAUSE
- (Radio-PLAY/STOP, Playlist-PLAY-PAUSE).
- TRACK/PRESET PREV/NEXT
- A quick press of the dial LEFT/RIGHT jump to Playlist tracks or Radio stations.
- Volume
- Rotate dial clockwise to increase volume, anti-clockwise to reduce volume. The dial indicators will tell you the present volume.
- SURROUND TRIM
- With the Klimax DSM out of Sleep mode
- Press dial UP to enter Settings menu
- Press RIGHT to select or LEFT to cancel Settings menu
- Scroll UP/DOWN to highlight "Surround"
- Press RIGHT to select or LEFT to cancel Surround menu
- Select a the channel and trim with UP/DOWN
- Klimax DSM INFORMATION
- Software version
- With the Klimax DSM out of Sleep mode
- Press dial UP to enter Service menu
- Scroll UP/DOWN to highlight "Software Update"
- Press RIGHT to select or LEFT to cancel Service menu
- Klimax DSM "Properties" (Room name, device name, IP address etc)
- Press dial UP to enter Service menu
- Scroll DOWN to highlight "Device" or 'Network"
- Press RIGHT to select or LEFT to cancel Properties menu
- Klimax "Settings" (|Balance, Lipsync, Surround volumes, Connect (Blutooth/Wifi) etc)
- Press dial UP to enter Service menu
- Scroll DOWN to highlight "Settings"
- Press RIGHT to select or LEFT to cancel Settings menu
Note: Cancel any previous menus by pressing LEFT key.
- To show the current volume value and mute condition.
- This is your Klimax DSM telling you that a software update is available.
- The update is not compulsory, just an indication that an update is available.
- A Software update is performed by:
- the dial settings to do a Software update,
- Press the UPPER part of the dial. The front panel display will now show System options.
- Press the LOWER part of the dial to highlight "SOFTWARE UPDATE"
- Press the RIGHT part of the dial to select this option.
- If a Software update is available you will see the Agree to update message and pres the RIGHT part of the dial to select this option.
- Manage Systems - Software Updates,
- IR handset or Linn App.
- Instructions on how to do this update are listed HERE
- Using the IR handset i button to wake up and further presses allow you to scroll throught the display available.
- On the Playlist this is typically Artist, Album & codec information. The lower bar will show the track position information
- On a Radio source this will show the information provided by the radio station and the codec information
- ......
- Show the Play/Stop/Pause/Buffering symbol to show the current transport state.
- Main Power switch totally power off the Klimax DSM
Controlling your Linn DS/DSM using and infrared handset
To control your Linn DS/DSM you can you the infra-red handset supplied with product as well as the Linn App, Kazoo. This can be downloaded & installed
The infra-red handset supplied has;-
* Volume control, Mute
* Input control with PIN selection
* Radio station selection using the handset joystick,
* Playlist navigation using the handset joystick,
* Transport control (Play, Stop, Pause, Skip & Search) &
* Music information.
The Technical Specifications of the IR handset can be found HERE
Control of the Linn DS/DSM using a PC/MAC/Tablets & Phones
Initial installation
- Linn App

The Linn DS/DSM can be done from many control points at the same time.
- The name of this control App/software is Linn App
or
- Kazoo (Aug 2023 - Ceased all development)
The Linn DS/DSM can be done from many control points at the same time.
Note: from April 2023 : Tidal have removed support for the Linn Kazoo application on ALL platforms. We recommend trying the new Linn app (available on iOS and Android)
- The name of this control App/software is KAZOO..
- Kazoo control App/software is available for
-
| Windows Kazoo download - from April 2023 : Tidal have removed support for the Linn Kazoo application on ALL platforms. We recommend trying the new Linn app (available on iOS and Android)
-
- Kazoo control App/software is available for
MAC OSX Kazoo download- from April 2023 : Tidal have removed support for the Linn Kazoo application on ALL platforms. We recommend trying the new Linn app (available on iOS and Android)
 Android Kazoo for Android Phone/Tablet download
- from April 2023 : Tidal have removed support for the Linn Kazoo application on ALL platforms. We recommend trying the new Linn app (available on iOS and Android)
Using the Linn DS/DSM control software
As illustrated by the above section, there are multiple software/Apps for different control devices. Although Kazoo has the same style of control in each device, there are minor differences depending on what your control device is. This is why we have different Manuals.
These manuals should only be used as a basic guide for what the buttons can do. We would recommend just using the App/Software and only using the guide if you are having difficulty or want to see what more features are available.
These guides may show some features that are not available, or not have not been configured to work in your system. If you're required additional information, then please contact your Retailer or Linn Support Site
- iPad / iPhone / Android Linn App
- Windows Kazoo
- from April 2023 : Tidal have removed support for the Linn Kazoo application on ALL platforms. We recommend trying the new Linn app (available on iOS and Android)
- Windows7
- Windows 8 / 10 / 11
- MAC/MACBook Kazoo
- from April 2023 : Tidal have removed support for the Linn Kazoo application on ALL platforms. We recommend trying the new Linn app (available on iOS and Android)
- up to Yosemite (OSX 10.10)]
- El Capitan (10.11 >)
- Kazoo User Guide for iMac El Capitan (10.11 >) onwards.. (including OSX Catalina 10.15)
- iPad/iPhone Kazoo
- from April 2023 : Tidal have removed support for the Linn Kazoo application on ALL platforms. We recommend trying the new Linn app (available on iOS and Android)
- Android Kazoo
- from April 2023 : Tidal have removed support for the Linn Kazoo application on ALL platforms. We recommend trying the new Linn app (available on iOS and Android)
Spotify Connect
- Spotify Connect can now be used on Linn products using firmware Davaar59 (Aug 2017) or later firmware. (That is, if your Linn Klimax DSM has had a software update after Aug 2017 then you can use Spotify connect)
- This allows you to select and play your Spotify music on your Linn DS/DSM players and use the internal volume control on the Linn DS/DSM.
- To connect your Spotify account to the Linn Klimax DSM :
- On your control device, iPad/Android/PC/MAC etc, connect to the same computer network as your Linn DS/DSM
- Start your Spotify app, (if it is already open then close the App, wait a few seconds, and open the App)
- Now check the Spotify Speakers icon to find your Linn DS. (In some cases you may have to power cycle your Linn Klimax DSM before this is seen)
- Select your Linn product, and you can now play to the Linn Klimax DSM from the Spotify account and control the Linn Klimax DSM volume.
This is web controlled and if your Linn Klimax DSM has already been paired with your Spotify account you will be able to control even if you are not on the same ethernet network.(So be careful that if you accidentally select the Linn Klimax DSM as a Spotify speaker and put the volume up high, and you are not at home)
- Check FAQ Spotify Connect for more information.
|
September 2025:We do intend to support Spotify Lossless:
|
WiiM solution to Spotify Lossless
Currently, a solution for Spotify lossless on the Linn DSM's, you can use a WiiM media streamer .
This setup will play at the quality of your Linn DSM – playback uses the Linn DSM’s audio clock, meaning that jitter from the source device’s clock will be removed.
Note: This will ONLY work with Linn DSM, not a Linn DS.
Plug a TOSLINK optical cable from the WiiM media streamer SPDIF OUT digital output directly into a Linn DSM TOSLINK digital input, and use the superior audio DAC of the Linn DSM. This will give you the full Spotify lossless, and any other WiiM supported streaming services into the Linn DSM.
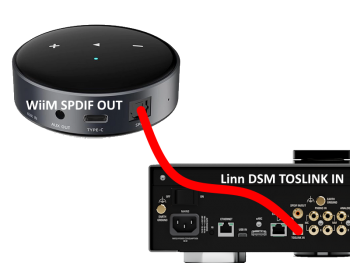
Set up of the WiiM for use with the Linn DSM is easy
- 1. On the WiiM control app, go into Devices, select your WiiM and the select the gear cog on the bottom right, this will bring you into the WiiM setup page.
- 2. In the Sound submenu:
- a).Audio Settings:
- i) We would advise turning "Fixed Volume Output:" ON. This will give the Linn DSM full volume control options
- ii) Optical Output Resolution: set to "Sample rate:" 192kHz & Bit depth: 24bit
- b) .Audio Output:
- i) Change to Optical Out
- a).Audio Settings:
To use the WiiM with the Linn DSM and Spotify:
- 1. Select the TOSLINK input on the Linn DSM
- 2. Open Spotify and Connect to the WiiM *** or the name you have given the WiiM.
- 3. Double check, in your Spotify User profile setting that "Audio Streaming quality" is set to Lossless, Up to 1GB/hr
- 4. Now play Spotify music.
ROON
from Davaar 106 onwards, (March 2024 >), the following products are also Roon Ready and support RAAT audio distribution: |
- Change Roon Protocol to Roon Ready in Manage Systems > Music tab.

- This will also allow you to decide, if the Linn DS/DSM has a DAC that supports DSD playback, which products decode the DSD. Either Roon decoding or Linn DS/DSM direct playback.
All Linn DS/DSM ARE ROON CERTIFIED devices
The Linn DS/DSM requires Davaar63 (May 2018) or later firmware to work with Roon V1.5 and above.(That is, if your Linn DS/DS/HUB has had a software update after May 2018 then you can use Roon)
This allows full hi-res audio, (384k/24bit) playback controlled by the Roon system
Roon Tested Setup
- On Linn DS proxy setups, Linn DS with Linn Kontrol preamplifier connected with RS232, the Roon volume control will not control the Linn Kontrol volume.
- A Roon Core is required in your network system to allow Roon to control your Linn DS/DSM.
- ENABLE the Linn DS/DSM player in the Roon - Settings - Audio - NETWORKED section.
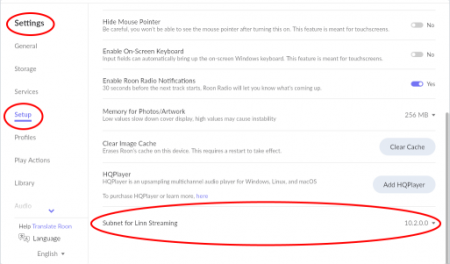
- In the Settings > Setup make sure that the "Subnet of Linn Streaming" is the same as the network that the Linn DS is on. Otherwise, they will not show in the Audio
- On Linn DS proxy setups, Linn DS with Linn Kontrol preamplifier connected with RS232, the Roon volume control will not control the Linn Kontrol volume.
Control
Primary control is through Roon.
Transport IR is disabled on the Linn DS/DSM when the Roon input is selected from Linn DS firmware release Davaar80 (Nov 2020)
Issues
Roon uses the Linn DS/DSM as a media player, the control interface IS Roon.
- • I cannot see any Linn DS in the Audio list...
-
- If you cannot see any Linn DS product in the Audio list then check that with the setup the correct Linn Streaming subnet (network address range).
- E.g. if your Linn DS has IP address 192.168.1.34 then its subnet is 192.168.1.0
- In the Settings > Setup make sure that the "Subnet of Linn Streaming" is the same as the network that the Linn DS is on. Otherwise, they will not show in the Audio tab. You can find the IP address by pressing the * button on the IR handset
- • I am only getting Airplay quality audio from the Linn DS using Roon
-
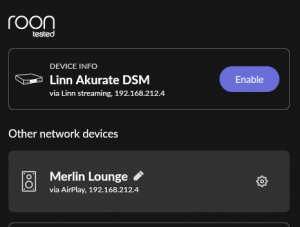
- In Roon: Settings - Audio setup page, you will have devices listed with "via Linn Streaming" and devices listed with "via Airplay".
- Pressing this "ENABLE" button on "via Linn Streaming" will bring this Linn DS player alive.
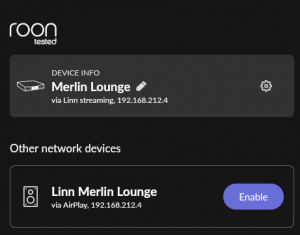
- When you press ENABLE, this will then allow you to rename this Linn DDS; otherwise it will be its default name. E.g. below the "Linn Akurate DSM" - "via Linn Streaming" has been enabled, and I have renamed it "Merlin Lounge".
- The Linn DS/DSM products have to be declared as "Roon Tested", networked devices in the Roon Core settings. (The "AIRPLAY" option for the Linn DS/DSM must be disabled within the Roon Core).
- Click on the Roon Ready - Enable and give a name to the Linn DS/DSM. (In the example below, this has been named Merlin Lounge)
- The Linn DS/DSM products have to be declared as "Roon Tested", networked devices in the Roon Core settings. (The "AIRPLAY" option for the Linn DS/DSM must be disabled within the Roon Core).
- • I press STOP and the Roon starts playing again...
-
- Transport (play / pause / stop) and Volume can be controlled using Kazoo or Ir handset. Although later versions of Roon will counteract these commands. Only use the Roon controller software to control what is playing.
- Linn DS Firmware Davaar80 onwards will disable transport controls whilst on the Roon input of the Linn DS/DSM
- • If I select an external source whilst playing Roon, I need to re-select the source to get it playing.
-
- This can be due to a confusion, as the Roon will send a stop command to the Linn DSM as you exit the Roon source. However, as the Linn DSM will probably have changed to this new source, then this new source is stopped by Roon. On external sources, this can only be recovered by selecting another source and going back to the originally selected source.
- The solution is to Stop or Pause the Roon source BEFORE you change to a different input on the Selekt DSM.
- This can also be reduced by going into Konfig or Manage systems and disabling the "AutoPlay" option.
AIRPLAY
- AirPlay is a Apple protocol that allows wireless streaming media.
- The Linn DS/DSM/HUB can take the audio stream via the "Netlink" input.
- AirPlay is a Apple protocol that allows wireless streaming media.
- Check <HERE> for any issues with Airplay
General products manuals and information
Top Of Page Index
Controlling the product User Guide
Product setup:Manage Systems user manual
Third Party Software Copyright
Troubleshooting
Top Of Page Index
For information on: troubleshooting, Surround options, "Ripping" Cd's , Exakt system then this next section will provide the information that you need:
