
Majik-I
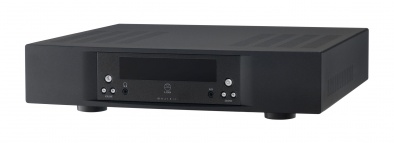
Product info
- Product Name: Majik-I
- Date of Introduction: October 2007 - March 2010
- Type: Integrated preamplifier and power amplifier
Support
Manuals
Majik-I Owners manual - English
Majik-I Owners manual - German
Majik-I Owners manual - Italian
Back Panel Connections

- MAINS INPUT - To connect to the mains electricity supply.
- SPEAKER OUTPUTS - To connect to loudspeakers
- ANALOGUE OUTPUTS (RCA, variable level) - To connect to a power amplifier with unbalanced (RCA) inputs.
- ANALOGUE OUTPUTS (RCA, fixed level) - To connect to an analogue recording device with unbalanced (RCA) inputs.
- ANALOGUE INPUTS (RCA, line level) - To connect sources with unbalanced (RCA) analogue outputs. Input 6 is a configurable input, which is factory set as a moving magnet phono input for connection to turntables. It can be changed by a Linn dealer to a line-level input or a moving coil phono input (moving coil is an optional upgrade).
- EARTH GROUND - To connect to a turntable grounding terminal, or an earthing terminal if no mains earth is available, or to join to the earths of other products in the system to improve performance in areas of poor/noisy electrical earth conditions.
- RS232 PORTS - For connection to Linn source products without ethernet ports.
Front Panel Connections

- MUTE BUTTON - Mutes/unmutes the audio
- FRONT PANEL DISPLAY
- STANDBY BUTTON - Brings the unit in/out of standby
- VOLUME ADJUST BUTTONS - Changes the volume up/down
- HEADPHONE OUTPUT (3.5mm stereo) - To connect to headphones
- AUXILIARY SOURCE INPUT (3.5mm stereo) - To connect to an analogue stereo audio source
- SOURCE ADJUST BUTTONS - Changes to the previous/next source
Installation
Please read the following carefully before installing the unit in your system – your unit may need to be reconfigured by your Linn retailer.
For further assistance, try our customer support page
Setup Menus
The setup menus can be used to configure the Majik-I to customise aspects of its operation to suit your requirements, to operate in a particular type of installation, or to view important functional data.
Entering and Navigating setup Using the Front Panel
- Press and Hold the MUTE button until "Main Menu" appears on the front panel display.
- Navigate up or down the options within a menu using SOURCE+ or SOURCE-
- Press VOLUME+ or STANDBY to select an option.
- Press VOLUME- to go back to the previous option or menu.
- Press MUTE to exit Setup.
NOTE: For each option the currently selected setting will be indicated by a tick beside it.
The Main Menu Menu consists of four sub Menus:
Display Configuration
| OPTION | Settings | Description | Default Setting |
|---|---|---|---|
| Display Brightness |
Auto or Percentage (2% to 100%) |
If set to ‘Auto’, the display brightness will change with the surrounding lighting conditions (dimmer surroundings => dimmer display / brighter surroundings => brighter display). To select ‘Auto’, scroll up or down the percentage settings and the ‘Auto’ option will appear in place of 0%. With ‘Percentage’, you can select a setting between 2% and 100%. The display brightness will (while out of standby) remain set to the specified brightness setting. |
100% |
| Display Content | Source and Volume
Volume Source Last Used |
If set to ‘Source and Volume’, both the currently selected source and the current volume setting will be displayed on the front panel.
If set to ‘Volume’, only the current volume setting will be displayed. If set to ‘Source’, only the current source setting will be displayed. If set to ‘Last Used’, the last setting (source or volume) to be adjusted will remain on the display. Note:The above settings are applicable only when the unit is out of standby, is not in display-sleep mode and is not being adjusted. |
Source and Volume |
| Display Timeout | 1 - 10 seconds | Determines how long, after an adjustment is made, before the display reverts to its ‘Display Content’ setting as detailed above. | 2 seconds |
| Sleep Display Delay | Delay in Minutes and Seconds
(0 seconds - 5 minutes) |
The time setting determines how long after the last command has been received that the display goes to sleep (where only 3 dots are visible on the display).
If set to ‘Off’, the display will not go to sleep |
off |
Source Configuration
| OPTION | Settings | Description | Default Setting |
|---|---|---|---|
| Name | N/A | Allows you to customise the input name as it appears on the display. Any name can be entered, up to a maximum of 12 characters (including spaces).
To change the selected input name:
To exit and go back to the menu, repeatedly press the ◀ key on the handset or VOLUME – on the front panel. |
Socket=Name
Aux=Aux Input 1=MajikCD Input 2=Input 2 Input 3=Input 3 Input 4=Input 4 Input 5=Input 5 Input 6=Phono |
| Type |
Aux (auxiliary) None Satellite Cable TV DAT Tape 2/VCR Tape 1 Phono/Aux 2 Tuner DVD CD |
The source type selected allows the input to be directly selected from the handset (see Handset, page 16), as an alternative to scrolling through the inputs. Notes: Assigning ‘None’ as a source type means the input will not be available for selection – useful for bypassing unconnected source inputs. Not all source types listed are available for direct selection on the handset supplied. Some are only available on older Linn handsets. If more than one source input has been configured as the same source type, repeatedly pressing the relevant key on the handset will scroll through all those that apply. |
Socket=Type Aux=Aux Input1=CD Input2=Aux Input3=Aux Input4=Aux Input5=Aux Input6=Phono |
| Volume Offset | -15 to +15 | Allows the volume level of each source input to be adjusted up or down, relative to the others. Allows you to equalise the volume across all sources. For example if a CD player and a radio tuner are connected, the CD player’s output volume may be louder than that of the tuner so this feature saves volume adjustment when switching between these sources.
Note:The volume difference will not be visible on the volume display – so when switching between offset sources, the volume display will not reflect the offset. |
0 |
Audio Configuration
| OPTION | Settings | Description | Default Setting |
|---|---|---|---|
| Volume Rate | 1/10 -
10/10 |
Allows you to adjust the rate at which the volume changes when the VOLUME – / + keys are held down. | 8/10 |
| Mute Rate | 1/10 -
10/10 |
Allows you to adjust the rate at which the volume mutes/unmutes when the MUTE key is pressed. | 8/10 |
| Volume Limit | 0 - 100 | Allows you to limit the unit’s maximum volume.
For example, if you set the volume limit to 60, the volume cannot be raised above 60. |
100 |
| Volume Preset | 0 - 100 | Allows you to adjust the volume level that the unit will be set to when it comes out of standby. | 40 |
| Headphone Offset | -15 to +15 | Allows the volume of the headphone output to be adjusted up or down, relative to the loudspeaker volume.
This option enables you to compensate for the different outputs of different headphone types. So after adjusting the offset, when headphones are connected or disconnected, the volume should not require adjusting. |
0 |
Unit Configuration
| OPTION | Settings | Description | Default Setting |
|---|---|---|---|
| Selection Timeout | 1 - 10 seconds | Allows you to adjust the time taken for source selection to take effect. A delay allows you time to scroll through and view available sources. | 1 second |
| Startup Source | None
Last Used Aux Phono Input 5 Input 4 Input 3 Input 2 Majik CD |
Allows you to set which source input will be selected when the unit comes out of standby.
Note: The names shown are configured in the Source Configuration options. |
Last Used |
| Standby Record From | None
Last Used Aux Phono Input 5 Input 4 Input 3 Input 2 Majik CD |
Allows you to set a source to be output at TAPE OUT while the unit is in standby.
Note: The names shown are configured in the Source Configuration options. |
Last Used |
| Handset Commands | Enabled
Disabled |
If set to Enable, the unit will accept remote commands from the handset.
If set to Disabled, the unit will not accept remote commands from the handset. (Setup menus will only be accessible and adjustable via the front panel controls.) |
Enabled |
| RS232 Configuration | N/A | This option accesses the RS232 setup sub-menu – used to configure the unit to communicate with other RS232 enabled products. | |
| Unit Defaults | N/A | This option accesses the defaults sub-menu – used for saving and recalling configurations. | N/A |
| Unit Information | N/A | Not adjustable – for information only. Allows the unit’s software/hardware revisions to be viewed. This category is mainly intended for Linn personnel and Linn-appointed service agents. | N/A |
RS232 configuration
| OPTION | Settings | Description | Default Setting |
|---|---|---|---|
| Baud Rate | 230400
115200 57600 38400 28800 19200 14400 9600 4800 |
Set the baud rate to suit the RS232 protocol being used. |
9600 |
| Parity |
Even None Odd |
Set parity to suit the RS232 protocol being used. |
Even |
| Data Bits | 7
8 |
Set the data bits to suit the RS232 protocol being used. | 7 |
| Stop Bits | 1
2 |
Set the stop bits to suit the RS232 protocol being used. | 1 |
| RS232 Events | 7
8 |
Set the data bits to suit the RS232 protocol being used. | 7 |
| Stop Bits | Enabled
Disabled |
If set to ‘Enabled’, the unit passes information regarding its internal status to an external device that accepts RS232 data. | Disabled |
Reset to Default
| OPTION | Settings | Description | Default Setting |
|---|---|---|---|
| Save Installation | Save | After the unit has been configured, you can save the settings by selecting this item. The saved Installation settings can be restored at any time should the unit’s setup be changed (see below).
Any alterations to the product’s setup that you wish to keep as a new Installation can be stored by selecting this item, which will overwrite the existing Installation settings. |
N/A |
| Restore Installation | Save | If you have made changes to the setup that you do not wish to keep, use this option to restore the previously saved Installation settings. | N/A |
| Restore Factory Defaults | Reset | Resets all options in all menus to their factory default settings. | N/A |
Product information
| OPTION | Settings | Description | Default Setting |
|---|---|---|---|
| H8 S/W | N/A | Allows the unit’s software revision to be viewed. | N/A |
| Main Board ID | N/A | Allows the unit’s mainboard hardware revision to be viewed. | N/A |
| Front Panel Board ID | N/A | Allows the unit’s front panel hardware revision to be viewed. | N/A |
| Phono Board ID | N/A | Allows the unit’s phono stage hardware revision to be viewed. | N/A |
| Input 6 type | Line Level
Phono MM Phono MC |
Not adjustable – for information only. Reconfigurating, if required, is implemented via a hardware adjustment which can be carried out by your Linn retailer. | Phono MM |